Category Archives: Interior refurbs-flooring and more

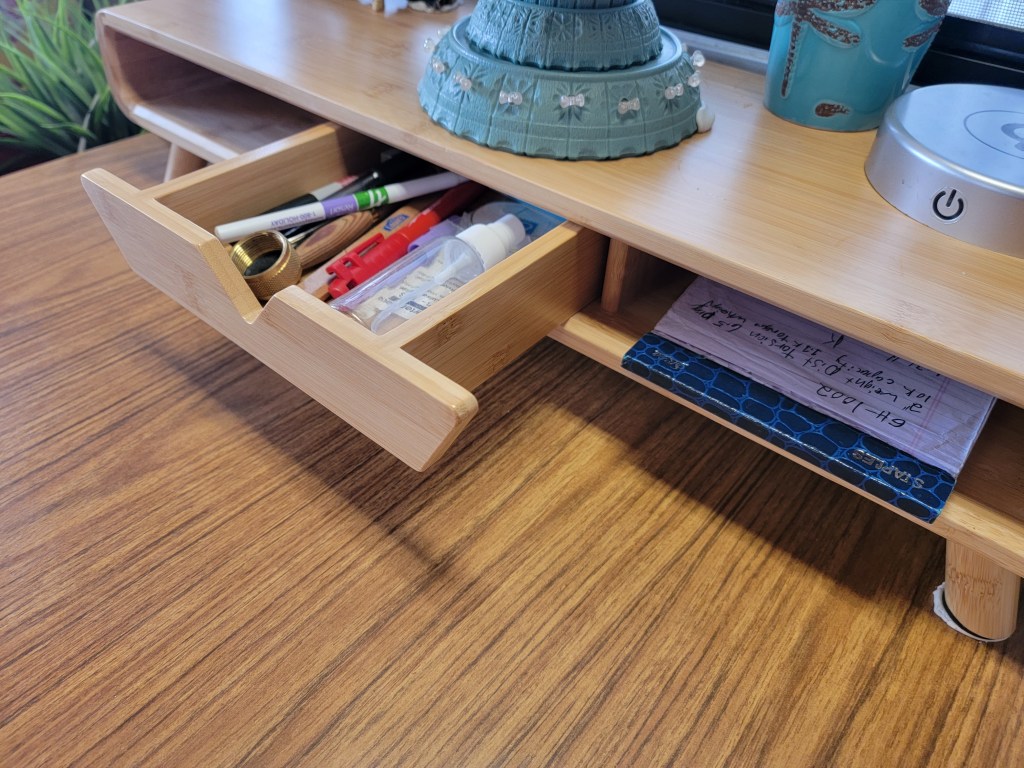
I Put it Somewhere….but Where is it? Tips for Organizing in Small Spaces

As many of you now know Kevin and I are striking out on our full time Avion life adventure in just a couple months. Your probably tired of seeing my periodic “days to go” count down on our Facebook Page! (Thanks for not complaining out loud!)

In this blog post I am going to cover:

  • The basics of downsizing
  • Methods and questions to use to help the process
  • Organizing Tips for small spaces
  • Real life examples/photos of what we found works well
  • How to find stuff after you have done such a great job organizing
  • The benefits you reap!

Getting Organized and finding places for everything we need (or think we are going to need) is getting really tough. FYI—Weekend, Week long or even month long trips are nothing like figuring how to move your entire household onto a rolling 32 by 8 foot tube of aluminum!

We ascribe to the adage that everything needs a place and that “place” becomes its “home” and after each use..it goes back there. No longer can you use a kitchen item and leave it on the countertop, use a tool and leave it on the coffee table (what coffee table??) or leave pairs of shoes or slippers lying by the sofa or door (yes, you know who I am talking about don’t you!)

So I have come up with some handy tricks/tips/steps to help with this process of our final downsizing. I think that these tricks/tips/steps can HELP YOU even if you are a weekend warrior camper, a few week traveler or…like us…full timers (or wannabees down the road).

BUT FIRST….SOME BASICS:

Don’t kid yourself!!! Downsizing takes work, it takes time, it takes hard-core REPEATED evaluation of you real needs & wants, things you covet beyond reason and….Yup! time for that item to go to someone else’s home–or into the trash bin!

I love the Marie Kondo’s KonMari Method of tidying and simplifying your lifestyle and your home & personal possessions– “stuff”. I have read her original Tidying book (twice) and listened to it on Audible twice now too. It has sunk in…but its still not easy. In essence she has you ask basic questions and below I have tweaked it for my own use….and share with you….

  • Relative to how many people are in your household…how many (insert word here like…coffee mugs) do you need? How many do you use daily? weekly? If you are like me…you have ONE favorite china one, and one favorite travel mug. Pass along your extras via donations, gifts, etc. to others who may need them more.
  • Does it bring you joy? Are there things in your closet, on your mantle, on a wall shelf that simply evoke sense of deep joy when you look at them? touch them or use them? Do they hold such sentimental value that without them you would not feel whole or connected to your family, your past or where you have been through your life journey? Then keep them (at least for now) and bring them along on your future journey or ask a family member or trusted friend to keep them safe for you.
  • Create your must haves from your closet based on clothes you wear routinely, that you feel good wearing, that are more classic in styling and can be layered depending on seasonal temperatures. This is your A pile. I started separating them out 4 seasons ago in a separate place in my closet so I know exactly who they are now! Now move onto your B pile—the occasional or seasonal clothing/shoe/coat items. Pare these down- you do not need 3 winter coats and 4 pair of boots! Finally, the C pile...you bought “cause it looked good (or fit)”at the time-but not so much anymore, or you wore it to one event and it now has dust on the hanger…you know what i mean! My closet was full of them too! Go through each pile again…be honest, use that repeated evaluation mode and weed out more. I am on about mode #8. Donate these items or sell them if they still have some value. By doing this you send those un-needed items to a new home where they can bring joy (or warmth) to someone who really could use them. No item likes to be left forgotten in a closet or cupboard- they want to be used!

TIPS FOR SMALL SPACES:

  • Watch a Marie Kondo video on how to properly fold items before putting them in drawers or totes. It really does work!
  • Overhead cabinets for clothing or kitchen soft goods like dish towels, pot holders, cloth napkins are great, but using soft sided storage cubes or plastic shoe boxes helps to keep things organized and in place. In truth, overly heavy object should NOT be put in overhead cabinets (the airlines knows what they are talking about here!) you could risk the cabinet pulling away from the wall supports at some point if heavy items are bouncing around as you roll down the road-or may simply be heavy enough to push open the cabinet and fall on the floor during travel.
  • Especially for the kitchen, select items that have multiple uses! Like the collapsible food storage container that doubles as a salad or ice cream bowl or when mixing up pancake batter. The roll up dish drying rack that doubles as extra counter space overtop the sink. We have links to many awesome products here on our “Amazon Fav List”, (just a list of things we like and use).
  • Bathrooms are WAY smaller than in a “sticks n bricks”. Medicine cabinets are small with short heights for items. Purchase travel size or small size of bottled items first and refill them as needed from larger more cost conscious size bottles you store under the sink. This will mean less dragging the big bottles out from under the deep recesses of your bathroom sink cabinet!
  • Use the clothing rod in your shower to hang bathrobes and jackets you may use nearly every day. Most of us RVing do not shower every day due to the amount of water it uses- we do a “bird bath” in-between shower days with baby wipes or similar cleansing cloths.
  • If you don’t already have a shelf behind your sofa that sits down about 8 or 9″–make one! It does not impede the jack knife feature. We utilize this space fully (90″ long by 7″ wide) for things like our TV remotes, Thermacell lantern and refills, binoculars, flashlights, small solar powered puck lights and more! (see what we use to hold them below!)
  • We raised up our original Avion jack knife sofa by 6 inches to gain very valuable storage space underneath our sofa. Yes, we needed to make a new sofa skirt to hide stuff underneath but that was a small price to pay for DOUBLING our under sofa storage. We used 2by4 blocks 2 stacked on top of each other, bolted to the floor then the frame of the sofa bolted to the blocks. Here is the link to that project-LINK

USEFUL ITEMS- DESCRIPTIONS, PICTURES AND WHERE TO GET!

Below are photos of items we have found to be super useful. In most instances they can be found on our Amazon FAV list. This is not a store we get a residual from, its merely our list of items we have used and liked and want to share. The album below shows the items. Underneath the album I have indicated where we have purchased some of the items (when I can recall where)

  • Plexiglas Magazine Holders: for under kitchen cabinet cleaning supplies were purchased through The Container Store-LINK
  • Wire framed, and/or fabric covered bins were purchased at Bed, Bath & Beyond but can also be found at many retail stores. SOFT sided ones work best for overhead cabinets due to the curve of the roof line.
  • Fold down counter extension (in our ’73) was the top of a TV tray from Walmart
  • Assorted lidded shoe bins and plastic storage bins under sofa are from Lowes/Home Depot and Walmart
  • for the following items, refer to links in our Amazon FAV list:
    • Rollup Dish Drainer
      • Collapsible food storage/prep containers
        • Grey lift top ottoman (is collapsible too)

HOW TO FIND STUFF AFTER YOU HAVE TUCKED IT AWAY IN A GREAT STORAGE PLACE!

We have all been there. You put something away and now its in a bin, closet drawer or somewhere you cannot find it!  right?!!

OUTSIDE: We have done inventory sheets on our exterior “basement” storage areas. Everything goes back in the same place after each use. Remember they can only hold up to 25lbs each on an Avion! These bays are not waterproof- so anything you put in there should be able to stand getting wet. We do use some heavy duty shrink style bags for some gear and they have worked against wind, mud and weather conditions. The storage bins behind the tires are the most apt to get wet!

In our truck “Merlin” We also utilize a DECKED drawer system in the bed of our truck for quick reach of all tools needed, auto supplies, etc. We then do a paper inventory and label each storage bin we have in the extended high cap of our truck. And we created a master list of where each one is placed in the bed–no fishing around and having to take it all out each time to find 1 thing we need! see our Facebook page for a whole post on this!

INSIDE THE TRAILER: Here are some tips on how I have found to help with that!  You may notice some are repeats from our slide show above but you may have missed something!

Fabric/Soft sided Bins 

I hang a spare key fob off the handle and write inventory on each fob

more….

I use green painters tape and write contents on outside of each bin. This helps Kevin put stuff back where it belongs too!

Hard to see into drawers!

We have this cupboard between our living room and hallway that has 3 pull out drawers. Each can hold up to 40 lbs per the original sticker. The top drawer is very high, above eye level and you cannot see into it so I put green tape on the metal outside facing forward so when the drawer is pulled out, you can see what gets stored in there! Works like a charm so I actually did it for each of the 3 drawers so Kevin also knows where to find what!

WHAT IS IN IT FOR YOU? I can honestly say our downsizing journey has had the resulting feel of heavy burdens being lifted off our shoulders. We actually sold a lot of stuff on ebay and Facebook Marketplace, especially our other hobby gear and made enough to pay for some of our Avion upgrades in the process.

Life is simpler, closets and cupboards are less full….but our life just gets more fulfilling! Here’s to happy trails and beautiful sunsets!

If you have not already subscribed to our blog and YouTube channel please do! We really appreciate it and your comments! Let us know topics you would like to see in the future!

Looking to Buy an Avion? Tips for your walk thru inspections!

Avion’s are HOT! The prices of them continue to go up, especially since the RV industry boom during COVID where new RVs simply could not be produced fast enough to meet demand. This blog post gives you information to help you in your search for your Avion.

Pricing (2023) can range from $FREE for a total wreck in a field to $40K for a pristine rig with upgraded systems like new plumbing, roof fans, new appliances, subfloor, furnace, on demand hot water heater and solar and more. Given their excellent construction over other all aluminum trailers they are normally worth the investment IF you are wiling to do some or most of the work yourself to maintain and do any further improvements needed. If you cannot do the work yourself- be prepared to have deep pockets and patience as there are very, very few professionals who can work on Avion’s correctly and they are in high demand-making a long wait for appointments. Please do not take your Avion to modern shops whose mechanics are not used to or trained to deal with vintage trailers. Oh sure, the simple refrigerator or toilet repair or replacement is fine, but not internal systems, frame, body or flooring please! Check out our “Resources & Links” page for list of where to get materials and tips/resources on where to get repairs done.

What does that mean for vintage trailers – and specifically Avion’s?

  • More and more people are scoping out abandoned woodlands, prairies and meadows and finding “hidden gems”- Avion’s long abandoned by once well meaning owners.
  • Many have found them in so-so shape and brought them back to life (sometimes to the good, sometimes to the not so good- but as they say “beauty is in the eye of the beholder”)
  • Some have been purchased by “flippers” and a word of caution here, that new interior paint job, new vinyl or wood flooring and a new staged look may be hiding shortcuts or missed necessary repairs just to make a buck on unsuspecting buyers. Do your homework! Use our list below to help!
  • Other’s have purchased a well cared for near original rig but perhaps continued to personalize it, or making some more modern upgrades but maintaining the classic Avion look.

ARE YOU MAKING APPOINTMENTS TO SEE AVION’S FOR SALE? Take along our handy reference sheet complete with helpful tools to bring, a check list of exterior and interior places to check, questions to ask.  Click this link below!

avion-rv-inspection-checklist-suggestions-thepewterpalace

It does not matter what, year, length or model.  Many of the components and things to inspect and look for are all the same.  The items on this list are purely suggestions and should not be construed as advice or a complete  list.  They are merely suggestions compiled from us and fellow Avion owners on various online forums and groups who have “been there, done that” and have responded many times over to this question. No one has all the answers but hopefully our check list will help you to find YOUR perfect Avion!

**Hiring a professional certified RV inspector is always a good investment and can save you huge $$ in the long run.  You may wish to give them our check list sheet since many inspectors may only be used to newer, more modern RVs and may not be familiar with the Avion construction or the known “weak points” they develop over the decades. Then, let them do their job!

You can find Certified RV Inspectors here-https://nrvia.org/locate/

We wish you every success in finding your Avion.  The hardest part is being objective when looking at trailers for sale.  The right one, at the right time, is out there for you.  Just be patient.

All the best,

sign off image with PP and bitmo

How to Gain Storage Under Your Sofa in your RV!

Our sofa, “pre-project” and Reddy approved!

If you are like us you are always looking to maximize storage spaces on your RV

In our 1987 32S Avion we have a gaucho style sofa.  This pulls forward and then down to create essentially a double sized bed for guests.  It is original to the trailer, but was fully reupholstered by the previous owner in about 2018.  As you can see from the photo above, we do keep a quilted sofa cover on it not only to protect from our dog (sadly Reddy died in Dec 2020) but also, grandkids and us spilling something since the fabric is a similar color to the grey throw and plain so it will show any and all stains, etc.  I don’t know if it was scotch guarded and do not want to take the chance it was not!  This was a cover we already had from our other 73 Avion.  Our 87 sofa is a bit longer.

In early Spring 2021 Kevin had the brainstorm that we could expand the under sofa storage by elevating the frame of the sofa.  We would also gain the benefit of the sofa being a little higher so as we age, it would be easier to get up from sitting on it.  Not that it was super low but any little bit helps once arthritis sets in!

Another reason for this project was that I found it very hard, and downright uncomfortable to try to have to kneel on or straddle that flip down solid upholstered sofa skirt panel when trying to get things out from under the sofa.   It was so in the way!  The skirt panel had the hinges and sat off the floor by at least nearly 2″ so that also reduced the height of what I could fit under there—and get out!  See next photo below if we have you totally confused on what we are talking about here!

EASY STEPS to our Project:

(1)  Unscrew the flip down front padded sofa skirt panel and remove floor mounted hinges, hardware.  We decided not reuse this after completing our project.  You could, I suppose opt to make either (a.) a new flip down panel out of wood then upholster with sofa material and reinstall the flip down hinges or (b.) add an extension board to the top of the existing flip down panel somehow and support it and then recover it all so it looks like one piece.  We opted to make a fabric pleated sofa skirt that simply velcro’s across the front of the sofa and hangs to the floor.  Since the fabric skirt weighs less than that original panel it’s another win!20210429_192140

(2)  Unbolt and get sofa out of the way.  TIP- we recommend NOT trying to get the sofa completely out of the rig due to narrowness of the entry door.  This thing is heavy and bulky AND honestly the project went so fast, it would have probably taken us longer to maneuver the sofa out of the door than the entire project took!  So leave it just tipped forward and out of the way.  NOTE- we left the panel nearest refrig in place on the side of the sofa end.  See more on this later.

You will need to unbolt from the floor and from the rear support as shown above which was screwed in. well, actually it wasn’t but we guess it was supposed to have been at some point!

NOTE we have carpet tile flooring done by previous owner. The brownish linoleum you see is original to the trailer when manufactured.

Before I knew it. our sofa was sitting in the middle of our living room!

(3)  Use this time to clean up, check water and waste connections and apply steel wool around pipe openings to ward of mice and other crawling critters from entering your living space!  Note– we still have the original grey water piping for our fresh water to kitchen sink. As of this post, we have purchased all materials to change everything out to PEX plastic piping and that is on the to do list for Spring 2022- ha ha so the sofa will have to come out again to the middle of the living room!

(4) Cut 6 blocks of 2×4 wood (2 for each mounting- laying on their side for a total elevated height of 3″) to a size sufficient to carry the floor mount sofa hardware to be rebolted back in.  Kevin fastened the 1st wood block layer in by itself using the old holes left in the floor as guides so they would be in the correct position.  He used 2 1/4″, #10 heavy duty wood screws.  He predrilled all holes in 2x4s to avoid any possible splitting.  He then mounted the second layer of the blocks directly on top of the first layer, and used 3 1/4″ #10 wood screws to mount it to the lower layer.  Be sure you know where those first screws are so you don’t try to screw down on top of them!

NOTE- we had LEFT the panel (bottom right corner of photo below it can be seen) at the tongue side of the original sofa in place since we hoped it would still work to hide that open end of the sofa. And it did!

KIMG0765

***This is also a good time to put some small, low wood “stops” mounted into the floor just in front of your water pipes to prevent anything stored under the sofa to get hooked on or that could push back the water tubing.  We held off doing this until we install our PEX system and will know exactly where the tubes will lie.

(5) Put the sofa back in place and re-screw it down in all locations.  NOTE- since now the crossmember support arm no longer hit the wood box along back, we put a 4×4 in underneath it, clamped it to the 4×4 with a “U” and secured the 4×4 to the wood box by toenailing (screwing) it in with more wood screws.  We did not want to put holes into the sidewall of the trailer.  It is very secure.  Considering when we unbolted the sofa to begin with, this cross member had never been secured- we figure its more secure now!

KIMG0766

(6) Load in the totes!  I tried various combinations of totes to find just the right mix for what we store under here.  Your needs may be different but I store the following under our sofa:  our Dyson Vacuum, totes with table cloths, Set of Sheets for sofa bed, multiple exterior solar light strands, swim floaty rafts, our cuckoo clock for traveling time, citronella table candles, and our Avion spare parts tote.  It a lot of stuff but its all in various totes that fit like a puzzle.  With the extension height of an additional 3″ I was able to now lay two totes on top of each other.  I prefer totes because it is far easier to pull out a tote than to have to reach under to pull out each separate item.  Also being in totes there is less concern over something hooking onto and tugging at or pushing against the water piping that lays along the bottom of the sidewall.  

In the photo below where you can see I now have a blue lidded and white lidded tote—I could only fit ONE of them before this project.  Essentially we have doubled our storage space under our sofa!

Additional Comments & Notes:

  1. As much as we would have preferred that the previous owner had carpeted completely under the sofa, actually we have found that even that little 1/4″ lip transition from the linoleum to the carpet aids in keeping the tote bottoms very well in place even during travel.  If you do not have that carpet lip, you may want to install a 1/8″ or 1/4″ strip of molding flush to the floor in between the sofa support blocks.  This will help keep totes in place during travel.
  2. I did find after a few trips that attaching an elastic bungy cord from one leg support (behind the sofa skirt) to the other was necessary to keep the higher tier of my totes from sliding out during travel.  This has solved that issue completely.
  3. We found that the sticky back velcro we tried first to hold the new fabric skirt on did not hold up well enough during travel or “leg traffic” from us using the couch.  I will have to secure the velcro either by sewing it on or by using a glue to adhere, letting it dry with clamps to ensure a good seal.  In the meantime, what I did was extended the length of the quilted sofa cover we use making it longer in the front and that covers 90% of the opening and really is working fine for now.  
  4. Kevin and I are not tall, we have pant inseams of 30″ (a.k.a short legs) and we have found that the raised height of our sofa is extremely comfortable for us.  Our feet just touch the floor now and it feels more relaxing on our legs.  If you are a taller person you may find raising your sofa could make your muscles relax even more!  We also find that as we age getting up and down from the sofa will be even easier as arthritis no doubt will kick in. 
  5. BEST TIP OF THE DAY! I should mention that at some point one of the owners of our trailer put a full shelf behind our sofa.  It is simply attached with 4 angle braces screwed into the sidewall and it about 4″ wide.  We would be lost without this shelf and store all sorts of things there.  I have found wire framed fabric bins at Bed, Bath and Beyond that fit there perfectly and keep things organized.  We also have one magazine storage holder (sits mostly behind our curtain) there for travel books, brochures and maps when currently on a trip, then the bins hold things like our battery lantern, binoculars, a plant, a container for our TV remote and other small misc items. One bin is open for me to set a mug or cup in while reclining on the sofa!  The change in height of our sofa had no impact on the usefulness of this shelf and we highly recommend you install one during this project while the sofa is out!  It runs the entire length of the sofa back.
  6. Sorry I do not have a photo of the sofa back in form with the pleated skirt attached.  I will try to get that done in spring when our RV is out of winter storage and update this post when available.

Hope you enjoyed this project article.  If you decide to undertake this project we would LOVE to hear from you and see  your photos!  Please feel free to leave us any comments on this project- we love to hear from our subscribers!

Until next time…safe travels and please visit our Avion merchandise store at www.MyAvionMarketplace.com and don’t forget to subscribe to our YouTube channel and this blog to get notified of future posts and videos!

Sincerely- Kevin and Luise Sherman

K-L and Avion-bitmoji-withCopyright2019_bye

Sneak preview Video, Our big Bathroom expansion VIDEO! just for our Blog Subscribers!!

We have completed our walk through video of our BIG Avion trailer mid bath expansion project!

As loyal subscribers to our blog YOU GET TO SEE IT FIRST!

If you LIKE this video please give it a “thumbs UP”, if you disliked…a thumbs down.

If you have not checked out the many videos we have made over our Avion ownership, or trusted other bloggers videos we have in our YouTube library now is a great time to explore. Happy travels in 2021!

Be Safe with LP Lines INSIDE your Avion!

Hey there,

This is a quick post based on the punch list of things we are going to prep our new to us 1987 Avion, 32S but this post applies to probably all Avions!

Under your stove you have a terrific drop down cabinet  with a lot of good storage space.  In our 1973 we used this for storing oversized trays, or some cast iron cookware and a plastic dish tub for stuff.

HOWEVER—this is also where LP lines typically come through on ALL AVIONS in the back corner (normally) of this cupboard which can pose a safety issue.  You NEVER want these lines to be pinched, or worse, punctured by stuff that you may have stored in that storage bin.

When you roll down the road, it has been recorded that your interior stuff sustains essentially an earthquake (cannot remember the degree magnitude right now, but is significant) so it behooves  you to batten down the hatches, and to be sure that anything you have in this convenient under stove storage area cannot shift and pinch, poke or puncture those precious LP lines!

Today, on our 1987 Kevin created a wooden “safety cage” that created a safe space for those LP lines. This project took a few minutes to do, a board, a power drill with screw driver bit and a few screws.  Safety is the word of the day.

Please check out this storage cabinet, and protect those LP lines! (yes, that is the original 33 year old linoleum!)

20200524_15380620200524_153818

Be well, hope to meet you on the road or at a Silver Avion Fellowship Rally soon!

Sincerely,

Kevin & Luisa Sherman

1987 Avion, 32S (our forever Avion) & a 1973 Avion, 28′ LaGrande (currently for sale)

Queensbury NY

Publication1


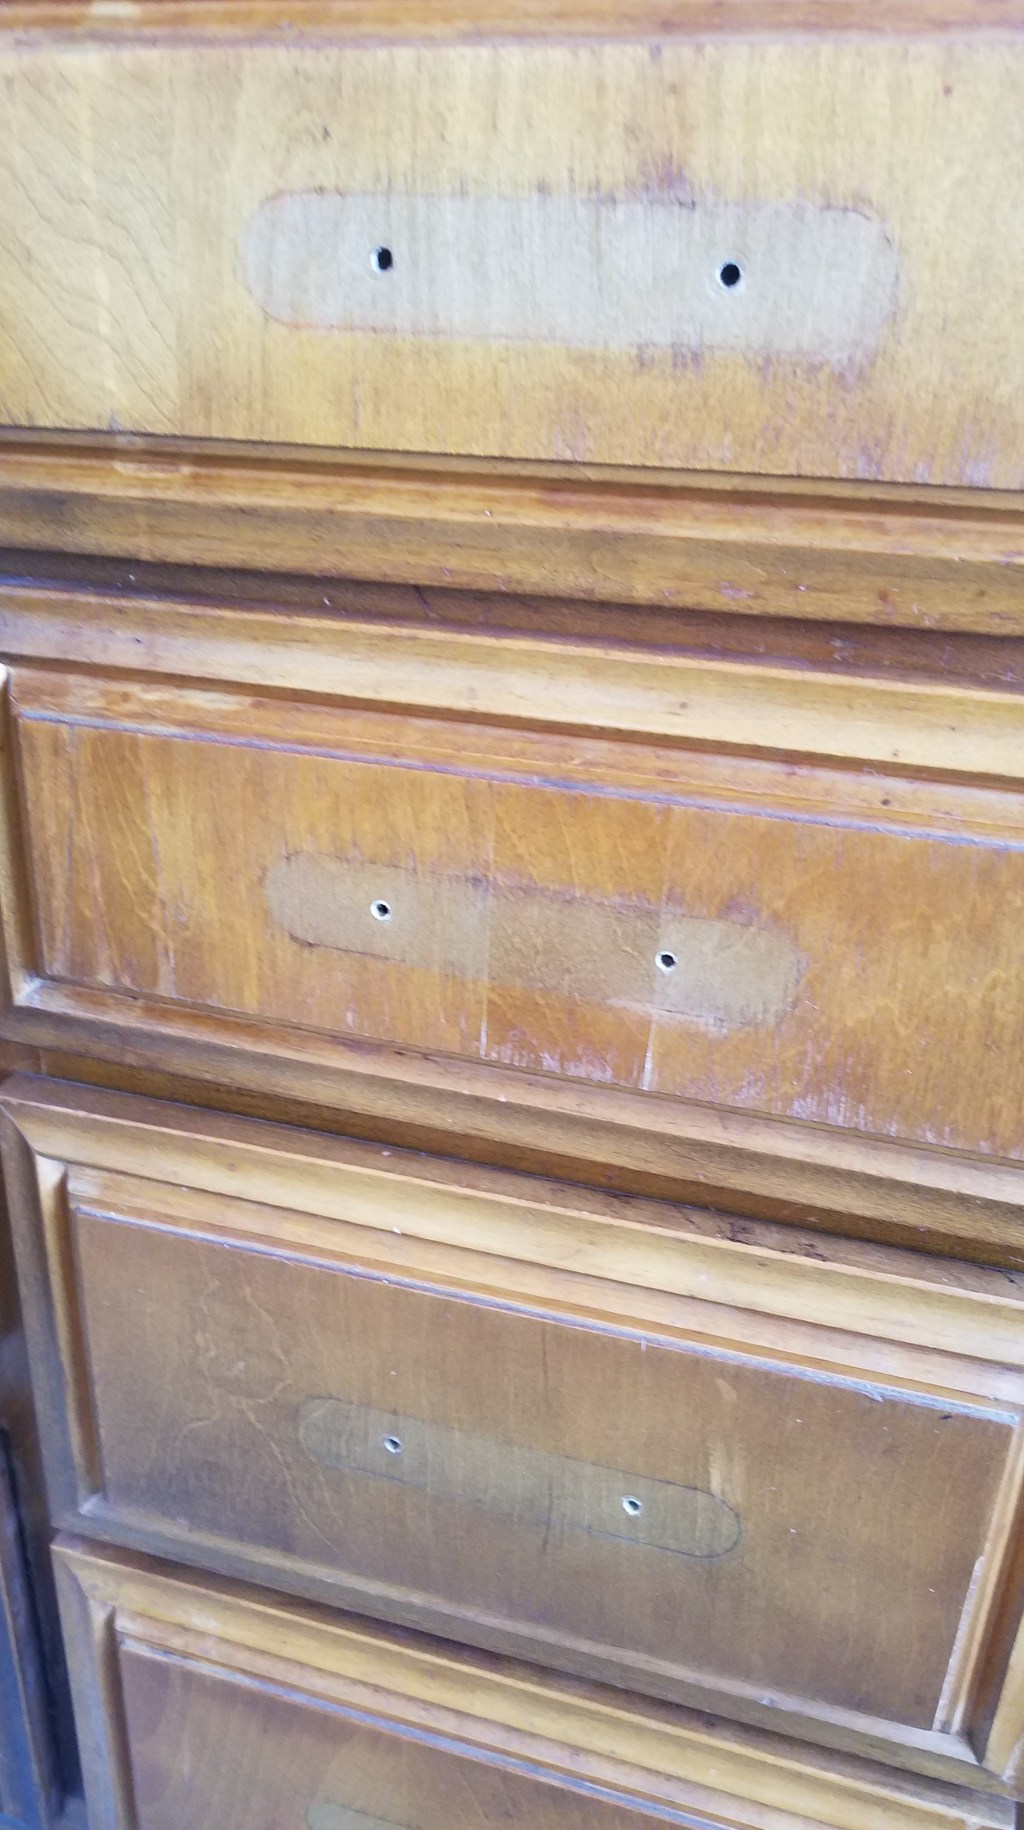
87 Microwave Gets a Facelift (removal++)

On our project list for our new to us ’87 Avion was to remove the original 1987 humongous microwave.  In truth–the edges of interior box were rusty and surely this behemoth sucks a huge amount of juice when “fired up” and running.  Plus…do we really want to trust the safety of a 33-year-old Microwave?

As an aside, in case you don’t know…Kevin and I have over 30+ years of 18th century living history reenacting at historic sites, museums, national and state historic parks from Nova Scotia to Colonial Williamsburg.  Yes…we are THOSE people who make and wear clothing and live the life of our forefathers and mothers in 1757-1781.  As a result of the immersion into this hobby, Kevin and I have long ago learned how to cook, clean and survive without a microwave for days on end.

Yes, at home I do use a microwave, but camping life and its pace and fresh air seems to shrug microwaving for us.

When we bought our ’73 Avion right off the bat we began looking to see what cabinet we could retrofit to install a small microwave thinking we needed one in an Rv.  Doesn’t every RV have one after all? (our Class A did).  But our common sense took hold and I asked discerningly- “what do we really use it for??”.  Perhaps heating a left over cup of coffee (can be done in a sauce pan), or reheating a left over (we rarely have leftovers and if so, tin foil can do the trick on the grill, in a covered pot on the stove or in our Avion oven).  So did we REALLY need a microwave and to hack into the pristine, original cabinetry that Avion’s were/are known for?  We decided to wait a year of using our 73 before we hacked.  A year turned into three and there was no doubt, no microwave was needed for us.  We are resourceful camping souls from the 1700’s after all-  having logged literally 1000’s of hours in reproduction canvas tents, hauling water and cooking over an open fire even in 95 degree summers (with 3-4 layers of wool and linen clothing to boot)!  Running water and a toilet are high style for us!

So fast forward to our newly purchased ’87 Avion.  The 32S has a front kitchen.  It’s one of the big reasons we love this floor plan.  Here is a photo of the behemoth microwave that came with her off the assembly line in Michigan 33 years ago this past February. Yeah, the # buttons were like the size of a postage stamp!

orig microwave in our 1987, 32S_ march 2020

Here below are some photos after the microwave was removed, and the cabinet interior cleaned up, a floor created over the framing and wiring for the stove exhaust hood safely wrapped, encased and secured.  Kevin did a super job on this and WOW!!  Look at all this space I have now!  More than enough for some modern convenience contraptions I really do use like…my air fryer, small InstaPot, my crockpot and metal stock pot (for the occasional Lobsta’ dinners now and then or the rally chili cook-off contest!)  Plus maybe even some oversized boxes perhaps of dry cereals, oatmeal, etc.

2020-05-12 13.25.59

2020-05-17 13.36.32

I had the brainstorm one night that instead of trying to salvage some original Avion cabinet doors to put in here, how about a corkboard?  In 225 Sq Ft of living space you always want to err on the side of versatility and each thing, full timers will tell you, should have at least 2 purposes!  So onto Amazon I went and found this beauty–a wood framed, magnetic chalkboard!  I have the link for it in our page that features our Favorite things/resources. (no, we do not have an Amazon store, we do not get any residuals from anything you order, its just us helping you to find things we love, use and have tried before)


I love the way the black chalkboard matches the look of the black front refrigerator and oven.  Really looks like it belongs!

So let us know?? what cha’ think?  We simply love it!  We used the same hardware as we had replaced in the kitchen (seen on right photo above) and so here is the big reveal below side by side….you decide!!  BTW…this board is chalkboard and magnetized so i am thinking a fun place to put grandsons current photos and some little magnets from special places we go to around the USA!!


Another project checked off the list!  This one took about a total of about 3-4 hours total including refit of interior cupboard, staining of frame, going to store to get hinges and the intallation this evening

Happy travels!

bitmoji-20200101073824

Kitchen Refresh & More–on our NEW 32S!

You may have seen our sneak peak where we unveiled that we just purchased a new to us 1987 Avion 32S.  We have dove right in getting to our punch list.  The weather here in upstate NY still is not great (3rd wk in April and still in the 40s-50s).  Thankfully for us (but not on the pocketbook) we have secured an additional RV garage bay 3 doors down from our 1973 (which is coming on for sale soon!)

The biggest “change” we have done so far in the last 12 days is the total switch out of the original cabinet hardware throughout the trailer which was a combination of off white porcelain and brass tone pulls and updating it with a new look that to us seems to go with the quintessential look of our all aluminum trailer. Before doing this switch out, I wiped down every cabinet inside and out applied Howard’s Restor-A-Finish to every piece of woodwork, doors, cabinet and closet fronts, then followed up with Howard’s Feed N’ Wax which not only makes the wood “pop” but also protects it with a non sticky wax finish. (I have placed a video from the Howard company in some additional details below)

See what you think! 

2020-04-14 19.29.27
BEFORE…..

2020-04-25 18.48.53
AFTER…..

You will notice that we found we HAD to re-purpose the original oval ended backplates because there was no way we could circumvent the fade and marks that they made. So Kevin had the awesome idea of spray painting them the hammered pewter finish we have used before. Below is after Kevin had by hand soaking in paint stripper, then stripper neutralizer, then green scrubbied them and finished with a steel toothbrush, then sprayed on primer.  Here is our parking lot “clothes line”!

2020-04-25 14.39.45

So we used the Rustoleum Hammered Aluminum (light version) to give it “the Pewter Palace look” and then installed the new brushed stainless modern handles for a clean updated look (Thanks to daughter Sarah for her #1 vote on the handles!).  The handles were found at Lowes in stock, in store just under $7 each- great quality!

Below you can see why we could not go with just the handles, but needed the backing plate. By the way, this is also before I applied the Feed N’ Wax.

The finished job in the kitchen! We are so very thrilled with the way it looks and functions!  We like the traditional “hammered pewter” with the modern sleek brushed aluminum handles- a melding of old world…and new!

20200425_184413

IN CASE YOU ARE INTERESTED IN READING MORE….

Other things we have finished on our punch list between April 14 (delivery day) to 26th, 2020.

All draperies, pillow covers removed and dry cleaned.  Although they were not really dirty and former owner thankfully was a non-smoker- we just figured easier to start with a fresh baseline.  The curtains had been custom made just 2 years ago.  There is a lot of curtaining and I am not sure I will keep it all.  In fact, I know i will be moving the beige kitchen curtains to the rear bedroom because of the pattern and color schemes of our current bedding and German decor.  Plus some of the curtain valances really needed pressing too to just look perfect! 40LBS of curtains, bedding, pillow covers came with our trailer…yikes that is a lot of weight!

All cabinetry doors and wood walls have been treated and fed with Howard’s   Restor-A-Finish (cherry in kitchen, Maple-Pine elsewhere).  Wow…what a difference- the woodwork quality in Avion’s is second to none!  Then everything was treated with a coating of Howard’s Feed N’ Wax.   Check out their video!

Mattresses refreshed: the mattresses have been Febreez’d, and set out in the sunshine during 4 sunny days (not every day was warm…but they were sunny!  The zippered mattress covers machine washed and came out great!  The mattresses had been custom made.  Due to the rear twin bed configuration, the twin beds are curved at the foot on one side to align with the curve of the rear of the Avion (Airstreams do the same thing).  The mattresses are an excellent coil quality, soft pillow top and only 2 yrs old from MattressInsider.com (tags still on) -so we are keeping them.

Mirrors all cleaned.  Some of the mirrors are glass, others (living room and bathroom) are highly polished stainless steel which is great because they are much lighter and will not break…ever!

Breathable Beds are important: Kevin drilled some additional vent holes in the tops of the bed’s wooden platform/storage covers.  We also took the fiber vent pads from our old Avion (also from MattressInsider.com) and trimmed them to fit the “new curve”!

2020-04-25 17.07.57

Dining table rehab:  we took off the hardware for drop down to bed dinette table.  Used same hammered aluminum spray paint to cover over rusty areas, and reinstalled table.  Looks great now!

Wiped down and cleaned all interior walls and ceiling:  For this cleaning I have found the best results are from either using a Mr. Clean Eraser sponge with (green) Fabuloso cleaner, diluted per their instructions or for stubborn areas I use GoJo textured hand cleaning wipes. These things are truly amazing and we use them on a lot of projects-besides being great hand cleaner wipes when working with grease, paint, etc. etc.

Window projects to date:  Kevin has lubricated all the window cranks, removed interior window screens and ewe have begun repainting frames with black satin Rustoleum spray paint. Washed all the interiors of windows.

The wonderful hallway double cedar closet wardrobe has been refreshed with Colton’s Cedar Spray (all natural and not a strong scent) to bring back its great qualities to repel moths and keep clothing fresh.  Neat thing we found was that Avion was so quality in their thinking that there are tabs that pull down a wooden cover with rubber gasket that goes over each clothing bar when traveling, thereby preventing the proverbial clothing hangers landing on the floor and clothes in a jumbled mess!

Original 1987 pull down shades get a bath:  I have decided to retain the original pull down fabric shades that are in the kitchen/dinette area, over the sofa and in the bedroom.  I HAVE removed the chic “mauve and pink” woven decorative trim though!  Ha ha!  I will need to replace some trim with something more to my decor in the kitchen and living room though because when these were originally made the trim was sewn and glued in place and the glue is so embedded and aged golden that it must be covered over.  The bedroom ones were far easier, those I was able to just cut off the original fabric scalloped tier to leave simply just a very decent off-white linen woven-look shade which will look just fine.  All of them got the “hot tub” treatment in our apartment bath tub with a hefty amount of Oxi-wash and Tide.  Check out that dirty water!  In defense of former owner, he had heavy black out curtains made and I suspect never really used these in the past 8 years he owned the trailer.

Well, that should do it for our aching backs, but so worth it for the first 12 days of ownership.  We are really pleased with how things are going.  Now that it stays light longer we have been able to get over the RV “carriage barn” after I finish working each day (remotely of course due to Covid-19 Pandemic) and the past two weekends.

Our goal is to have the interior completely knocked out and finished by end of next weekend so we can move all of our gear out of the 1973 and get her up for sale!  Then we will start on our 32S exterior punch list so stay tuned!

Bye for now, be well, stay healthy and safe!

Kevin & Luisa Sherman

Publication1


Prevent Moldy Mattresses! Moisture protection for Mattresses project

WHO WANTS MOLDY MATTRESSES?

There are many reports about moisture issues from underneath RV mattresses.  This is a real issue and one not only that can cause rotting wood structure of your bed platform but also cause unhealthy mold to form there as well as literally on the outside and inside of your mattress itself.  Not good!

This issue becomes more prevalent with those who full time in their rigs or especially for those who are in high humidity areas or who winter in their rigs where internal heat temps versus external surfaces (e.g. in ours the wheel wells under our bunks which essentially are “the outside”.  This converging of a heated surface (body heat, furnace heat) and a cold surface will cause sweating and condensation.

There are a few things you can do right now to ward off this problem:

1.  Cut some 1-2″ holes in the bed board base to allow for airflow.

2. Take a pool noodle or stiff foam and cut into slices and place along any sides of bed where it touches the wall. This will increase air flow against mattress edges.

3. If possible flip mattresses regularly and spray with a mold inhibiting cleaner. Let air out.

4. When not going to be using your RV for any length of time flip the mattresses up onto one of their long sides so both the mattress and bed boards are exposed to the air.

5. Ensure that any exterior compartment doors on your RV are properly sealed from bad weather leaking.

After researching and doing a lot of checking of reviews and posts from full time RVers we also found the following product.  We ordered it and did our install before beginning our 2019 camping season.

https://www.mattressinsider.com/mattress-condensation-prevention.html

59374459_798732200501978_9172026463040307200_n
This is the roll, as received and standing atop my curbside Avion bunk.  Note I am not sure all bunks come with the cut out handles like this.  Could have been something done by one of our rig’s previous owner, but a great idea even though you also have the below bunk cabinets!

It is sold by the foot and is I believe 4 ft wide. So for our Avion bunks @ 34″ we did have to cut to fit both width and length.  The stuff is very sturdy but also simple enough for me to cut with sturdy kitchen shears.

GATHER ITEMS NEEDED:

  1. Sturdy Kitchen Shears
  2. Metal tape measure or yard stick
  3. An extra pair of hands
  4. Double faced Heavy Duty  minimum 2 inch wide Velcro strips or large squares (more about this later!)
  5. Duct or Gorilla Tape (if you have a double or queen bed and will need to piece together)

STEPS:

Measure width and length of your bed/bunk.  If you have an Avion floor plan like ours and two bunks, simply double the length of one bunk for what total length you will need to place for your order.

Place order, will be shipped directly to you. Is not super heavy. Watch for when company may have sales on free shipping!

We took our measurements of bunk base, first cut new mat the correct length, then marked and measured the correct width and cut. Note- we have a slight molding lip on our bunk base that is intended to create a bit of a lip to prevent mattress sliding off.  So we cut our mesh mat to also fall just inside that small lip.

For the actual install, we followed the manufacture’s recommendations and we placed the “mesh pocket” side down on our plywood bunk base, then placed the mattress on top of the breathable fabric side of the mesh.

** after using for a few trips this way we did find that the mesh side was very likely to cause our whole mattress to slide a lot and often found our mattresses half into the hallway after being on the road.  A fix we plan to do this year is to take a few large strips of the 2 inch wide sticky back Velcro strips and place them a few places on the mesh side to stick down onto the wood bunk base.  The small molding on the bunk base that DID keep the mattress itself in place was not enough to hold the mesh layer in place.  The mesh layer is a woven plastic and a bit slippery.  We anticipate that the Velcro strips will do the trick and highly suggest this modification.

After securing down with the Velcro strips, replace mattresses down on top of fabric side of new mesh mat.

Sleep well!

If you have found other materials or fixes to prevent moisture from ruining your wood bed base or mattress let us know!

Kevin & Luisa Sherman

K-L and Avion-bitmoji-withCopyright2bHr

Bedroom Carpet Facelift and Upgrade

Oct 22, 2016.  Our coach originally came with an off white sheet vinyl with gold veining.(guess they wanted to match the jazzy mirrors with gold veining which we actually adore!) However the vinyl is a bit tired and having a cozy carpet to step on in the early morning wake up is really welcomed. So we decided to do a carpet facelift.  The previous owner can cut and fitted an off-white Berber rug remnant in place. It was in decent shape and clean. What you see are just shadows. But the transition from kitchen to rug was never completed with any threshold etc. And you also had to be careful not to catch or chip the raw vinyl edge.

So we used the remnant for our pattern. Luck would have it, Home Depot ( yes about our 8th HD trip in two weeks… uuugh) had a 26″ w oriental runner sold by the foot. That was the exact width we needed! And the color will go fine with my Spring 2017 decor refit.  That is secret for now.  Our length needed was 74 1/2″ and this provided enough to once again notch out the moulding door jam at the bathroom transition.  The door in the bathroom was plenty high so this was deemed not a problem for a carpet install right into and even with the door threshold. In fact the BR door is very high clearance off the ground. I know the ’72 brochure I have seen said Avions came with “deep pile quality shag carpet” .  I suspect just cause our owners chose vinyl the production line was not bout to change their jig for one coach.  Hey we ARE talking the 70’s folks and I remember shag all over our house!  But really? In a camper? Yikes! The dirt build up had to be disgusting.  I believe our first owners voted for vinyl from the start. Reason we think so is because the white with gold veins is sheet vinyl and runs clearly under all bathroom cabinets, under beds, under kitchen cabinets. Suggesting that it was put down first during the coaches construction and all else was installed on top.

Anyway, I digress. Sorry. Back to our project. Here we are measuring and cutting out the notches to fit BR door moulding. Remember to lay your pattern piece same facedown direction as your new carpet!

Remember if you ARE using an existing carpet that you have both of them facing in the same direction on the table…not pile to pile (like I almost did) because notches may not be identical from side to side when you flip your new carpet right side up. Ours notched areas were not  identical and so your cuts will not be correct if you screw this up.  Our carpet cost us 26.00, the two oak thresholds were $11 each, plus stain which we had.  1/4 inch carpet pad was $8.50 again a remnant cast-off from a local carpet store.

The new Carpet was cut first with a box cutter. (Could not find our carpet cutter). Then little final trims retire able to be done in coach with sturdy household scissors which gave us more control for tiny slices to ensure perfect fit at doorway. I also recommend leaving any of the edge building threads long. Wrap them to the back of your new carpet and tape them down with gorilla tape. This prevents any short traveled threads from. Showing or eventually popping loose and showing on the top side.

Below is carpet pad being trimmed and pieced to fit. Note orig gold veined Vinyl flooring. Not bad for 44 yrs old!

You could butt together and tape any pieces of padding. we did not bother on such a small seam. Larger seams should be taped to hold in place well.

Below are final adjustments and oak transition thresholds screwed in place. Be careful not to screw any deeper than you have to. Be especially careful in BR to bedroom areas. There have been more than one Avioner who ended up using too long a screw and drilled into a holding tank by mistake! Total bummer!

Below the thresholds are being screwed down You want to be sure you grab enough of the carpet to keep it secured. Our entire dining and kitchen area subfloor and vinyl had been replaced in last six yrs with 3/4″ marine plywood so our carpet and kitchen vinyl is now even. It was not before. Here is bathroom transition.

Here is kitchen transition. Sure does feel nice under foot! Fits perfect under the under bed cabinets and drawers no problem. We did have to take the heat vent cover on curbside under my twin bed and screw back in place after carpet was down.

The finished project! Looks and feels grand. Lucky for us HD also had an already found piece that matched at 31″x48″ so that is in kitchen area. That small area rug did coat another $20 but worth it to ensure the match.  We are really happy with this. Total project time, not including obtaining materials, 1 hr. Total project cost, under $80.

Replacing Refrig Panels

Oct. 22, 2016.  We were not thrilled with the black plexiglass, sticker laden refrig panels that the previous owner had. Granted we were impressed with how much and far they had traveled ND, FL, CA, ME but it just seemed so “in your face” and not us.

Do we had one 2’x2′ repro vinyl “tin” ceiling tile in the “Cracked Copper” finish that we wanted to try in place of the black plexiglass panels. We had this one panel already because we had bought a few different ones to try in our old Class A RV as a protective backsplash in our kitchen/stove area

It had always worked well, was super easy to clean and yes easy to cut to size with household scissors!  So we cut one to size to see how it would look on the top panel. And LOVED it!

After running to HD and Lowes however we found that the company does not sell their ceiling tile size at these stores any more. They only sell what is sized to actually fit as kitchen backsplash, which is too small for our 8 cubic foot Domestic refrig which is about 6 yrs old. So on to trusty Amazon.com to search. Found them easily and at the same price we paid per panel 6 yrs ago. Amazon prime free shipping and we had them in three days.
Another  project check box completed and we love the look.  And because these are actually vinyl they don’t dent, scratch or rust. they wash with soapy rag and are easy to switch out. If you like the silver tin look they have those too! The Cracked Copper finish compliments our wood cabinetry and the refrig really melds in much better than standing out as a black box.  Happy us!