Category Archives: Lighting Projects

Sneak preview Video, Our big Bathroom expansion VIDEO! just for our Blog Subscribers!!

We have completed our walk through video of our BIG Avion trailer mid bath expansion project!

As loyal subscribers to our blog YOU GET TO SEE IT FIRST!

If you LIKE this video please give it a “thumbs UP”, if you disliked…a thumbs down.

If you have not checked out the many videos we have made over our Avion ownership, or trusted other bloggers videos we have in our YouTube library now is a great time to explore. Happy travels in 2021!

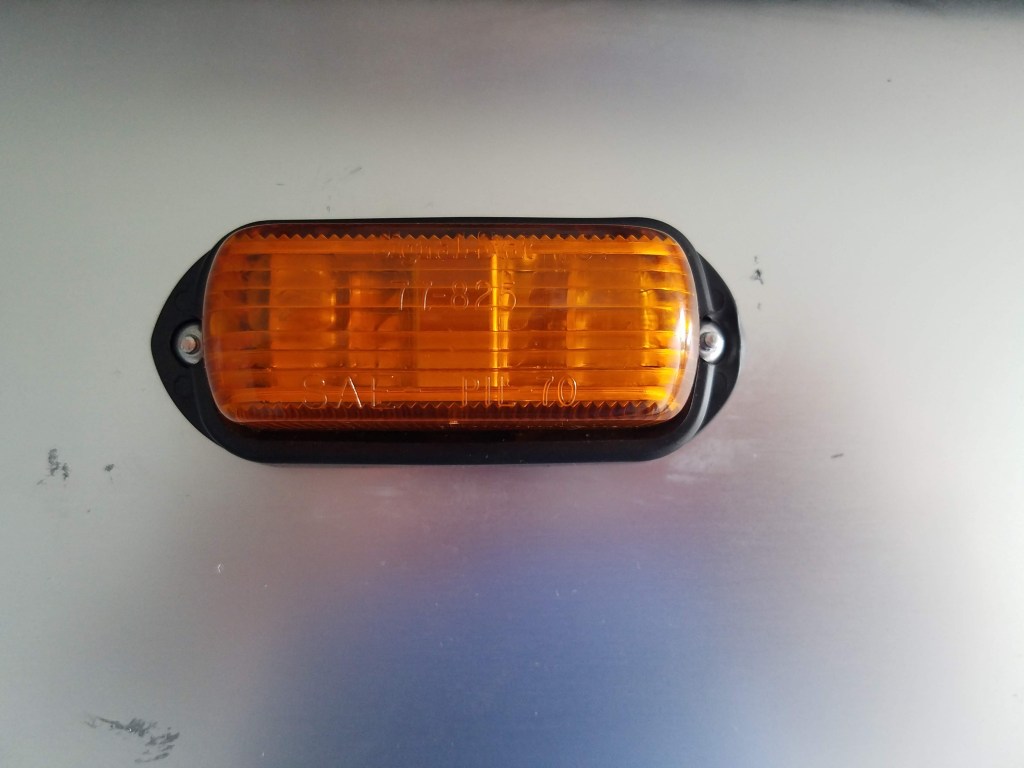
Great Marker Light Replacements for Avions!

We needed to find a good source for our 1987 32S front and rear marker lights.

Amber in front (4) plus one centered on curbside near awning roller cover….

( 3 ) red lenses in rear.

2020-04-15 16.49.54
Front of our 1987 32S, Rockguard removed so we could more easily work on the marker light project AND for replacement of all window glass bead (seals, etc.) June 2020

20200414_135837
Front


Below is the excellent new product we found that fits perfectly to the 3″ on center and continues to be the same style as the originals with the rubber base and slip in lenses.

https://www.easternmarine.com/rubber-body-mount-amber-marker-light-1506ad?fbclid=IwAR3ZU7WNOMLPoDsqfUivnJtwQhGQVPClhDZL96hLh30_VPYixcEfs_ub314

I have put this photo specifically in below to show how we use a thin bead of Parbond along the top and 1/2 to 3/4 the way down each side of ANY light, or any fixed object, plate, etc. that must be installed on the exterior of the Avion.  This protects those vulnerable areas (now that have screws or rivets through the skin) from water penetration.

Kevin used 5/32 Olympic Rivets to secure the fixture in place.

20200607_131800
Notice the aluminum colored bead of Parbond along the top and part way down each side to prevent water penetration into fixture or rivet holes. (Rivets were dipped in Parbond before install.

So very often, as was the case with our ’73 Avion and now in our ’87, because of a lack of Parbond or similar sealant above the light fixtures, water gets in there, rusts the bulb clips and in some cases aids to corrode the wiring junctions.  A few seconds of Parbond application (see our other posts or our FB page about the fill-able syringes we use to feed a nice thin bead-rather than straight from the tube!)  solves water penetration issues.  Parbond sets up firm, but not permanent and can be removed. We use the aluminum color on this type of project, and clear Parbond on our black rubber window trims.  Clear could certainly be used on the light fixture project too.  Any other things you may have to afix to the side, e.g. an aluminum patch, etc. we recommend using the aluminum colored Parbond if the area will be eye level or lower.  This is what Chuck Cayo used when repositioning our awning brackets when we changed from an original Carefree system on our ’73 to a new Zipdee system in 2018.  So if its good for Avion-Guru, Cayo…it works for us too!!

2019-04-22 18.20.172018-09-02 17.21.24

Last step on this project….

These marker lights come with incandescent, typical automotive bulbs.  Fine enough and what is shown in the lit up photo above.  However, we plan to change out EACH of these lights with LED bulbs to save energy, burn cooler and even brighter, and above all…so we get far longer life out of each bulb and should not need to do much maintenance at all with them.

We have worked with M4Products.com customer service AND the makers of the light fixtures to verify that the following small style LED bulb replacement will work in these new marker light fixtures.

https://m4products.com/ba9s-3d-2-cw-cool-white-led-light-bulb-with-mini-round-base/?fbclid=IwAR3qDP3lLHlLJ1fMBP5Sy2ZdqiZfkJqBdZQMnbjckg0PwXXOi06TeJRnxUo

We hope this post has helped you with this project!  Let us know!

Be well, travel safe, enjoy the journey!

Kevin & Luisa Sherman, thankfully Covid-19 free!

Publication1

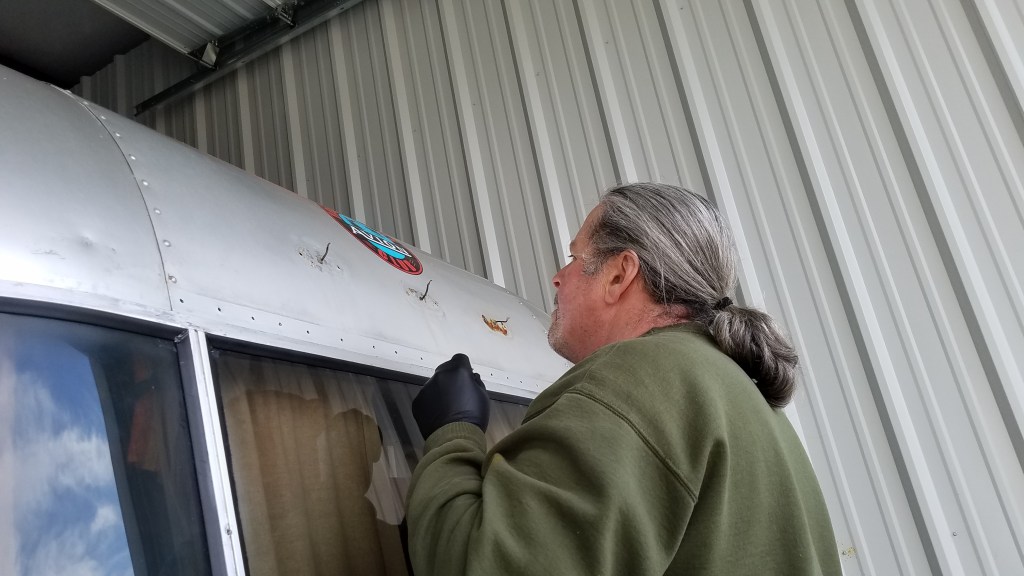
Front Running/Marker Lights-Reworked

As many of you have read, we are undergoing a major redo of our rock guard on our 1973 Avion, 28′ LaGrande.  While doing this we were “up close and personal” with the nose of our Avion and realized that some dingo along the way of line of ownership of this Avion installed 5 of our running or “marker” light fixtures upside down. Below is with existing fixtures before our rehab project started.

2019-04-11 12.54.09

What does that mean?  How can you tell fixture is upside down?

Is there a right side and wrong side, right way and wrong way?

Well, yes….the outside housing (normally white or off white) of these fixtures have pre-cut “weep” holes  (normally one on center edge and one on the lower half of each side) that allow any moisture and rain to seep out rather than be trapped inside the fixture causing the internal workings to rust and eventually fail.

2019-04-21-13.13.50.jpg

Here is a great photo (above) of our center one that obviously was installed upside down (don’t be confused by the manufacturers writing being upside down when you install it properly.  Just be sure the weep holes face downward) and therefore had been a collector of water for who knows how long.  The rusted metal is quite evident and this as can be seen on the photo above had also caused a rust streak to show on the Avion’s skin below the fixtures themselves.  You can see the rust stains in this quick video clip below.  You can also clearly see the left fixture is upside down with weep holes facing the sky whereas the right fixture is correctly installed with weep holes on the bottom facing the ground.

Not to mention, the potential of enough build up of rain to find their way to the hole made by the wire coming out of your rig’s skin and thereby allowing that water to get in between your skin.  Not good!

So while we had our rock guard off, it was much easier to work on the three running lights on the “nose” of our rig.  One had been replaced by Fletch (see previous posts and our resource page) and installed correctly, but we were not sure he had used stainless steel screws (a must do according to Kevin) but it also had not been sealed with par bond along the top and part of the sides and so Kevin decided, lets just take all three down, update their bulbs and do a little maintenance while we were at it.

2019-04-21 09.19.47

First step was to purchase one replacement fixture to retire out the rusted one (see bag picture below).  Kevin purchased a replacement easy at our local Auto Parts store.  Most will carry them unless you need a real vintage look one.  At some point we believe all of our truly original ones had been switched out- what we have now is modern standard style anyway.  The wiring placement was just a little different though.  The ones on our rig have the electrical wire (single) come through a hole in the fixture back and then connect to the wire of lamp on front.  Kevin had to drill a small hole in the new fixture to guide that Avion wire  to the front.  No biggie.

2019-04-21 13.12.53

To LED or Not to LED….that is the question!

While Vintage Trailer Supply (VTS) does carry LED fixtures we decided for now now to replace with LED quite yet.  In time we will definitely put in LEDs because reports are they are so much brighter and of course, also are far less on your battery.  For now, we went with those like what they identify as “1970’s Marker Lights” on this same linked page.  We noticed some reviews said that the VTS LED fixtures are for wiring to be done on rear of the fixture.  Hmmm…that could require some modifications for our set up, so we decided hold off on LEDs and to talk to other Avion owners on the Facebook chats or in person at rallies this summer first to see what they have done.

We took down all fixtures.  None of the fixtures had a rubber gasket behind them.  This may be a step you wish to take. VTS does sell sheets of rubber gasket that then you can cut to fit any fixture, etc. you need it for.  We chose not to use gaskets and leave them as they had been installed.

My job was cleaning up the plastic lenses and other housings.  Meanwhile, Kevin took to cleaning up the area underneath the fixtures and making sure that the aluminum skin underneath was clean, prepped and treated.  The fixture that had the rusted stuff had in fact begun to eat rust through our aluminum skin so we were really glad we had taken on the project.  In order to prevent any more rust corrosion he gently sanded away the rust (green scrubby) and lots of elbow grease.  He cleaned and prepped the area well.  I then did a very small touch up with grey rust inhibitor paint (same as was used on our frame and hitch) that will be totally invisible when fixture is reinstalled but we have piece of mind that no more rust will grow there.

2019-04-21-13.14.44.jpgWe had trouble finding the very small wire caps at Lowes like what was on there, so we purchased these and they worked fine on the two original fixtures we had but Kevin did have to re-use one of the smaller grey caps on the new fixture simply due to the different interior design did not allow for a comfortable fit using the blue cap.

It goes without saying be sure your wires are in good shape.  Be sure that you are using plastic caps AND use only STAINLESS STEEL screws when doing your install.  Stainless will not rust up and add to the potential for rusty water stains on your Avion aluminum skin.  Stainless steel screws should be the only type used on your RV in our opinion (in addition to rivets obviously)

Be sure to put a dab of Parbond INSIDE each of the screw holes before screwing in anything into your Avion skin!!  We did this with the marker light installation too.

Kevin intentionally installed the NEW fixture in the center since the outside casing was just a little different than the existing two.  I applauded him for recognizing that slight detail but having it look intentional and more symmetrical really did look great.

After the new or cleaned up existing fixtures were installed, my job “as artist” was to apply Parbond around the top and partially down both sides of each fixture.  Kevin tends to have a heavy hand with any of this kind of step, so since I have a steady hand these tasks fall to me.  I did apply straight out of the Parbond tube because I needed a goodly bead to ensure that no gap existed between the fixture edge and our rig.  Be sure to NOT cover the side weep holes if your fixture has them as long as they are low enough to be effective.

You may notice on the large bottom picture above there is a different color silver on the left side of the fixture. This is because our NEW fixture did not fit completely flush against the skin of the Avion.  So I cut a 1/3 width of our Eternabond Tape and applied that just around the side sections (covering weep holes there since too high) and all along the top lapping half of the width of the tape to the skin of the trailer to create a perfect seal against water penetration.  Then I applied Parbond over that.  Done!  This baby is not gonna leak!

**If you tend to be heavy handed and shaky you may wish to put some Parbond into a smaller disposable syringe with plunger and use that. See short video clip below to see what we use in narrow spaces or edges.   We will have detailed on these in our post about our rock guard final install post and also source for what we use on our blog’s Resources Page.

Note- the new fixture had two large weep holes on the bottom so we were not concerned about covering the one on either side.  Since these fixtures sit so high on your rig, you will not ever even notice the Parbond unless you get on a ladder.  When camped, most times we have our rock guard open so the fixtures are even less noticeable.  Far better to secure from leaking than to worry about aesthetics.

2019-04-21 17.14.10

Another project checked off our 2019 Spring Punch List!

Hope this blog post has helped you in some way to tackle your light fixture projects.  If it has, please leave a comment– if it did not help….please tell us that too and what would have been more helpful.  We always want to create not only a journal of what we did for nostalgia sake for ourselves but we strive to be a helpful resource and inspiration for Avion and other aluminum trailer lovers.

Please subscribe to our blog so you get notified of future posts on other how to projects and our travels!

Safe Travels…..One Life…LIVE IT!!

2019-04-21 09.31.43

Luisa & Kevin Sherman  at ThePewterPalace.com           Visit and LIKE us on FACEBOOK!

Phase Two- Spring 2017 Refurb projects, 5-1-17: Rear lights, Eternabonded roof

Updates are streaming in from Fletch of Fletcher’s Trailer Sales in Trumansburg NY on how our Pewter Palace is coming along.  There were some parts we needed to source out and thank goodness for the awesome fellow Avion owners who monitor the numerous Facebook and yahoo sites for newbies like us who are looking for sources for parts and input on how to’s.  It is not always easy finding current parts that work in a 44 year old trailer, but we did great and our window glazing bead material and non-electric reflectors for the lower sides are enroute to Fletch for installation this week and next.

Found out that our license plate lamp socket was none existent.  Explains why it did not light (duh!) and we joke that it must have fell out somewhere between here and one of her two trips (that we know of) to Alaska over the past 44 years.   Fletch had to replace the socket by drilling out the holder from the bracket first, then install new wiring and socket–but she is all set now.  Gotta love our license plate huh!!

Next there was the resealing of the major lateral roof seams (Fletch said others looked fine) that run the front to rear length of the rig and across the front and rear noses.  The fix of choice among vintage Avion and Airstream owners is called Eternabond.  This is a high performance, long lasting tape-that may look like common duct tape, but is not.  This tape adheres like cement and prevents any water penetration at all.  No leaks happenin’ in our Palace!

We also replaced a few cracked and non-functioning vent caps with nice looking retro styled vent caps.  Fletch applied Dycor lap seal to ensure a good weathertight seal around these.

We also have had work done on our inside roof vents but that is going to be chronicled in its own separate blog post.

All for now.  If all goes according to plan, we will be headed out over Mother’s Day weekend to pick her up.  Can’t wait…but I really have to get cracking on making the interior curtains!  yikes!