Category Archives: Towing an Avion

Making your RV Feel Like Home- Keeping Things STUCK in Place Even When on the Road!

View of our 32 S model 1987 Avion. This “rare breed” floorplan was only produced for three years by the Avion Coach Corporation.

One of the first things anyone says when they visit us in our Avion is how “homey” it feels, comfortable, cozy and not sterile like many “off the lot” modern RV’s today.

Often, the next question we get is…

“it must take you a long time [when setting up camp] to put out all of these décor items (some would say clutter or chachkies! ) and knickknacks and then store them all away again”. 

Actually—no!  Everything you see in our coach stays in place where it is displayed.   I do not have to move anything except dish soap bottle on the kitchen counter, our authentic cuckoo clock, and the soap dispenser in the bathroom!

In the photo above you will see I have opted to keep the upper and lower curtain rails in place and just have narrower side curtains.  These curtains are wide enough to create privacy for the curved front windows when the center pull down shade does the rest at night.  Notice I use the bottom curtain rail to store some things during travel time too! ( I DO take down the white vintage ’70’s swag lamp and it sits in the left corner of the front counter when we roll down the road)

HERE IS A QUICK LIST OF TIPS & PRODUCTS I USE TO KEEP THINGS IN PLACE IN YOUR RV—EVEN WHEN TOWING DOWN THE ROAD!

A 6″ wide shelf behind the sofa creates a great storage space with metal framed fabric bins!

Metal Framed Fabric Bins Sit on Shelf behind our Jack knife Sofa.
See purchasing link below.

The photo above shows three of the five storage bins I purchased at Bed, Bath & Beyond in 2021.  They have a wire frame for durability and are perfect for storing those things that we use routinely when traveling including:  TV and other remotes, LED lanterns and flashlights, Binoculars, Travel Journal, Travel brochures, etc. and a vase of artificial flowers I often put outdoors on our dining table.  We are still able to pull out our jack knife sofa when we have guests staying over. * I left about 5″ in between two of the bins.  This is where I tend to put my beverage water bottle or travel mug of coffee when relaxing on the sofa when we are set up at camp. Source, 2021

Using forms of “anchor” putty’s to hold things in place are perfect for RVs.  Read on to read ‘my reviews’ on three products I have used.

The photo slideshow above shows various items in our RV we leave out and do not move during towing.  Things like a ceramic beer stein with flowers that sits on our front kitchen counter, our mid-century modern looking table organizer (link) with a vintage 70’s table lamp and other items set in place.  In our bathroom, my mother’s china cup and saucer- now a home for a gnome sits on our bathroom vanity and back in the living room/salon even our faux “stag head clock” in our living room–all stay out and stay put every day we travel. 

We have clocked multiple trips over 3000 miles each, up mountains of 17-24% grade roads to 5K elevations (and back down) as well as dirt roads, washboard roads and surviving way too many roads with pot holes and frost heaves!

Review of THREE putty brands I have used: and my recommendation!

Quake Hold (Museum Putty) 

 This is my “GO TO” product!  It is great and what I have used successfully on the ceramic beer stein, the gnome in the tea cup,  the dinette table shelf organizer and our faux (plastic but very real looking) stag head wall clock.  I also put this behind each corner of any framed pictures I put up on picture hooks.  It keeps the pictures level and keeps them from potentially swinging and marring stained walls or wallboard.

20220217_111301 (2)

Pro’s:  Terrific holding power, re-useable, no smell, no staining on walls. Holds up well under all interior temperature conditions we have been in so far (-10 to 95 degrees).  It allows you to remove items from their hold by twisting and pulling at the same time.  You will truly be impressed by how secure it makes things and how hard you have to twist/pull to release its hold.  I have not had any issues with its color staining any surfaces.

Con’s:  it is a light off-white in color )they call it “neutral”- so it is not completely invisible when used under items.  You can see this from my photos as little white stuff sticking out from underneath Honestly, it is really hardly noticeable.  Through trial and error I have found the best holding power is when you allow some of the putty to be on the outside of the edge of your item as well as underneath for those items that sit on flat surfaces.  For framed photos, etc. held vertically you do not need to do that.  I simply put pea sized blobs under each frame corner.

Rock N’ Roll Clear Gel Putty

As the packaging says, this GEL is really only for glass and china type stuff.  They do also now make a putty similar to Quake hold but I prefer the quality of Quake Hold better.  I have tried this Rock N Roll Gel and found it does not hold as well as the Quake Hold.  Also a real ‘con’ is that this stuff MELTS when your rig gets hot inside (aka if you are away for the day not using AC/or when stored at home when not camping and temps rise above 80 degrees. Source* (*note, this is not where I purchased from so I cannot validate reputation of online source)

2020-07-12 16.40.38

Pro’s:  it is clear, highly pliable.  Does work well on glass or mirror items (not sure how many of us have crystal figurines on display in our RV’s though)

Con’s:  It melts when temp inside RV gets hot.  It melted and puddled under some items on our dinette table. Does not do well on vertical applications in my experience. (yes, I tried to use it behind corners on picture frames, only to find it melting and running down my wall one summer day!- ugh)  Because of its propensity to melt, I no longer recommend this for RV use.

Museum Putty Wax

I have used this on a variety of surfaces from metal to wood to ceramic and it does work but I find it not as convenient as the white putty Quake Hold above- nor does it have the same holding power for heavier things, especially those made of wood and/or sticking to a wood surface.  

41tumHGbmkL._AC_

Pro’s:  it is somewhat clearer and less conspicuous when used than Quake Hold putty.  It does a decent job of holding not too heavy items.  Somewhat easier to twist/pull items you need to reposition.  Does not stain finishes.

Con’s:  Due to its consistency, I find it harder to get out a blog from the container- I use a bottle cap with its serrated edges to dig into the container to get out sufficient for use.  It is simply too hard to dig any out with your fingers.  It is a wax base and therefore may also have a tendency to melt in hotter environments.  For this reason I would not recommend a vertical application either.  In my experience it does not work well on wood items  but works ok on plastic, ceramic and glass.

LAST BUT NOT LEAST….WHAT TO DO WITH “RUN-AWAY” PAPER TOWELS!

How many times have you opened the door of your RV after a day of travel to find your paper towels have unrolled and are strewn across your kitchen floor?

These ARE THE ANSWER!

2020-08-29 15.48.19

Viva Paper towels do cost a little more but they will not unroll after a day of road travel.  They are also darn good paper towels and very absorbent so in truth you will use less overall.  We currently have this vertical paper towel holder but in our old ’73, 28 foot LaGrande model we had a traditional horizontal holder above the counter and we never had unrolled paper towels with Viva brand– AND I did road test others like store brands and Scott’s brand and other name brands and none did the job of staying on the roll on the road!

PARTING TIPS….. FOR HANGING PHOTOS, FRAMED ART, ETC and other WALL DECOR ITEMS:

Most folks already know that 3M stick on hooks are a Godsend for RVers.  We use them all the time! 

BUT I have found that if you really want pictures or things of any weight like barometers, framed art, etc. I use these stick on Velcro strips.  Specifically, the type that have the lock-n-grip type, not the traditional type that has soft fuzzy on one side and teeth on the other.  I use the heavy duty type of Velcro that have teeth which interlock when put together.  I  always purchase the one that is rated for heavier than my item really is.  These work really well and so far (knock on wood) I have found that I can also peel off the Velcro strip I may have secured to our Avion wall board since it is a vinyl composite board, not paper applied to wood.   I have also used the Command Brand similar type too on less heavy hanging items, apply as directed.

DISCLAIMER: As with all the products we have discussed here, it is best you test out products first.  For wall applications, your interior walls may have had some sort of after market application that could make it different than ours.  Please don’t send me a bill for any broken item!  [smiling]

Well, that is my review of keeping things in place!  We all love to have a homey feel in our home on wheels!  Hope you have found this little article helpful! 

Let us know what types of tricks/products you have found help with this issue! To be sure, a simple search on Amazon nets many companies touting great sticking power of their putty’s and other products.  

Please visit our YOUTube Channel and please subscribe!    We have great videos on many topics from renovations, tips, other favorite gadgets, as well as travel videos and campground reviews.  We appreciate your support of our efforts to help others along the way!

-Luise

a402ba9edf2325289cf5c2fdd4ee0381250481b99b3b6bc38b34e7103ac7e712.0

MORryde Suspension System & Kodiak 7K Hydraulic Disc Brakes -Major UPgrades to our ’87 Avion

Up on the lifts at MorRyde in Elkhart, Indiana. They do allow you to sleep on your rig and plug into shore power during the installation process….but up and out by 5:45 AM because they start working at 6 AM sharp!

Anyone who has an Avion (or Airstream for that matter) knows that the clearance underneath these silver babies is less than optimal and can really cause issues especially trying to do boondocking or dispersed camping-which is something we plan to do a lot of once we are full timing starting in 2023.  We found in our 28′ we had issues, but it was even more pronounced in our 32′  since our tail end extends that much further back from the tire axels. 

At times we were even limited as to what gas stations, parking lots or even campsites because of the “dip” from street to lot/site.  NO MORE!


HERE IS A GREAT VIDEO about the IS and disc brake systems in easy to understand language.  We are happy to share with you from vloggers Crazy Family Adventure.

After lengthy research, discussion with people who have installed it and with Technicians at MORryde and then more research we decided to take the big plunge and have the MORryde Independent Suspension System AND Kodiak (7K lb) hydraulic disc brakes installed on our 1987, 32S model Avion.  This decision is not for the faint hearted and a huge investment (just over $7K total for axels/suspension/Kodiak Disc brakes as of this post in Fall 2021) and this does not include the new 8 Lug tires and rims we needed to get for the hydraulic brake install we wanted.

Anyone who has the original MORryde suspensions on their Avion’s (late 60s into late 70s) knows that the center rubber sheer spring that hangs down (encased in steel) in between your tandem tires takes  a ton of the impact from road travel and it is certainly touted as one of the best suspension systems that Avion installed back in the day and any travel trailer can have.  We loved it on our ’73 and missed it once we started traveling with our ’87.  This new version from MORryde, called their “I.S.” (Independent Suspension) system basically replicates that type of system from the older Avion’s WITH ONE HUGE DIFFERENCE! 

We now have that 70’s type of MORryde Rubber Sheer Spring on EACH OF OUR TIRES!  The results is a super smooth ride, less wear and tear on the trailer frame–and with new axels and all these new components there is piece of mind that we will not likely have problems with axel failure/breakage and have a hard time trying to find the correct old “split axels- the Dexter Adjust-a-ride” we did have.

If you think about your suspension like we do, it is the foundation of your “house”.  It needs to be strong, in good working order and built to last.  Our Avion is our home (full time starting in 17 months, 3 days, 2 hours, 29 seconds but who is counting right??) and we want a strong foundation for the tens of thousands of miles we plan to do each year with her over some pretty challenging terrains.

For the sake of brevity, we will list PRO’s and CON’s of our experience, the system and the end results.  In the end, would we do it again?  yes, but read on!!

Inside our OLD external battery box is where the Kodiak hydraulic brake controller was being installed. We had to move our 2 AGM house batteries to under our streetside rear bunk temporarily as part of this project. Our next big project is installing our 6 Battleborn Lithium Ion batteries to underneath our curbsite bunk. The hydraulic brakes are awesome!!

PRO’s to our process-products-end result:

  1. Increased our ground clearance from 8.5″ (at low point of old axels) to over 15″.  No more worries about getting off road, into gas stations or parking lots. Our rear side frame and front tongue frame sit at right around 26″. NO more worrying about dips into parking lots from the street or uphill grades from street.
  2. The MORryde website has excellent information and videos.  And phone calls in advance to their tech folks were very helpful in our decision making to go with the IS versus the 3000 or 4000 systems. Your Avion may benefit from the other systems and worth inquiring about!
  3. The Kodiak Hydraulic Disc brakes are game changers!  Wow!  what stopping power and peace of mind.  So different than electric brakes!  Makes braking of the trailer feel totally “as one” with our tow vehicle. No more grabbing, no more concerns on long down or uphill travels.  These are beefy! Just the new brake system alone was worth the install!
  4. All new axels, rotors and all brake components so less chance of failure or need to hunt down vintage parts to fit/work. We like having a new, rocksteady foundation under our trailer.
  5. During install process we were able to examine the trailer frame since belly pan was removed (we had not done that prior) to see it was in excellent condition- even our Tech was super impressed with quality and condition of this 34 yr old frame!
  6. MORryde allows you to park the night before your appointment in their lot outside garage, then once install commences you are allowed back onto your “elevated rig” after the day shift is done.  This saves on hotel costs– our install took 2.5 days.
  7. The MORryde Service center staff are very good.  The Tech and Service Manager listened to our questions, were responsive to our concerns and talked us through the process as it was happening in real time. (BTW we were the first vintage trailer to get an IS install) They also gave us a tour of the entire facility so we could see these IS  systems being fabricated on site.
  8. We knew what our costs would be before they started and this was all reviewed with us in advance.  There was no type of upselling or gimmicks.  The products stand on their own and we really feel their shop labor rates were very fair.
  9. The Tech you get is assigned to your rig from start to finish and are highly skilled and trained.  They are very professional, the shop is clean, well managed and everyone is super friendly. (well you are spending a bundle too!)
  10. The waiting area during the day is stocked with goodies, drinks, etc. and very comfortable with overstuffed sofas and with WIFI and rest rooms.  You can also order and get a complimentary lunch from several area restaurants who delivers to the MORryde office.  No charge to you- we did Panera both days.
  11. To their credit, when an issue was relayed from us back to MORryde they made good on sending out new parts at their cost and covered the labor costs  in a refund to us to have this correction done locally at a shop we found near to us. Kudos out to Adirondack Truck of Queensbury!

CON’s to our process-product and end result

  1. We did not know that the rig was going to be lifted SO high. Originally we were told up by 4-6″ and we were fine with that. Then as install progressed we were told it changed to 7-8″. We now have a full 11.5″ from top of our tire to top inside of wheel well. Looks odd because all of us are used to seeing our low lying, stealth to the ground rigs.  To counter this somewhat we have purchased Fender Flares (aftermarket bought at Bontragers near Elkhart) to install by riveting on the exterior of the well lip to help mitigate the space visually.  We will temporarily remove the track you see below that we riveted on to slide our Zipdee Tire Shades into, then will rivet the fender flares on using the same rivet holes and refasten the tire shade track over top of this once again.  Due to the curvature of the wheel well opening (at approx. 1 pm and 11 pm locations) we are going to have to apply small sheets of anodized alluminum from behind to fill in those gaps.  Not an ideal fix, but its the best we have come up with.  If you have another idea please let us know! kimg3454
  2. Our frame, (measured at front and rear frame on tail before it rises upward) now sits at 26″ above the ground. Before this install it was approximately 18″. This height has resulted in perhaps a lessening of the aerodynamic nature of the Avion design. However on our trips since we have not encountered any issues with this even on highways with winds and Semi trucks zooming by- but we also use a Hensley hitch which certainly is a big help and have a high top cap on our pick up which deflects wind.
  3. No pre install weigh in like video’s said they would do.  When we watched the MORryde videos during our decision making process we really liked the fact that part of the process included weighing your rig so that the correct sheer springs weight range would be installed. We know our trailer is street side heavy due to Corian countertops and all appliance on that side. We had hoped this weighing step and install to account for this would solve any undo stress on one side of the axels/tires. Needless to say when we arrived we were told they no longer do that weighing part of the process. We were not happy with that explaining again we knew we were heavier on one side and in the end (keep reading full story) it would have saved a lot of angst as a result.
  4. We were not made aware that our specific I.S. axels were going to be wider than our original ones.  We were told this is due to the necessary deflection needed for the tires to toe out or in independently we now had our tires extending out about 2.5-3″ outside of the wheel well! We question the need for this still.  Was it really because this is the standard length for modern RV’s and what their shop is set up to make?  This was a total surprise to us and not a happy one .  We did not realize it until the entire install was complete. It really changed the look of the trailer profile. Hence another reason to purchase the aftermarket tandem aluminum fender flares at about $75 each. We have added another project to our list to rivet these in place after removing our tire shade track and replacing it over top the fender flares (a project just completed). ** The tires extending past our sidewall profile also can mean more damage should a tire fail, and certainly without the fender flare, way more road grime, water from wet roads, mud etc. spewing onto our vintage aluminum skin trailer body.  
  5. “Houston we have a problem!”  On our trip back to upstate NY (Lake George area) from Elkhart, IN- this is a 780 mile trip of all highways we found at our pit stops that some of our interior decor, drawers,  gear, and equipment that NEVER had bounced around or shifted before was now doing just that!  Wait a minute!!!!!!
  6. We were supposed to have a smoother ride, not a bumpier one!  We also noticed porpoising  (rocking nose down to nose up) of our trailer when hitting even slight road seam bumps that we had not seen before.  Houston!!???? another issue!
  7. Not all communications via email were responded to in what we feel was a timely manner by MORryde staff, especially with our issue after install was brought to their attention.  We do recognize that Covid-19 certainly had a part in this as did some staffing changes at MORryde.  We know everyone is busy but waiting weeks for a reply is not appropriate in this tech age.  Once a reply was gotten, we were instructed what measurements we needed to do and send to them.  With this information, MorRyde determined that indeed the WRONG SHEER SPRINGS had been installed *Yup, that weight thing again”- Avion’s are heavy!!-they are not the cardboard box trailers produced today.  Even though we had given them our weight parameters…someone obviously did not compute this correctly from the get go.  So what was happening was that the #2 Sheer springs originally put on at the shop were insufficient to carry our weight and were causing the axels to bottom out when hitting even mild to medium bumps in the roadways-trashing our trailer inside and pounding on our frame unnecessarily on that first trip.
  8. Sheer Spring REDO!  With new #3 sheer springs in hand, you can see the big difference in size! See photo below.  We had to take another day off from work and had a local shop (Adirondack Truck on Big Boom Rd, Queensbury- who were great!) take out the springs from our install and replace with these beefier ones.  We are very happy to report a 2.5 hr trip two days later on our next camping adventure proved we had no more jostling, drawers were shut, gear not strewn about–so issue appears to be solved and the ride is smooth as we had hoped for and been promised.  Needless to say, the issue we had caused us undo stress wondering what on earth we spent all this money for?  Did we ruin the quintessential look of our Avion only to have a bumpier ride?  In the end…the ride is better, the clearance is better and we have the peace of mind of a very strong foundation (suspension) and a new braking system second to none! 

Final thoughts read below…..

For those who wish to see some of the quick video footage we took during the install process here you go!

Welding of new brackets to support axels. Video link

New axels with highlight on the Kodiak Disc Brake system. Video Link

First axel being lined up for install. Video link

Our Tech, Matt doing the welding of first axel onto frame. Video link

Closer look at streetside axels after being welded to frame. Video link

Balancing and aligning our new tires on axels-Hunter System. Video link

In summary...it was a stressful project from start to finish.  We were under the gun to have our house batteries relocated before we left for Elkhart, then a 780 mile trip out there.  We did not get our Avion into the shop until 2pm on first day of appointment, ended up being there 2.5 days and missed two days with fellow Avioners at our SAF rally.  We were shocked by the resulting height of the trailer and over extended tires past our sidewalls. AND, the saga did not stop and we had to have our sheer springs replaced within a month due to a size miscalculation on their part of which they did send us the correct replacements and covered labor.   But all is well now and we are happy!

In the end…we have a super rugged, solid foundation to our home and now we have an AVION OVERLANDER® rig now….and that is the beginning of a new story!

PLEASE SUBSCRIBE TO THIS BLOG SOYou can stay tuned so you can see the debut of a new separate off grid adventure blog from us with a separate, additional URL at AvionOverlander.com that will only focus on off-grid, off road- boondock and dispersed camping adventures, tips and more—coming in 2023 when we hit the road full time and do a lot of boondocking and off road/off grid adventures! (not to worry thePewterPalace.com will not be going away and will continue to be the repository for our campground reviews, regular trips, projects, tips and more!)

As always, if you have any questions, want more measurements, etc. please do not hesitate to reach out to us at any time via direct email to PewterPalace87@gmail.com!

Till we meet on the road or around the campfire!

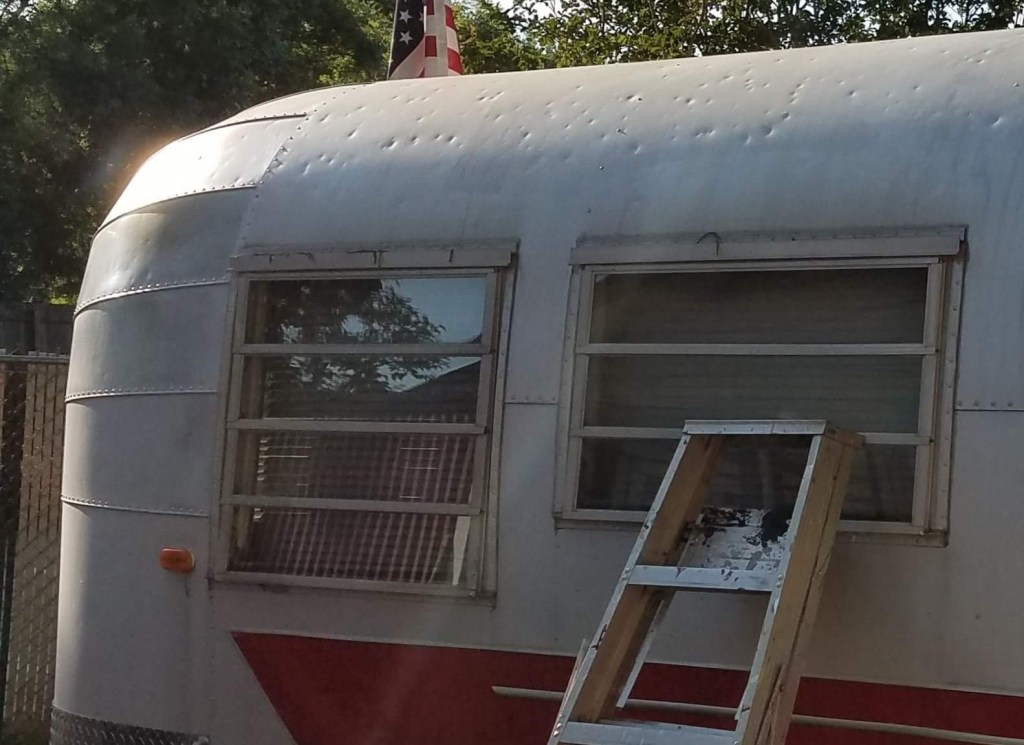
Loose windows? Here’s a quick fix!

WHY? People have had the windows on their Avions blow open and get broken off of the rig when a gust of wind hit their rig while going down the road or in a bad wind storm. Don’t let this happen to you!

When we owned our 1973 Avion, 28′ LaGrande Model we noticed that one of the three prior owners had put on some “make do” hardware that held the windows more solidly closed while rolling down the road or during winter or very bad weather (rain or wind). Below is one of those “make do” clips but overtime it was only functional with our little slip of a wood shim in it! So the time to find a new “fix” was due!

The original after market “make do” window securing clip needed a shim when we bought the 73 Avion!

CAUTION! These old Hehr windows especially the “awning type” which are the one piece large windows that crank open from the bottom out…CAN AND DO have the potential to catch a wind and fly open when rolling down the road at 50+ MPH. In case you do unfortunately lose a window or purchase a reno project Avion, Hehr does still make awning style (and Jalousie) windows and some online companies also carry a limited amount of dimensions. NO ONE in our research makes the rounded front curved windows that flank your center front window so please baby those fixed windows- we also have them in the rear bedroom of our ’87!

*note, since purchasing our 1987 32S Avion (jalousie window style) we do not have this issue with rattling or fly open accidently windows but we still make double-triple sure they are fully secured before we begin towing because if open even a little bit the wind could catch the smaller pane of a jalousie and pull it open to and strip your window crank system in the process. It seems the issues of rattling windows is more prevalent with the awning style windows found on pre mid 80’s models.

Additionally, some of our window torque operators (those little metal boxes that your crank handle fits into to raise the window out) were less than perfect, wear out quickly due to soft metal gears inside and did not always “snuggly” hold our window shut.

ABOVE- Sill Torque Operator, for LEFT side
ABOVE- Awning style window on our 1973 Avion opened and you can see the Torque Operator installed on right side of this window with its arm extended, cranked out.

WHAT TO DO TO PREVENT WINDOWS HAVING A MIND OF THEIR OWN??

We purchased these simple metal “shelf clips” at our local hardware store. https://www.lowes.com/pd/Hillman-20-Pack-0-25-in-Shelf-Pins/3013872

They are cheap, come in boxes of multiples and made for a decently attractive but functional solution to ensuring our windows were all securely closed to prevent accidental opening during trailering.

We put a stainless steel screw into the pre-drilled hole and the “pin” which is intended to fit into a round hold in a bookshelf wall is actually what holds the window closed. (sorry evidently did not take a photo of this before we sold our 73 Avion!)

Another closeup of the original “clips” that had been installed on our 73 Avion by a former owner to prevent window rattle and secure when towing to prevent possible blow open and ruin!

Part of our routine before we got underway for a trip and then when we arrive to set up at our campsite was simply to take a cordless power drill and unscrew the stainless screw to be able to rotate the clip away from the window frame to allow the window to open. We did not remove the clip entirely, merely rotated out of the way so it was ready to be deployed again to do its job once we were packing up and making ready to leave our campsite.

Last but not least….we cannot stress enough the importance of a “WALK AROUND” safety check BEFORE you tow your RV 2 feet! The walk about is Luisa’s job so there is a second pair of eyes on the hitch area and all its hook ups, etc. This Walk-Around will be where you check to see that all of your windows are secured down, if using clips like we outline above, they are engaged and tightened, awnings latched/locked in place. I will be posting a complete other “walk around” post to go into more details on this very important safety standard of practice.

Be well, happy travels!

Baby’s Got New Shoes! (Tires & Rims)

Today in  90 degrees and 64% humidity…..we (well, ok Kevin did all the work, I did my typical go-fer job and took photos) installed 4 new tires and a spare onto our 1987 Avion 32S.

The tires that came on our 87 Avion were a mixed batch with DOT codes ranging from  2015 to 2018 (the spare).  3 were Load Star brand and 2 were Power King Tow Max STR.  We were not real comfortable with the miss match and ages.  So The Pewter Palace needed new shoes!

After  much research Kevin made the decision to go with new 16 Inch aluminum rims and 16 inch radial tires.  This effectively raised the trailer a 1/2 inch overall.  Not a lot, but since these Avion’s are notoriously low to the ground, anything helps.

There is a huge debate and preferences of radials to bias ply tires.  To each his own.  Our feeling is we are going to be doing a lot of long distance multi day travels on highways especially as full timers.  Radials can handle that 6-8 hour day of driving in high heat conditions better than bias.  But this is our opinion from research and we believe everyone had their preferences and their reasons and we do not plan to get into a debate over it.  If it works for you….then that is great.

2020-07-05 13.06.23

Here is what we bought to complete this project:

TIRES:

LT225/75R16 Michelin Agilis CrossClimate  M3JH02CX2220                                             (July 2020 price in NY@ our local tire store, Warren Tire, Queensbury NY, $240.95 per)

https://www.michelintruck.com/tires-and-retreads/selector/info/agilis-crossclimate

RIMS:

16X6 6-Lug on 5.5″ Aluminum T02 Trailer Wheel – T02-66655T                                     (July 2020 price, online-$121.99 per rim)

https://recstuff.com/trailer-wheels/aluminum-trailer-wheels/16×6-6-bolt-on-5-5-aluminum-t02-trailer-wheel/

CENTER CAPS FOR RIMS:

4.25″ Stainless Steel EZ Lube Center Cap CCS002 (July 2020, $10.99 each online)

https://recstuff.com/trailer-tires-wheels/wheel-accessories/4-25-stainless-steel-ez-lube-center-cap-ccs002/

METAL VALVE STEMS: (we strongly urge metal valve stems, why?  rubber breaks down over time due to exposure to sun, etc.  Also if you have tire pressure monitoring devices on the stems, they add weight and over time the rubber will flex enough that they will crack and you lose air out of the valve stem….been there…done that!)

High pressure, Bolt in Metal Valve Stems (0-131 PSI)  ($3.99 each)

https://recstuff.com/trailer-tires-wheels/wheel-accessories/valve-stems/high-pressure-bolt-in-metal-valve-stem-0-130-psi/

HERE ARE SOME PHOTOS TO SHOW COMPARISONS FROM THE 15″ TO 16″

2020-07-05 12.23.59
New Michelin 16″ on left…….original Load Star 15″ on right.                                                               Both are mounted on Aluminum rims.  We chose the new rims to match what is on our tow vehicle, our 2011 GMC Denali 2500HD, 4WD, Crew Cab, Gas Engine. Sorry due to close quarters in our RV garage I could not take the photo head on, so actually the 16 inch looks a little smaller…its not!


Even with the addition of the 16″ size there is still plenty of “head room” above the tire.  Original 15 inch is on right.  NOTE:  This FACE WIDTH  of the tires are the same width!

2020-07-05 12.24.442020-07-05 12.24.35

We did have these tires professionally mounted and balanced at our local, very reliable Warren Tire shop here in Queensbury NY.  We always recommend having your tires balanced professionally!!

STILL TO COME….(due to shipping delays have to go on later when we do bearings and brake checks)

We have ordered Centramatic Balancers: 

GENERAL INFO ABOUT THIS PRODUCT:  https://www.centramatic.com/balancers.rhtml

OUR ORDER:   AJP-10″ Light Duty 6 on 5.5″   (July 2020, pricing  4 pc set, $199.00 online only)

https://www.centramatic.com/wheel-balancer.rhtml?modelNumber=200-223

Wheel Bearing Check and Brake Checks will be done before our trip to the Silver Avion Fellowship Rally hopefully (leaving in 8 days), if not this will be done upon our return.  We had been told by previous owner bearing and brakes are good….appear so, but we always like to create our own “new benchmark” on our trailers for our own piece of mind.

Happy and safe travels….hope this post has helped you!  We LOVE COMMENTS!

Be safe, hope to meet  you on the road or at a campground or rally someday!

Kevin and Luisa Sherman

Publication1


Looking to Connect with Avion Owners?

What are you doing at 7 PM (EST) on Tuesday nights? 

Join us for a live, virtual chat ZOOM meeting with fellow Avioner’s from all over the USA (and the world)!

If it is one thing that this Covid-19 Coronavirus pandemic has taught me, it is how to connect virtually with people in meaningful ways despite not being with them in person.

For my work, I have become very proficient at hosting live ZOOM meetings (you can start a basic Zoom account for free!) and have found that these LIVE virtual in-person meetings have enabled my colleagues, friends and family members to share stories, tips, timely topics and even share documents, photos, etc. in a meaningful easy way.  SO WHY NOT DO IT WITH AVION OWNERS?  LET’S GET TOGETHER TO “TALK AVION!”

Avion Tuesday Talks_instagram_eveninglight

SO…..Kevin and I are launching “Avion Tuesday Talks” –weekly topic —  live chats via ZOOM at 7 PM (EST).  Each week, we will have one manageable topic and hope to attract long time Avion owners to brand new owners….and everyone in between.  Even members of any of the Avion Facebook groups who are still “in the market to buy their first Avion” are welcomed.

Suggestions for future topic talks are always welcomed by shooting us an email, posting a suggestion on our facebook page or posting a comment on this blog anytime!

NOTE:  These meetings are best joined by you using a laptop with built in camera and speakers.  PC’s with audio and video are fine too.  Cell phones are ok but a little clunky to get the best experience.

My Pewter Palace Zoom account can handle up to 95 attendees.  Right now, I am also doing just the free subscription so our chat can only be 35 minutes (yup, i know i will have to put the timer on!).  If this catches on, we will explore upgrading to the paid service where longer 1 hr chats can be done.  But lets crawl….before we walk and see if the interest among Avioners is there first!

HOPE YOU WILL JOIN US AND HELP SPREAD THE WORD!  You can find the events listed by date on ourPewter Palace facebook page under the “events” tab.  This is where the topic of the week will be listed as well as the direct link info to log in and then join us at 7 PM.

Not familiar with Zoom??  It is super easy to learn and use!  Here is a terrific tutorial to view before your first live Zoom meeting!     Watch now!

Mud Flap Install- Protecting the Beauty!

We spent the following week preparing for our big trip out to Elkhart, Indiana to enjoy the Silver Avion Fellowship Rally with 41, count ’em…41 other Avions! While at it…we installed a mud flap system to protect our silver beauty!! 

Back story.……When we returned from our longest road trip to date (16 days) to Dearborn, Michigan this past May/June for the TCT (Tin Can Tourist) Centennial Rally we noticed that at some point, we must have driven over some loose gravel, rock chips in a construction zone because on the curbside of our Avion front area (yes, the area where Airstreams have those protective “wings”) we had a whole lot of small, tiny dings into our aluminum skin.  We  know these were not there prior to our trip.  It is worthwhile to note that with our multiple excursions now through Pennsylvania, Ohio, Michigan, and Indiana…that the roads in those states are not nearly as good, or well maintained as ours are in NYS.  So ok, higher gas taxes, and over all taxes may have some redeeming quality…but we still live in one of THE most expensive states in the union–so not much solace there.

So we have decided to purchase a mud flag bumper guard set up for our tow vehicle which is a 2011 GMC 2500 Denali HD, 6L gas, 4 WD, Crew Cab with Leer extended bed cap (which we LOVE!!).

20180630_151125833740899135420454.jpg

A mudflap system would have most likely 99% prevented these chips from happening.  Only sorry we did not do sooner, 46 years on the road and our baby got dinged!  Not only does a mudflap protect from errant rocks coming up and hitting your rig, or worse yet, your rockguard or windows…BUT it also handles…well….MUD (snow, slush, dead animal debris, floating garbage or UFO’s on the highway!-yes it happens!)  Kevin works for NYS DOT and can tell you amazing stories of what his crew finds on the highways.  Mud was the other thing that washed up onto our Avion body front during this most recent trip.

Kevin got lucky when he inquired about pricing for a Rockstar Mud Flap bumper system at our favorite local after-market auto parts detailer and installer- Mac The Knife (Mac also is the one who redid our rock guard and spare tire cover- he does great work!)  Mac happened to have a left over demo model of a Rockstar brand system that he had had on display in his shop a few years back.  Yeah, it was dusty but Kevin got it for less than 1/2 price off current retail …and it is the same system being sold today for over $479 list.  Here is link to similar set up that we have which is currently available through ETrailer.com.  FYI-We have purchased several things from ETrailer.com and are very impressed with the ease of ordering online, their quick shipping and quality products.  They have a huge inventory of tons of stuff and their customer service reps are very good.

Bear in mind, these things are heavy.  We realized that since this will be a one time purchase for us…and when we are in our 70’s and 80’s and still on the road (don’t laugh…we will be good LORD willin’ and the creek don’t rise!) we needed the easiest way possible to lift this baby off the back hitch to store it away if we did not want to cruise around with it on the truck (it does add weight= lesser gas efficiency when not towing)

Here is a good video to show how you hook on the system to your rear bumper.

So Kevin had the idea to create a semi-permanent fix which was to affix the flap system to the receiver piece insert which then can be pulled out with the mud flap bumper system.  Otherwise, we would also have to be pulling off the entire (and super heavy) GenY Torsion Hitch with the whole mudflap bumper system attached as one unit.  That GenY Torsion Hitch is also a great piece of equipment and we will do a separate post just on that and cross link it here at some point.

AccessRockstarMudflapsBumperFlange_2
view of bumper step, where guard sits atop for custom look

Steps we did:

  1. Retro fit a longer 12″ insert reducer from 2.5″ to 2″ so that we could bolt the mud flap guard system right to that. Here is the link to the additional hardware bracket needed as well.   Link to hardware sold at ETrailer.com
  2. Kevin used a DeWalt Saws-All with brand new blades to cut off the excess length off the reducer.  Be sure to clamp down the reducer so you get as straight a cut as possible.  The reducer was too long and butted right  up to our spare tire, so that needed to be trimmed back by several inches.  Doing this however, then threw off the alignment of the pre-drilled side holes in the reducer, making use of a hitch pin lock impossible.
  3. He then used several different drill bits to cut new holes in the correct positions needed to now be able to throw the hitch lock 5/8 ” pin through. It has a key lock and we have had it rekeyed to match the truck ignition so you always have it handy!
  4. We followed some video’s found on YouTube for the Rockstar brand installation because as we mentioned, this was a store demo unit and therefore we had no instructions or paperwork with it.
  5. Once installed where we knew it was properly in place, we also had to install a Heat Shield (bought on Amazon, see our link/resource page) to prevent the heat from our large exhaust pipe from damaging (a.k.a melting!) our heavy rubber mud flaps.

heat shield

It is very important to have this heat shield if your exhaust goes out back before using the mudflap unit. If your pipe exhausts to the side you will not need the heat shield.

IF you are purchasing a brand new kit, you may have to put your unit together yourself.  See Video    As a demo model…Kevin did not have to do these steps!  Ours was ready for install!


2019-07-04-16.42.52.jpg
This is showing the install WITH the GenY Torsion hitch in place.  The GenY now can be removed by itself and the mudflap guard system stays on the vehicle unless we decide we want to take it off for non-towing times, or touring. Still to do was install the heat shield, and apply some bumper pads on truck bumper to protect from rubbing of mud flap bumper tabs.

If you have any questions about this install, or why we chose our hitch or this mudflap system, feel free to email us directly at 1973Avion@gmail.com!  We would love to hear from you!

Safe journeys!  Share photos of your mud flap project with us on our facebook page!

Kevin & Luisa Sherman

K-L and Avion-bitmoji-withCopyright2bHr

14 Tips for Avoiding Damaging Hail to your RV!

My husband Kevin and I are avid YouTube watchers and follow about a dozen full time RVers.  A handful of them are in Airstreams, one is in an Avion.  From time to time, these Vloggers end up talking about how they dodged a bullet and were able to miss a potentially damaging hail storm. (actually some of our tips could also be applied to impending hurricanes, tornadoes or high wind storms in general)  In other cases, folks have not been that lucky.  Owning a vintage aluminum trailer takes special attention.  We and fellow owners know these shiny (or in our case, anodized) aluminum beauties require care and protection not only from the elements of weather but also from what it can dish out like falling trees, baking sun rays, forest fires, lightening….or hail!

In this blog I have gathered up some tips and suggestions from fellow RVers (of any type rig really) on how to try at least to minimize (or escape completely) the horrible and expensive damage that a hail storm can do to your Avion.  Having to replace any of the skin panels on a vintage Avion is expensive and time consuming.  To date, I am really only aware of one person who most would entrust to this task and that is Chuck Cayo of Watervliet, MI.  I have Chuck’s contact info on my resource page and as a foot note on several of my blog posts.  Chuck’s grandfather, uncle and father owned the Avion corporation.  He grew up with them and repairs and restores them to this day.  We drove our “Pewter Palace” to Chuck this spring (2018) –a 15 hour drive so we could have him work on it.  Yes, he has that stellar of a reputation for anything Avion.  SO–if my tips below come too late, and your Avion (or Airstream for that matter) has been damaged by Hail….call Chuck!

STEP #1 IS TO PURCHASE A GOOD QUALITY WEATHER ALERT RADIO AND KEEP IT ON WHEN USING YOUR AVION!  Be sure to get one that runs on batteries too!

There are several good Apps found in the Iphone and Google Play Store that offer weather alerts.  Keep them on when you are RVing but maybe away from your rig so you know when to ditch that grocery cart and get running! We use one from the National Weather Service and are sure to put in our location at the time.

Avoiding Hail Storm Damage:

 #2—GET ‘OUTTA THERE!  We are fortunate to have wheels on our beauties and hopefully yours is towable and with good tires.  So hitch her up and get out and away if you have any forewarning that hail is even possible!  Spend the weekend or a few days in a nice place away from harm.

This Avion did not escape…a hail storm! (photo by JoAnn Jackson Edgar (TX)

hail damage, JoAnn Jackson Edgar, TX

The saving grace is most hail storms are very fast moving….your task is to move before the storm moves over top of you!

if leaving your locale completely is not an option…..

#3  Hitch up your rig and tow it to one of these possible shelters:

  • Many are free and available in most locations (if you are out in the open on BLM land, sorry…cannot help you other than try to find some trees somewhere to get her under).

Look around your neighborhood or a local town for any of the following:

(Hint—scope these out as you are approaching your overnight campground or stop if there is even a chance you may get a hail storm rolling through!)

  1. The Contractors entrance with large overhang at a LOWES or HOME DEPOT
  2. The outlying lanes of a drive up bank area with large overhang
  3. Local town, etc. park with lots of tall trees, or side road with same. Even getting tucked as far as you can under trees will break the direct fall of many hail stones.
  4. Highway Underpasses are perfect places to hide out.  Just don’t run over the motorcyclist that is also seeking shelter from the storm!
  5. Do It Yourself Car Wash Bays.  these are perfect!  even if you have to let your tow vehicle be exposed, that is what insurance is for and the tow vehicle will be far easier to get fixed than your vintage Avion or AS.
  6. If you are fortunate enough to know someone who owns an airplane hangar-ask if you can bring your trailer into safety there till storm passes.
  7. If you know someone who owns a car dealership, or a large repair garage they may let you bring your rig in for the short time needed till storm passes.
  8. A covered pavilion at an Elks Club or similar, or a local park.  Often these are flush to the ground on cement pads and can be driven on. (careful about permission first!)
  9. Some campgrounds we have seen in AZ ,TX and southwest actually have whole rows that are with covered pavilion style sites (often with solar panels on top)
  10. A local storage facility may have lockable storage garages large enough.  Worth the call to find out and to ask if in a pinch like a storm coming if they would allow you to rent one just for a day in case of emergency. Bird in the hand, some may allow this!
  11. If time permits, you could I guess even get some sheets of thin 4 x 8′ plywood laid atop your rig (throw some guy ropes over top to secure down tie off on cement blocks, etc. on ground along side of rig) as best you can to protect the aluminum skin at least a good percentage of it.  IF you have solar panels up there, this is a must to protect them!
  12. Keep your Avion in an RV Storage Garage (this is what we do) for the piece of mind that she is always protected from all elements when not in use. *this also prolongs the life of awnings, curtains, Eternabond tape on roof, Everbright or similar finish treatments, all sealants around windows, roof vents, skylights, etc too!  We figure its an investment in the long run we would rather pay now…than pay later!
  13. If you are in a location in the USA (or elsewhere around the world) that is prone to hail storms, (tornado’s and hurricanes too) then investing if at all possible in your own secure built shelter/garage for your favorite Avion may be the best option-obviously if you have enough room on your property to do this.

Our RV Storage Garage.  It was specially built for RV and Boat storage.  Check your yellow pages!

2018-01-20 11.04.142018-05-13 09.28.28

If you have any further suggestions or tips please reach out to me so I can add them to this as an update.  By no means do I consider myself an expert….I merely like to pass along what I have learned from others and “pay it forward”.

One life….live it!

Luisa

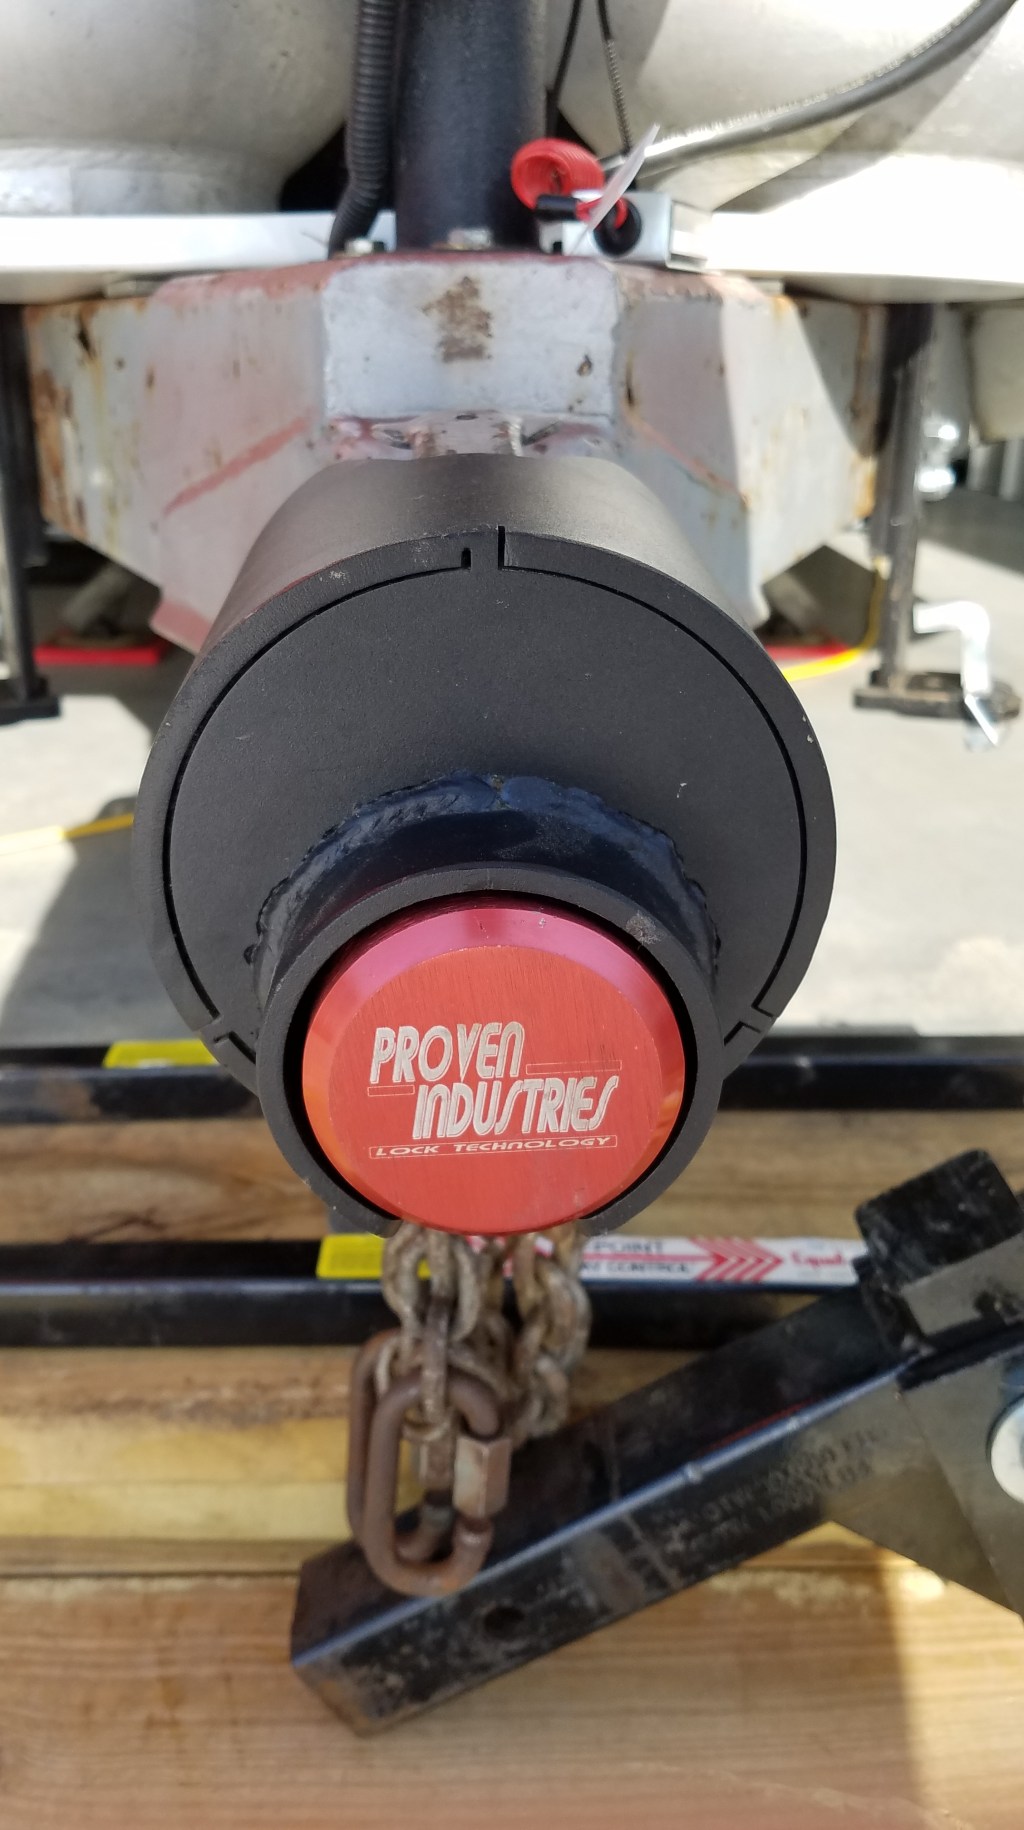
Keeping Your Trailer Safe from Thieves

It’s February and it is a great time to evaluate what equipment we have and for creating a punch list for the coming camping season.

I suspect our fellow camp trailer owners may be doing the same tasks! (Those who garden are also looking at seed catalogs right now too!)

Just this past year, two of our friends have purchased or are in process of purchasing a bumper pull travel trailer for themselves.  While we had truly hoped they were joining the vintage Avion owner family, they decided to purchase more contemporary rigs.  We wish them well and tons of wonderful miles of travels and hope we can camp together in the future!

One of the tips we would like to share with any and all travel trailer owners (motorhome owners can skip this blog entry! LOL) is how to KEEP YOUR TRAILER SAFE FROM THEFT!

I belong to many, many facebook sites and there are a few FB pages that specifically cater to sending up alerts to recent thefts of camp trailers.  It seems that the theft of especially vintage trailers is on the rise in the USA because of their popularity and growing value. If you do not currently subscribe to any of those site, I suggest you at least join one.  Who knows, while you are tooling down the road some day you may be able to help return a stolen rig to its rightful (and very distraught) owners!  You also may learn some valuable tips on how NOT to be premiered in the next new theft alert!

My husband Kevin is notorious for using YouTube and other means to carefully and methodically research RV products.  After much research, we purchased what is known by many in the know as “the most bullet-proof anti-theft hitch lock out there”.  It is made by Proven Industries, a USA based, family business who offer a LIFETIME GUARANTEE on their products. (no, we do not receive any incentive or endorsement perk from them)

Word to the wise!!!!  The traditional hitch lock that simply sends a large bolt-like pin through the hole in your hitch clamp or the kind that fits into just your ball socket with a bale type that goes over your hitch tongues are NOT going to stop thieves.

No matter how big the pin, how great the padlock.  Case in point- we had one of those MasterLock U shaped locks on our hitch two winters ago.  This is the kind that has a ball that fits into the underside of where your hitch ball normally goes then the U shaped lock goes over the top of your hitch tongue.  When we went to get her out of the winter storage garage about 40 min. from our house, we realized we had forgotten the key to the pad lock.  Kevin simply used a hammer and within about 40 seconds had busted the deadbolt U shaped thing off and removed the lock. Literally it took about two swipes of the hammer. Please do not be a statistic!

Proven Industries is the manufacturer of what is considered the Cadillac of the hitch locks and it is made in the USA and the customer service and reputation of the company is stellar.

In going to their site you will see that you must select the right lock for YOUR rig.  All hitch configurations, coupler sizes, etc. are NOT alike!  If in doubt, call them like we did especially for vintage rigs.  They know their product and can direct you to the right fitting product for your needs.

Check out their demo video’s to see the strength and effectiveness of these hitch locks.  Well worth the $$$.

A few other tips we can offer to you for keeping your rig safe are—-

  • Pull down your shades during the day if you are away so that it is not so obvious there is no one home.  Ditto at night if you are away from your trailer.
  • When you are in camp, but maybe somewhere out hiking, at the pool or walked into town, back your tow vehicle right up to or broadside to your locked hitch ball so no one can drive right up to your hitch.
  • Install trailer wheel locks (operate like a scissor system) in between your tires if you have a dual axle system.
  • Put a tire lock on your tow vehicle. (see fellow bloggers Long Long Honeymoon (AS owners)  and the TriMax lock they recommend). On our list to purchase this year!
  • If you get a Proven Industry lock system try to also lock your safety chain ends also into the lock area.
  • Install an aftermarket deadbolt on your door(s).  Factory trailer door knob locks are notoriously poor.  Especially on vintage trailers (many brands) the doors have been known to fly open as you are on the highway- resulting in lots of $$ to repair (that is if it was not left by the side of the road a mangled mess).

Hope you have found this blog article helpful.  We would welcome your suggestions, comments and any tips you have for preventing theft of your trailer.

PS:   We will be doing a post soon on LED light replacements (save money, reduce in cabin heat and save 12 V battery life!) so keep watching and reading!

Mor-Ryde Jack Lift Hook for Avion Travel Trailers

Here is our video on how to use the original Mor-Ryde Bottle Jack Lift Plate.

This original piece of equipment has become quite rare to find because along the way subsequent owners did not know what that somewhat rusted, odd shaped thing was. Lucky for us, our previous owner inherited his trailer from his Uncle who was an old-timer and had owned our trailer for over 20 years taking her to Florida annually and also to Alaska and California.  He knew the value of having this little piece of metal to ensure no damage would be done to the Mor-Ryde suspension in case of a need for a tire change.

We hope this video will assist those who have this equipment, maybe packed way low in one of the storage bins on your trailer.  This coming winter, Kevin plans to get these replicated and we should have them for sale.  Let us know if you are interested and we will follow up with you when availability and pricing becomes known.

We appreciate your comments on the video.  If you like it please give us a thumbs up!


Tow Vehicle….update

It has been a very long winter here in the Southern Adirondacks.  A lot of snow, cold and dreary days.

Last weekend, while riding back in our tow vehicle, our 2005 Chevy Suburban, 1500 Z71 4 x 4 our transmission went on RT 28A south of Vergennes VT–about an hour north of our house.  Thank goodness for AAA RV Plus and we were towed back to our local transmission shop for repairs without a dime out of our pocket.

2017-03-25 16.23.16-1

We love this vehicle and did not hesitate to put the new trany into her…but to a tune of $2800 ouch.  We did beef up a few of the components which did add a couple $100 to the ticket–but worth it when towing our 1973 Avion trailer.

wp-image-1792442491jpg.jpeg


We are so thankful that we were not towing when the transmission went, or that we were not half way down the east coast or mid-west.  It is worth it to put the money into her since she is expected to last us a good  many years and will need to be in prime shape for towing our Pewter Palace this summer and many more.

Kevin and I enjoy watching many of the great Vlogs on YouTube with full timers who have Airstreams (Like “A Streamin’ Life“, “Long Long Honeymoon” and “Less Junk, More Journey” and are learning a lot from them in preparation for the day/year we take our final step to full time RV living.

One thing we noticed is that all or most of them have adopted pet names for their tow vehicles.

I have been trying to come up with a pet name for our Suburban and yesterday when I was hopping in to go to work it hit me when I wasn’t even trying—whammo!

Darth Vader!!  “Darth” for short.

Notice the resemblance?? (pardon the mud on “Darth” I was off-roading a bit today)

darth22017-04-01 17.13.55

So home from ABC Transmissions in South Glens Falls, who by the way were awesome and really stand behind their work.  Its a quality deal, with quality people and we would recommend anyone to go there.  Heck, the owner owns a 2004 LT Suburban…a kissing cousin to ours so he can’t be all that bad right!?? (BTW–he did love our vehicle and loved all of our bells and whistles that comes with the Z71 package…and he said wow, that is a sharp looking vehicle)  We agree…

So parting shot, here is Kevin with Darth and the Pewter Palace!!

wp-image-1792442491jpg.jpeg

Happy Trails!  many more miles to go…..