
On our task list at least every spring (more frequently now that we full time) we do the “roto-rooter” type of pipe clean out on our travel trailer. Whether you only do a week a year, two weeks or two months or more- this is a necessary cleaning project you need to do.
*This obviously needs to be done when camping at a FHU site with decent water quality & pressure and sewer hookup.
EQUIPMENT NEEDED:
Rubber gloves (yes, you are working around waste water)
A reliable fresh water hookup with good pressure
Water Hose (we use one we use for utility/designated grey water hose purposes, not our good fresh water hoses)
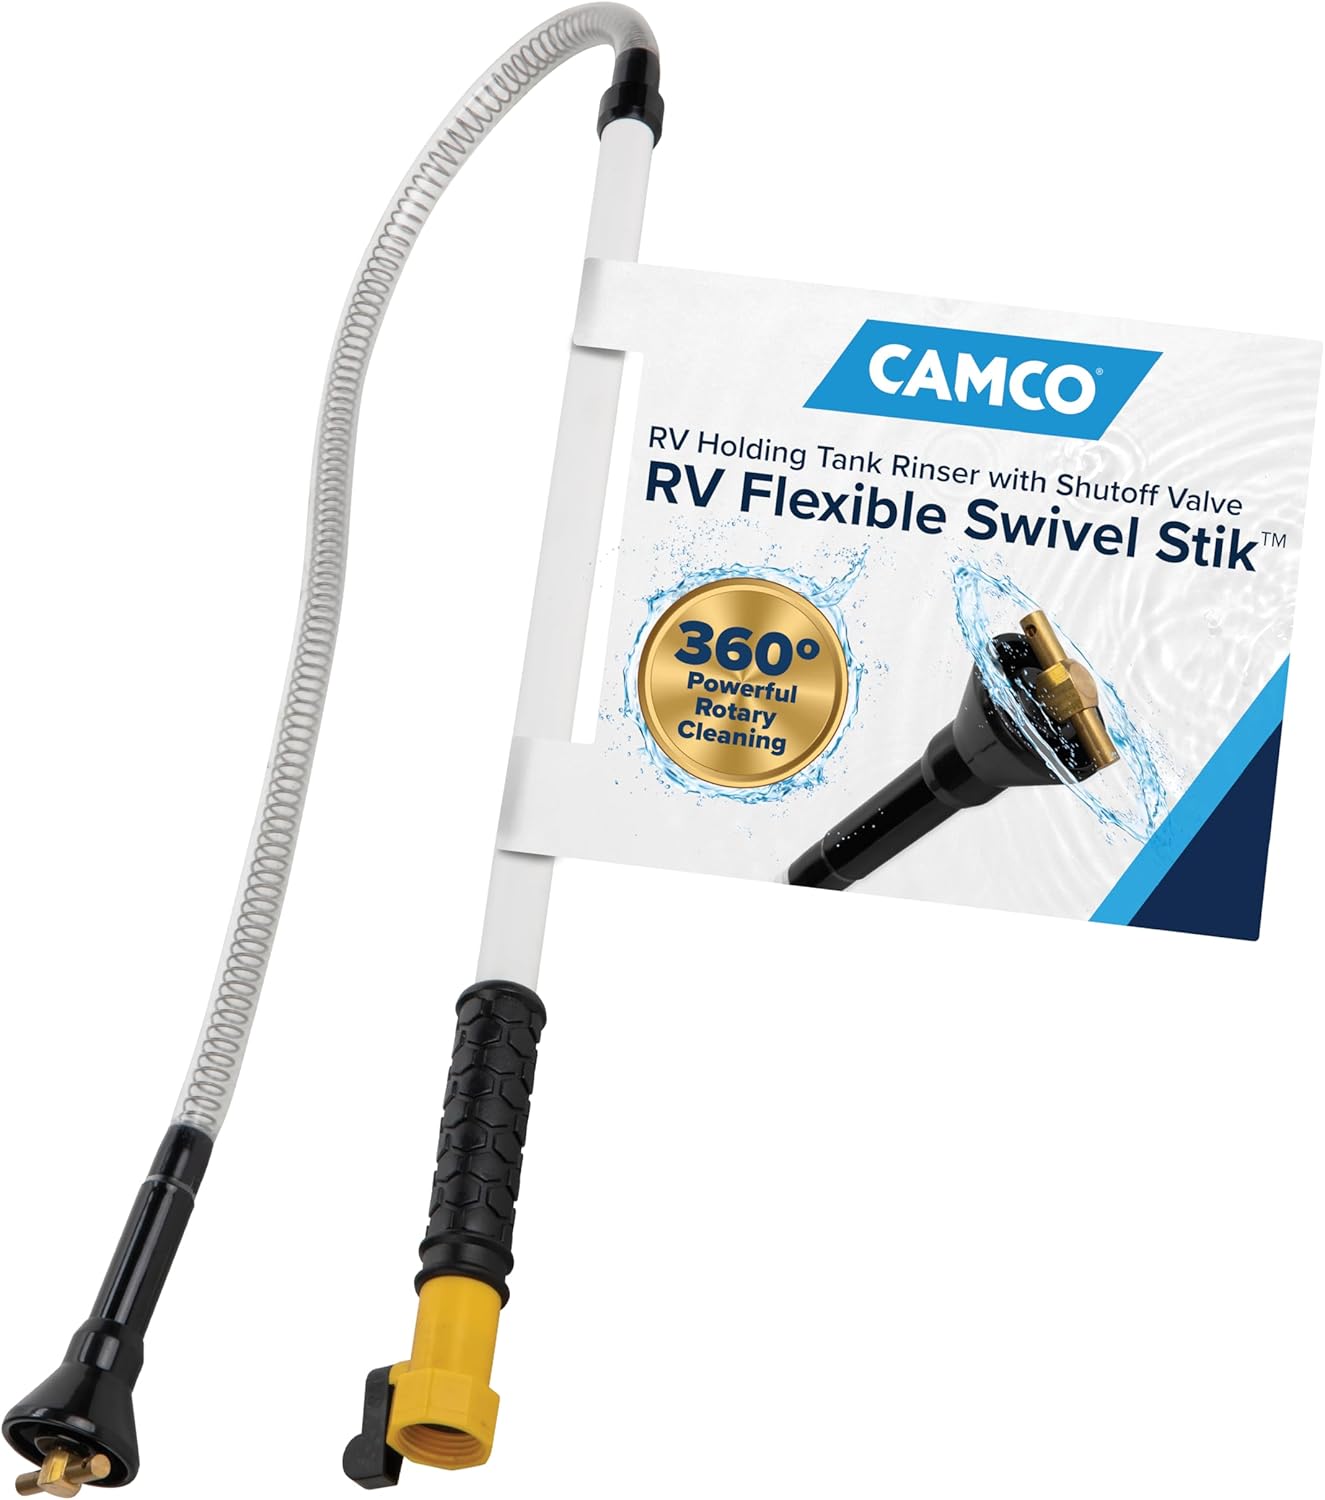
Camco Flexible RV Swivel Stik with agitator hose attachment
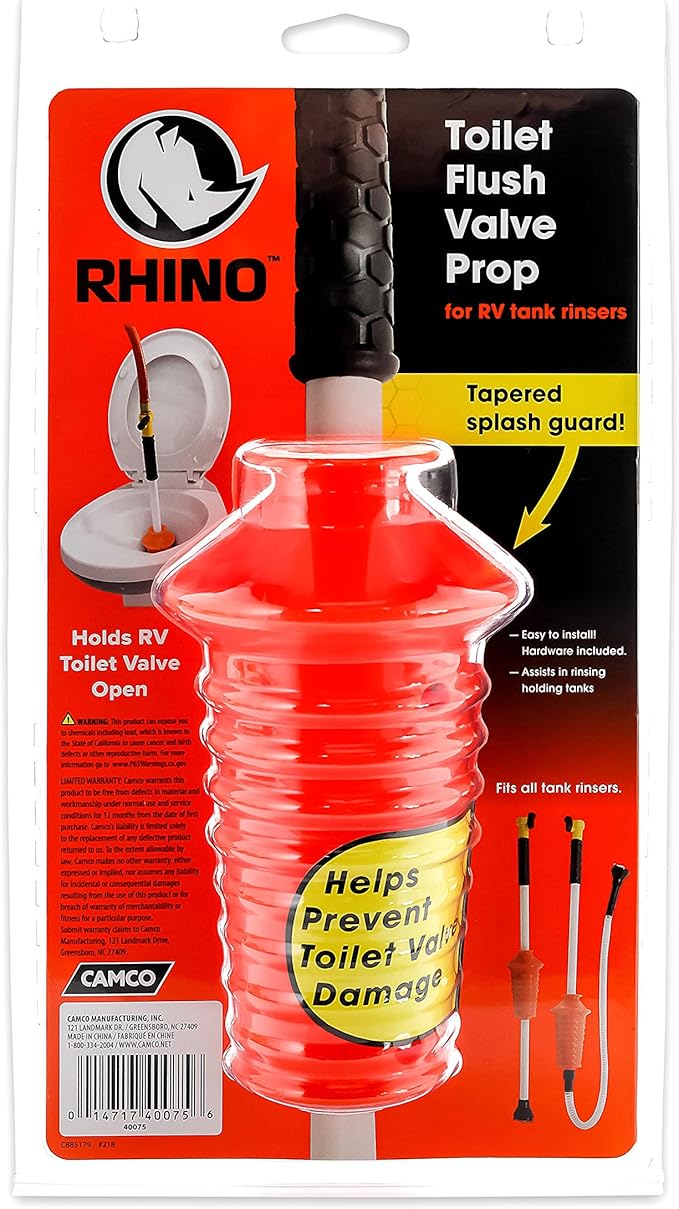
Camco Rhino Toilet Flush Valve Prop Watch Video as Kevin uses in our RV Toilet near the top of the pipe from bowl to black tank.
Camco Water Heater Tank Wand Rinser Watch Video as Kevin uses it in our kitchen sink
PROCESS:
- Hook up your sewer slinky hose firmly to your sewer dump connection at the campground. If not threaded, it is advisable to use a rock or other weight to ensure connection stays seated in place.
- Dump both your black and grey tanks of any existing waste in the holding tanks. (Back flushing not necessary). For the toilet cleaning project be sure to have the black tank valve (Valtera)plunger left open.
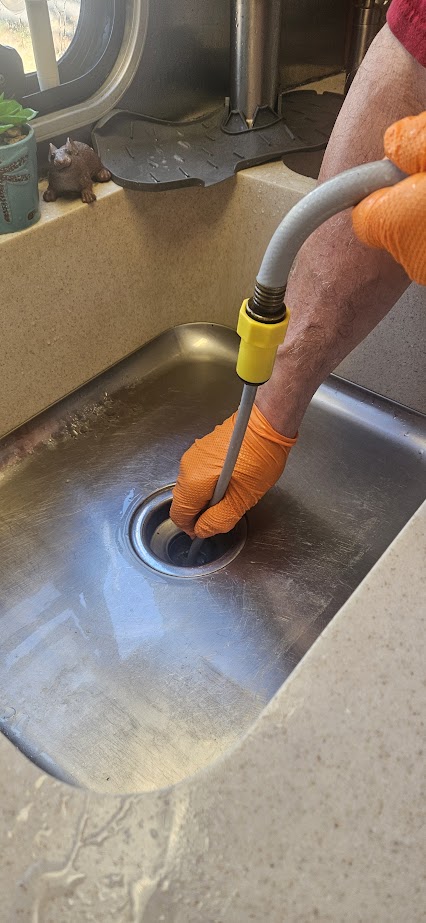
- Remove all counter top items from bathroom and kitchen sink areas. Remove any drain plugs (we removed ours permanently and only use the small screen type that lay into the top of the drains- they make sizes for small sinks and larger shower sizes).
- Carefully remove window screen(s) from the window(s), needed to enable you to feed your wand and hose length needed through from the outside. We use our mid-bath bathroom window and a long enough grey water hose to also reach our front kitchen.
- Hook the Camco swivel wand to hose end. Be sure flipper switch on wand handle is “closed”!
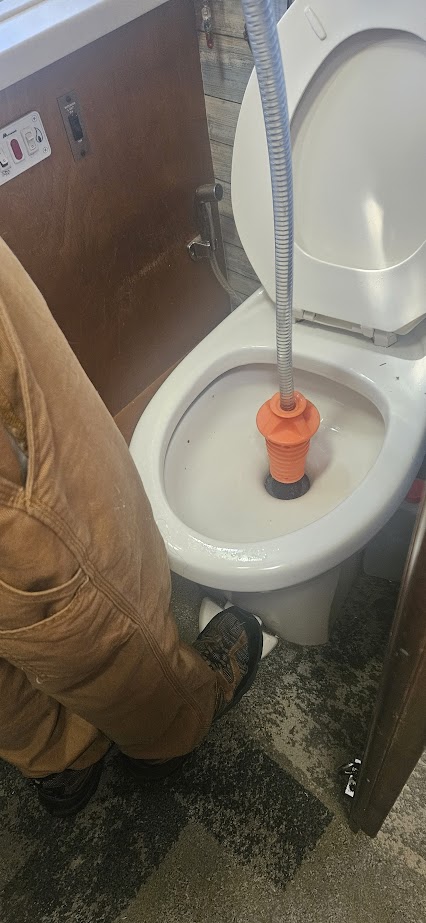
- Slide the Rhino Toilet Flush Valve Prop and screw closed onto the hose section so that narrow end is facing the swivel agitator end. The Valve Prop works well to keep water/debris from splashing up and through toilet bowl opening and also allows for better control of the tank and toilet bowl pipe cleaning areas. It also keeps the sliding trap flap at the bottom of your bowl open for you so you do not have to constantly depress the foot pedal or slide open.
- Place wand end into toilet bowl. Turn on water at city water source pedestal.
- Place one foot on the toilet foot pedal as if to flush (or with one hand pull lever as if to flush). While doing this put the tip of the wand down as far as it can go and until the orange plastic Toilet Flush Valve Prop seats into the toilet hole.
- HOLD ONTO THE WAND FIRMLY! Flip the lever on handle to “open” to allow water to flow. The wand end has a metal spinning outlet that spins around at a high rate of speed and force allowing water to forcefully clean all surface areas.
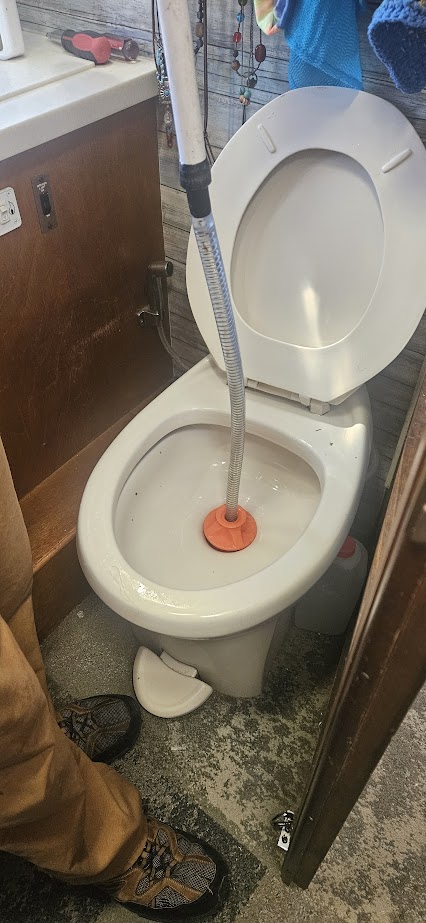
- Once you feel the lower black tank area has been sufficiently cleaned, carefully retract the wand end towards you to where it now is rinsing the straight pipe from the toilet bowl into the black tank. Go up and down at least sevetal times along the length of that pipe. It is good to pull the wand end with swirling water up and down a bit to get all areas of this pipe. Often, this is where TP will build up. We normally doing this tank and pipe rinsing for about 5 minutes total. IF you have another person to help, have them watch the clear end of your sewer pipe hook up to see if foul matter is still coming thru. If water looks clear of debris, you are done with the toilet part of the project. BE CAREFUL NOT TO ALLOW THE SPINNING WAND TIP TO COME OUT OF THE TOILET PIPE HOLE- or you and your entire bathroom will have a shower!
- Once finished with the toilet-Turn off the water at the city water source pedestal outside!
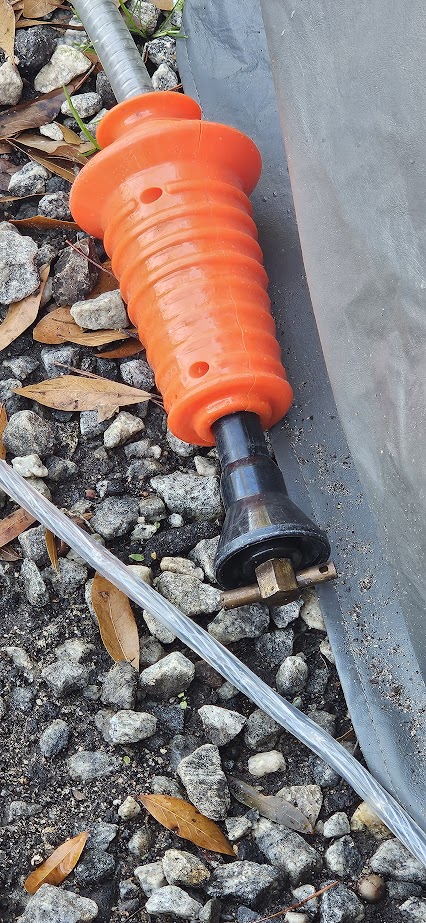
- Now proceed to switch out the rotating agitator end of the wand with the slightly bent hard plastic tube attachment (Camco Water Heater Tank Rinser attachment) that comes separately. This is the one you will use for all shower drain and sinks AS WELL AS when you do your routine Hot water heater maintenance cleaning.
- Close your black tank plunger discharge valve and now open your grey water tank dump valve.
- Making sure the wand handle shutoff lever is closed. Turn back on the hose at the city water inlet pedestal. Check to be sure you have your grey water dump valve open now.
- Place the wand tip into the bathroom sink drain at least a few inches down. Hold onto the wand handle firmly!! and then turn on the lever at the handle to allow water to flow.
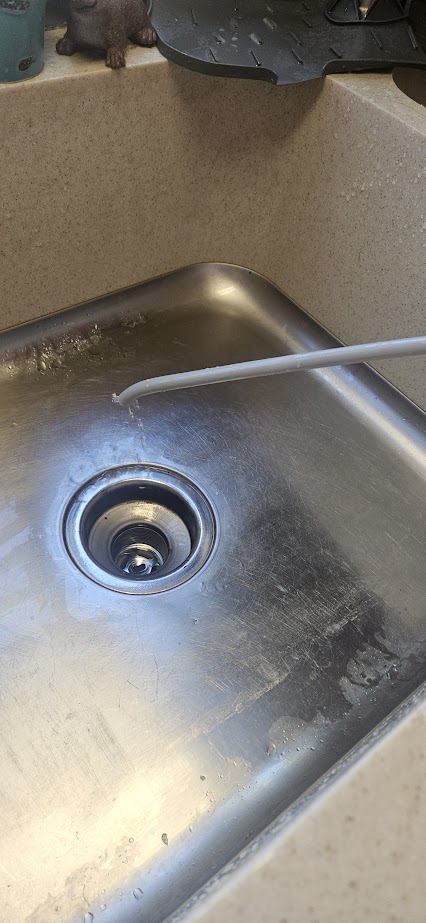
- Again, bringing the wand tip up and down in the sink drain pipe allow it to go as far down as possible without forcing it against bends in the plumbing. Be sure your grey water dump valve is open! We allow the water to flow through sink and shower drains and pipes for at least 3 to 5 minutes each.
- Now repeat same process for the kitchen sink drain(s).
SEE BELOW FOR PRODUCT SOURCES & ADDITIONAL TIPS!
Tips:
-This spring cleaning can be done by one person but having a spotter to watch to see if debris is still flowing out helps!
-Using a clear pipe at both your valve area and the elbow going into the sewer dump hole helps to see particles and Gauge more easily if water is running completely clear.
-it is NOT recommended to use any type of harsh chemical drain/grease solvents in RV plumbing systems
-to reduce every day grease build up read our blog article with great tips here!
HELPFUL VIDEOS FROM CAMCO & OTHERS:
VIDEO: Using the Camco Swivel Stick. This video shows both the straight stick and one with flexible hose type. We prefer the flexible hose style.
VIDEO: Attaching and using the Toilet Flush Valve Prop. This add on piece gets installed by you onto the swivel stick product above. It holds your toilet bowl trap open and prevents back splash of nasty stuff from the pipes and black tank!
VIDEO: Attaching and using the Camco Water Heater Tank Rinser. This video shows how to use as part of your water heater regular maintenance. We ALSO use it as shown in our video above to get down into our bathroom and kitchen sinks.
We hope this post has helped you in providing good RV maintenance projects! It is ALWAYS far better to be proactive with maintenance than REACTIVE with costly RV repairs!
NOTE: We DO have a shared list on our Amazon account that shows these and many more products we like and have gotten through Amazon. You can find that on our RESOURCES & LINKS page of our website. Many are available at any decent RV supply store as well. We DO NOT derive any income or complimentary items if you purchase these items. We currently do not have our own “amazon store”. We are not paid or compensated in any way to promote products.
Safe travels- Happy Camping! Please LIKE this post if you have found it helpful–that helps other RV owners find it more easily!
Kevin & Luise


Leave a comment