It’s that time of year that I am beginning to dread more and more each year….winter is coming! It is marked by falling leaves, the need to start our car for a few minutes to “burn” off the frost from the windshield and now this weekend….the proverbial need to ready our Pewter Palace for the coming of the winter hibernation.

Eventually, when we retire we will be doing the “Chasing 70” dance- which for those in the know..is traveling to anywhere and everywhere that it is in the ranges of the 70-78 degree weather around the USA. Sure we have some specific places picked out like AZ (photo to right)

and western CA along the Colorado River area and maybe an occasional trip to Fort Wilderness Campground in Orlando for a Disney Holiday fix—but for the most part our map is open to ideas for where to spend our winter months from Nov 1 to May 1 (at least!)
But for now…it is a process of putting our Avion snug in “the carriage barn” ( our rented RV storage unit) which keeps her high and dry, away from the elements of snow, ice, and sleet. BTW for those of you who are contemplating an aluminum beauty, be it an Avion or our cousin the Airstream—please know that it is NOT recommended that these trailers be covered with the traditional RV cover sold at many camping supply and RV dealerships. The covers can actually mar your aluminum finish and wreak havoc with your rig. So owners basically have a few options: they are “chase 70, put her into a garage/RV storage barn, or at minimum put your trailer under a strongly built pavilion/roof that will keep snow off the rig, but is open on the sides.
NOTE: A simple search on Google will net you all sorts of “handy lists” in PDF etc that you can download and print off to do your check list to button up your rig for winter. We recommend you check those out. Perhaps even some of our fav bloggers may have some!

So, the Pewter Palace is being prepped for winter this weekend and over this coming week. Here are the basic steps we do and then some of my videos will go into a little more details both inside and out.
- Shut off ByPass to the Hot Water Heater. Lift up the “blow off valve” and get a 5-gal pail and put underneath and unscrew the plug and let hot water heater completely drain out.
- Go to the city water and using my air chuck threaded for the water line hook that up. Use an, oil-less portable air compressor to blow all the water out of the lines. Kevin set’s it at 30lbs of pressure to blow out the water from all the lines.
- Open all faucets and keep them open
- Push the pedal and the spray nozzle in the toilet, and also shower head to be sure all water is drained out completely.
- Pour RV (pink) antifreeze into toilet bowl , and all other drains including the shower, kitchen and bath sinks and then be sure to pour at least a few inches of antifreeze into the toilet bowl when closed and check the bowl for evaporation over the winter as you want that liquid to be in the bowl to keep the seals moist.
- We leave all the faucets open all winter, all low drains open, holding tanks are drained.
- Outside, he gets is 2 foot extension for the sewer line and his yucky 5-gal pail and he pulls the black line let it drain out any remaining. Shut and then do grey water whatever may be remaining. Take this and dump it. He takes a little bottle of water and bleach solution to clean the bucket and then store.
- Then disconnect the two foot sewer host, spray off with bleach and water solution and let dry.
- Put on a winter cap on to the sewer connect. (he has drilled a few small holes in it for ventilation but small enough that no critters can get in). It is suggested to spray the black and grey sewer valves and push in and out a few times to lubricate. We keep our valves out and open to allow air flow. Our tanks don’t stink at this point! (also as side note, we highly recommend UNIQUE brand RV Digester. Check out all about that here in one of our past blog posts: Its All About the BLACK TANK!
MOVING INSIDE:
Inside is a bit more my domain for winter-ization. Its become pretty routine now and here is what I do in some basic steps:
- Remove all liquid products (again, our garage is great and secure but NOT heated!) from under the kitchen sink, bathroom sink and also the bathroom closet. Use them over the winter at home or place in storage closet at home where they can hibernate too till spring!
- Remove all food stuffs, spices and anything remotely food like from the rig. Anything that could even remotely explode with freezing temps, or whose scent might be attractive to starving varmints.
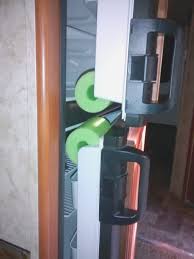
- Wipe down the inside of the refrigerator AND freezer area with a mild cleanser that does include either bleach or at least an antibacterial cleaning solution to ensure you have a squeaky clean fridge. Use some sort of block/holder to keep the doors open for the winter storage time. Do not let them close! Pool noodles work well. We already had one of the hard plastic ones from Camping World so use that. I actually think the pool noodles are better, that hard plastic thing is easy to knock out by accident!


- Strip beds, clean all bed linens and place all sheets and blankets from beds into scented (we use Febreeze scented lavender) draw string kitchen trash bags and label if needed.
- Lift bed mattresses and dinette seat cushions up on their side to allow air flow in and around them thereby reducing chances of any mold and also critters getting more room to hibernate in darkness. We store the scented bagged linens on wood part of bunks next to the mattresses.
Here is a brief video to show this part of the winter storage technique.
4. I then take BOUNCE brand fully scented (knock off brands do not work…we have tried them!) and I place at least two in each cupboard including under sinks, in pantry area, in clothing and bath closets, around toilet area. I also place them in and around all the mattresses, bagged linens, dinette cushions, etc. There are varying reports of these working but I know from over 7 years of experience they have worked for us. We also use them for decades when we are reenacting camping on our tent floor cloth and under our cots and bedding to keep insects, mosquitoes, beetles, spiders, snakes etc out of our tent…and it definitely works for that too!


5. In the bathroom closet I pay extra attention (and more Bounce sheets) because this is where some of our exterior systems/hoses are coming in to the rig. Including where our power box is on outside and near where the sewer intakes, etc are). Here you will see where not only have I put Bounce sheets all over the floor and shelves but I have also hung a store bought (from Vermont Country Store) Mouse deterrent herbal bag. It says it lasts a few months. I have not used this specific brand but it says that it is good for nearly 100 sq feet–so with this cabinet shut it will more than do this bathroom area!
We do not use any snatch & kill traps because the whole idea is that we do not want them even coming in…(I do not want a rotting dead mouse inside over 5 months!) We DO have some of those black box traps for mice and rats on the cement floor in the garage with poison in them. We have seen evidence of some nibbles eating the poison but no dead carcasses in the traps themselves- I guess word has spread that our “restaurant” serves bad food! LOL

6. Lastly, a few other places on the outside to put Bounce sheets. We put a few in ALL of our exterior storage bins and also most definitely in our exterior sewer area, power box and also hot water heater compartment area. Again, these are all areas where there is a potential for a varmint to shimmy through even the smallest of openings-they only need the size of a penny or dime to get through!
Last but not least, give your rig a really good vacuuming and wipe down all counter tops, table tops, bath fixtures etc. I use Clorox Cleaning Cloths.
Some questions people ask…
Do you keep your “camping wardrobe” in the closets? We do but again, there are Bounce sheets in all closet floors and shelves. We also store smaller clothing items in plastic snap lid bins all the time above our bunks. I have put Bounce sheets tucked in between totes and on lids here too.
Do you keep your pots and pans, cookie sheets, and silverware onboard in winter? Yes, and we have always done this with no problem. Obviously in spring if we see any sign of mouse droppings or nesting, then everything will get a full sterilization in our dishwasher at home, but otherwise just a good wipe down does the trick each spring.
Do we keep toilet paper and paper towels under RV sink cabinets. NO! we do not. These items provide a huge attraction to varmints looking for nesting and bedding materials. We take those paper products home and use them up over winter in our apartment.
Do we close our blinds and curtains. NO we do not. In fact, those of you who may have the day/night pull down fabric type shades your manufacturer may caution you not to do keep them down all the time. It releases the factory pleating too much. But we keep our curtains open during winter too. Because our garage is dark, there is also no need for us to shelter our interior cushions, and linens from sunlight by having our curtains closed.
How important is it to have your tires up on board or something and not in contact with the cold driveway or dirt? VERY! For the best life and safety of your tires, please drive up on at least 1-2 inch thick boards. We actually drive our rig up on those heavy industrial rubber mats that can be purchased at Lowes or HD. They have holes in them, which allows for ventilation but also as Kevin notes, rubber to rubber is the best of all worlds. You can see a little of the black mat in our video clip above. We also keep these mats down all year because they make a great way for us to know exactly where the RV rear should be when backing in the trailer after a trip. No guess work for me!
This year we are also going to be laying some LED warm white rope lights on under our rig to keep on 24/7. We learned from Courtney & Steve of AStreaminLife.com that they have found that by putting some sort of illumination under their rig they have been spared from any mice infestations–even when camping in boondocking fields. So since we do pay $15 extra per month for electricity in our storage garage, we will put these low voltage rope lights on. We just purchased two spools in the lighting section of Lowes today (better quality than Xmas section). These are the kind and quality that store owners may purchase to go around their display windows, etc. They were $38 for a 48 foot length. We bought two so we can go just inside both wheels and full length and width of the rig with no problem. We will use them on extended camping stays with power too. For boondocking we will get four solar spot lights (tip from Steve and Courtney too!) so we still will have lights to ward off critters. You do not want critters in your rig…ever! Especially when it becomes your full time home. See some yucky videos from both AStreaminLife and from LoLoHo bloggers on their issues with mice in their Airstreams. No fun!
That’s all we have time to share for now. We will stop in and visit the Pewter Palace a few times over the winter months to check on her.
Safe Travels—–One Life….LIVE IT!
Kevin and Luisa Sherman


Leave a comment