We made the decision in 2021 to upgrade from our 2 wet cell batteries to six (6) 12V LiFePO4 Deep Cycle 100 amp Battleborn Battery bank system. Part of this decision was an excellent promotion Battleborn (Dragonfly Energy in NV) was running at the time which afforded us essentially to buy 4 batteries and get 2 free. PLUS as Escapee Club members we received an additional 15% off at that time!! Here is just a short slide show sample of some of our steps in this project.


IN THIS ARTICLE:
Why make the change?
- Our house batteries were on their last legs after only owning the trailer for 1 yr. The batteries were 5-6 years old. One night- while boondocking, we forgot to unplug our 7-way plug from our truck. We woke up to a dead truck battery in a very remote NPS campground with no power. This pushed us over. We only had 70 amps of useable power with our current battery system.
- We knew we were going to be going full time RVing in 2023 and wanted more off-grid capacity
- We knew we were going to be installing Kodiak Hydraulic Disc Brakes in the future and the front exterior battery box was to hold the required hydraulic disc brake pump
- We wanted to be able to do multiple days off-grid with no issues. We now can easily go 5-7 days without electric hookup and can recharge our batteries with our Honda 2200 Generator easily and efficiently.
- We could save $$ by selecting dry camping versus needing hookup sites even at established campgrounds.
- Using an inverter/charger system with Lithium batteries all of our 110/120 outlets in the trailer would now work.
- Getting a clearer, and easy way to monitor our battery bank levels and energy use and supply.
- NOTE- we chose NOT to install solar on our roof. Why? weight, added expense, we like to camp in the woods (shade), we have a relatively low energy use profile.
How we made the decisions about what equipment we needed/wanted:
LOTS of research! Kevin scours YouTube, the Internet and speaks to reps from companies to gather tons of research before we make any big jump decisions like this. Some of the key influencers we used to get our information were the following:
- www.Explorist.life Nate Yarbrough and his team are leaders in this field and have an outstanding reputation to help DIYers. This is an excellent website for Lithium battery research. They are not Rvers hawking products- this month- because of being sponsored by a company (this is important!). Here is the specific video that we used to do a lot of our own training on how to do the install because it was done in an Airstream (closest to an Avion video we could find at the time) Here is a link to the video. We also ordered their wiring plans for this Airstream project and used them (minus the solar set up) to guide us exactly how we needed to run our wiring from our existing power fuse box and how to connect all the components of our new set up (we will list all of our components further on in this article)
- Will Prowse, Electrical Engineer: is another YouTuber and online resource person who offers excellent reviews of various Lithium batteries. He is a certified electrical engineer who tears apart batteries, tests them for quality and many other components and offers his unbiased, unsponsored reviews. Check him out here at www.Mobile-Solarpower.com and on YouTube
WHY Battleborn Batteries (A.K.A Dragonfly Energy)?
DIY INSTALL HELP: Their YouTube videos are excellent and cover a wide range of products, set up “how to’s”, trouble shooting and more. Here is just one of the videos we found helpful which was how to set up our Victron Multi-Plus 12/3000 Inverter/Charger. We also liked that we could buy nearly ALL of the major components we needed from Battleborn directly. They did a 1 hour consultation phone call with us initially to go over what system we currently had, our wiring, our electronic needs like cell phone charging, our appliances, our typical use of things like lights, tv’s, hot water heater use, microwaves (we don’t have one by choice) and other energy needs. They helped us determine the best system for us and sent us a detailed inventory priced out list of equipment.
Here is a PDF that we created and sent to BB of our energy draws and needs at the time. You should plan to create your own personal list before starting this process too- use ours as a sample of the info needed! PDF Link

COST & QUALITY: As mentioned above, in 2021 Battleborn Batteries (rest of article referred to as BB) were offering a great sale, we saved $2000. (We will provide a complete inventory of our purchase later in this article) Plus, at the time very few companies were producing these batteries for consumer use and BB had already been touted for their high quality and they are assembled and tested in the USA. They are a USA company based in Carson City, NV. Today (2024) there are more options for where to purchase LiFePO4 batteries- but we emphasize our caution about potentially lower quality imports. We firmly believe you get what you pay for in the end.
CUSTOMER SERVICE & ONGOING SUPPORT: perhaps of all the reasons why we are firmly behind using Battleborn Batteries is because over the past 3 years they have consistently provided us with outstanding, over the top customer support and service. From the get go- when we called them (sometimes needed to leave a message for a call back) they responded within 24 hours-even on weekends and took tons of time over the phone and even some video calls to step us through some of our install questions. Then the big one…..when we were in TOK ALASKA….thousands of miles from anywhere, our system was failing to continue to recharge itself. Our Battleborn Support helper, Hugh (yes, we are on a first name basis now) aided us to troubleshoot to understand that it was actually our Hughes Watchdog that was the real culprit. However, in this process, Hugh also went inside our BB system remotely and realized he could optimize our system further and did so right from his desk in NV to our system using our Victron App and his remote system access abilities. This remote phone call in the middle of Alaska was 2.5 hours of technical support at NO cost to us. BB does not even make the Victron systems (they are made by a Dutch company) but BB/Dragonfly Energy sells and supports them. They know them inside and out and can assist customers directly who buy the Victron and other components from them (BB).. They can set up the entire system custom for you before they ship it to you as well. Try this from a battery made and sold from China!! This would not be the first time that Hugh has assisted us with outstanding customer support when we had questions or needed guidance.
DIY Versus CONTRACTOR INSTALL? Making that decision
We are not going to tell you that this was an easy, weekend project. We had months of research, weeks of ordering/shipping of needed supplies like wiring, connectors, etc. in addition to our initial BB battery and major component order. We had to purchase specific tools and we had to deal with our Avion trailer being un-usable for long swaths of time since the beds were unusable, we had a work table set up in our living room and we had to go with power shut off regularly. We estimate that the entire project took us about 2 months of fall and winter weekends (we were still working full time).
We had considered having the system done by a contractor however, in 2021 there were few and far between doing this into RVs much less VINTAGE RV’s. (We were perhaps cutting edge on that aspect!) ADD onto that this was during the COVID pandemic!! In the end, cost and simply no installers available in or even near upstate NY made the decision for us. As an example, we had one quote of over $14,800 for an install and he would not use our already purchased BB batteries or components. We had another who would use our BB batteries (at that time sitting on the shelf in our RV garage) but would charge us over $7,000 for labor. Neither would come to us, we would have to tow our trailer half way across the US to their shop, spend money on a hotel for at least a week for them to do the install or leave it there and drive back home again. This was not in our game plan. So in the end, we did the entire project, the two of us as a DIY with the ONE EXCEPTION of we did hire a local electrical contractor to do a final inspect and installed a 20amp separate service for us in the Avion (that’s another blog post!) We estimate our total materials cost to be $8K including tools. This does NOT include the costs for the DC to DC charging components.
Ultimately, we know our system inside and out. We know it was installed correctly and we know we can troubleshoot and do 99% of our repairs if needed. And….we learned A Lot!
OUR SYSTEM COMPONENTS:

As mentioned above, we used a list from Explorist.life for much of the specs for our wiring, coupler and hardware needs. See his site for this as some of his resources/vendors we used may have changed over time.
Caution! The list below is probably not complete- but it is what we could find in our files 3 years later! It is only meant to give our readers and IDEA of what you will need. Your needs, based on your set up may very well be different. We included names of vendors as resources only and have no vested interest in promoting any one vendor or resource over another.
From Battleborn Batteries (Dragonfly Energy)**
- (6) BB10012 Battleborn 12V 100 Ah Batteries
- (1) PMP123021102 – Victron Multi-plus 12/3000/120-50 120v VE Bus
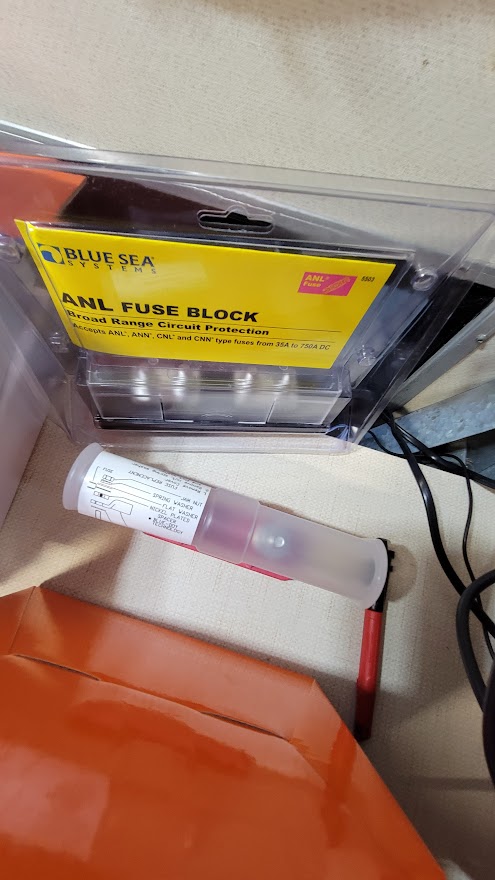
- (1) ANL300KIT – 300A ANL Fuse + Fuse Holder
- (1) BPP900450100 – Cerbo GX
- (1) BPP900455050 – GX Touch 50
- (1) RJ45UTP UTP Cable, 10 meter
- (1) VE Direct Cable, 10 meter
- (1) BAM030712000 – Victron BMV-712 Battery Monitor
- (1) BBW12120 – Sterling Power Battery to Battery Waterproof Charger 12v input to 12v output up to 120amps
- (3) 1/OAWGCABLE – 1FT-1/OAWG Inverter/Charger Cables
- (2) 1/OAWGCABLE – 2FT- 1/OAWG Inverter/Charger Cables
- **important note- this purchase was in 2021, component # may have changed, or upgraded. Please do not use our list without conferring with Battleborn first! Your needs may be different than ours was!
From BatteryCablesUSA.com link
- (90 ft) S1/0BK 1/0 Gauge 0 AWG Extreme Battery Cable Black- by the foot
- (90 ft) S1/0RD 1/0 GUAGE 0 AWG Extreme Battery Cable Red- by the foot
From WireCare.com link
- (1) 97-99-396 10 AWG Non-insulated Wire End Ferrule (2 packs of 10)
From EclipseTools.com link
- (1) # 300-103 Lunar Series Die Set for Wire Ferrules AWG 10-6
- (1) # 300-097 Lunar Series Die Set for Wire Ferrules AWG 22-12
From TEMCO.COM link
- 4/0 Red Wire Cable
- 4/0 Black Wire Cable
- 2/0 Red Wire Cable
- 2/0 Black Wire Cable
From Amazon.com link
- 4/0 x 5/16″ Wire Lugs
- 400 Amp MEGA fuse
- 3/4″ Red Heat Shrink tubing
- 3/4″ Black Heat Shrink tubing
- 400 amp ANL Fuse
- Heavy Duty ANL Fuse Holder
- Master Disconnect
- 6 AWG Ferrules
- 1/2″ Red Heat Shrink
- 1/2″ Black Heat Shrink
- 100 Amp MEGA Fuse
- 6 AWG Triplex Wire
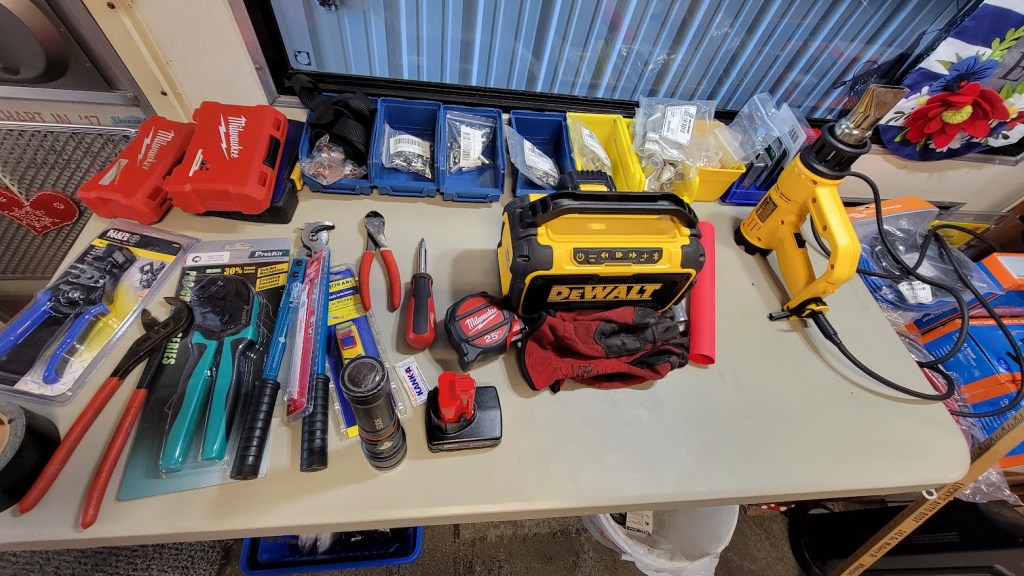
Other tools we bought specific for this project include the following that may be purchased online or at local big box stores.
- Hydraulic Crimper Tool
- 14″ heavy duty wire cutters for 4 gauge wire
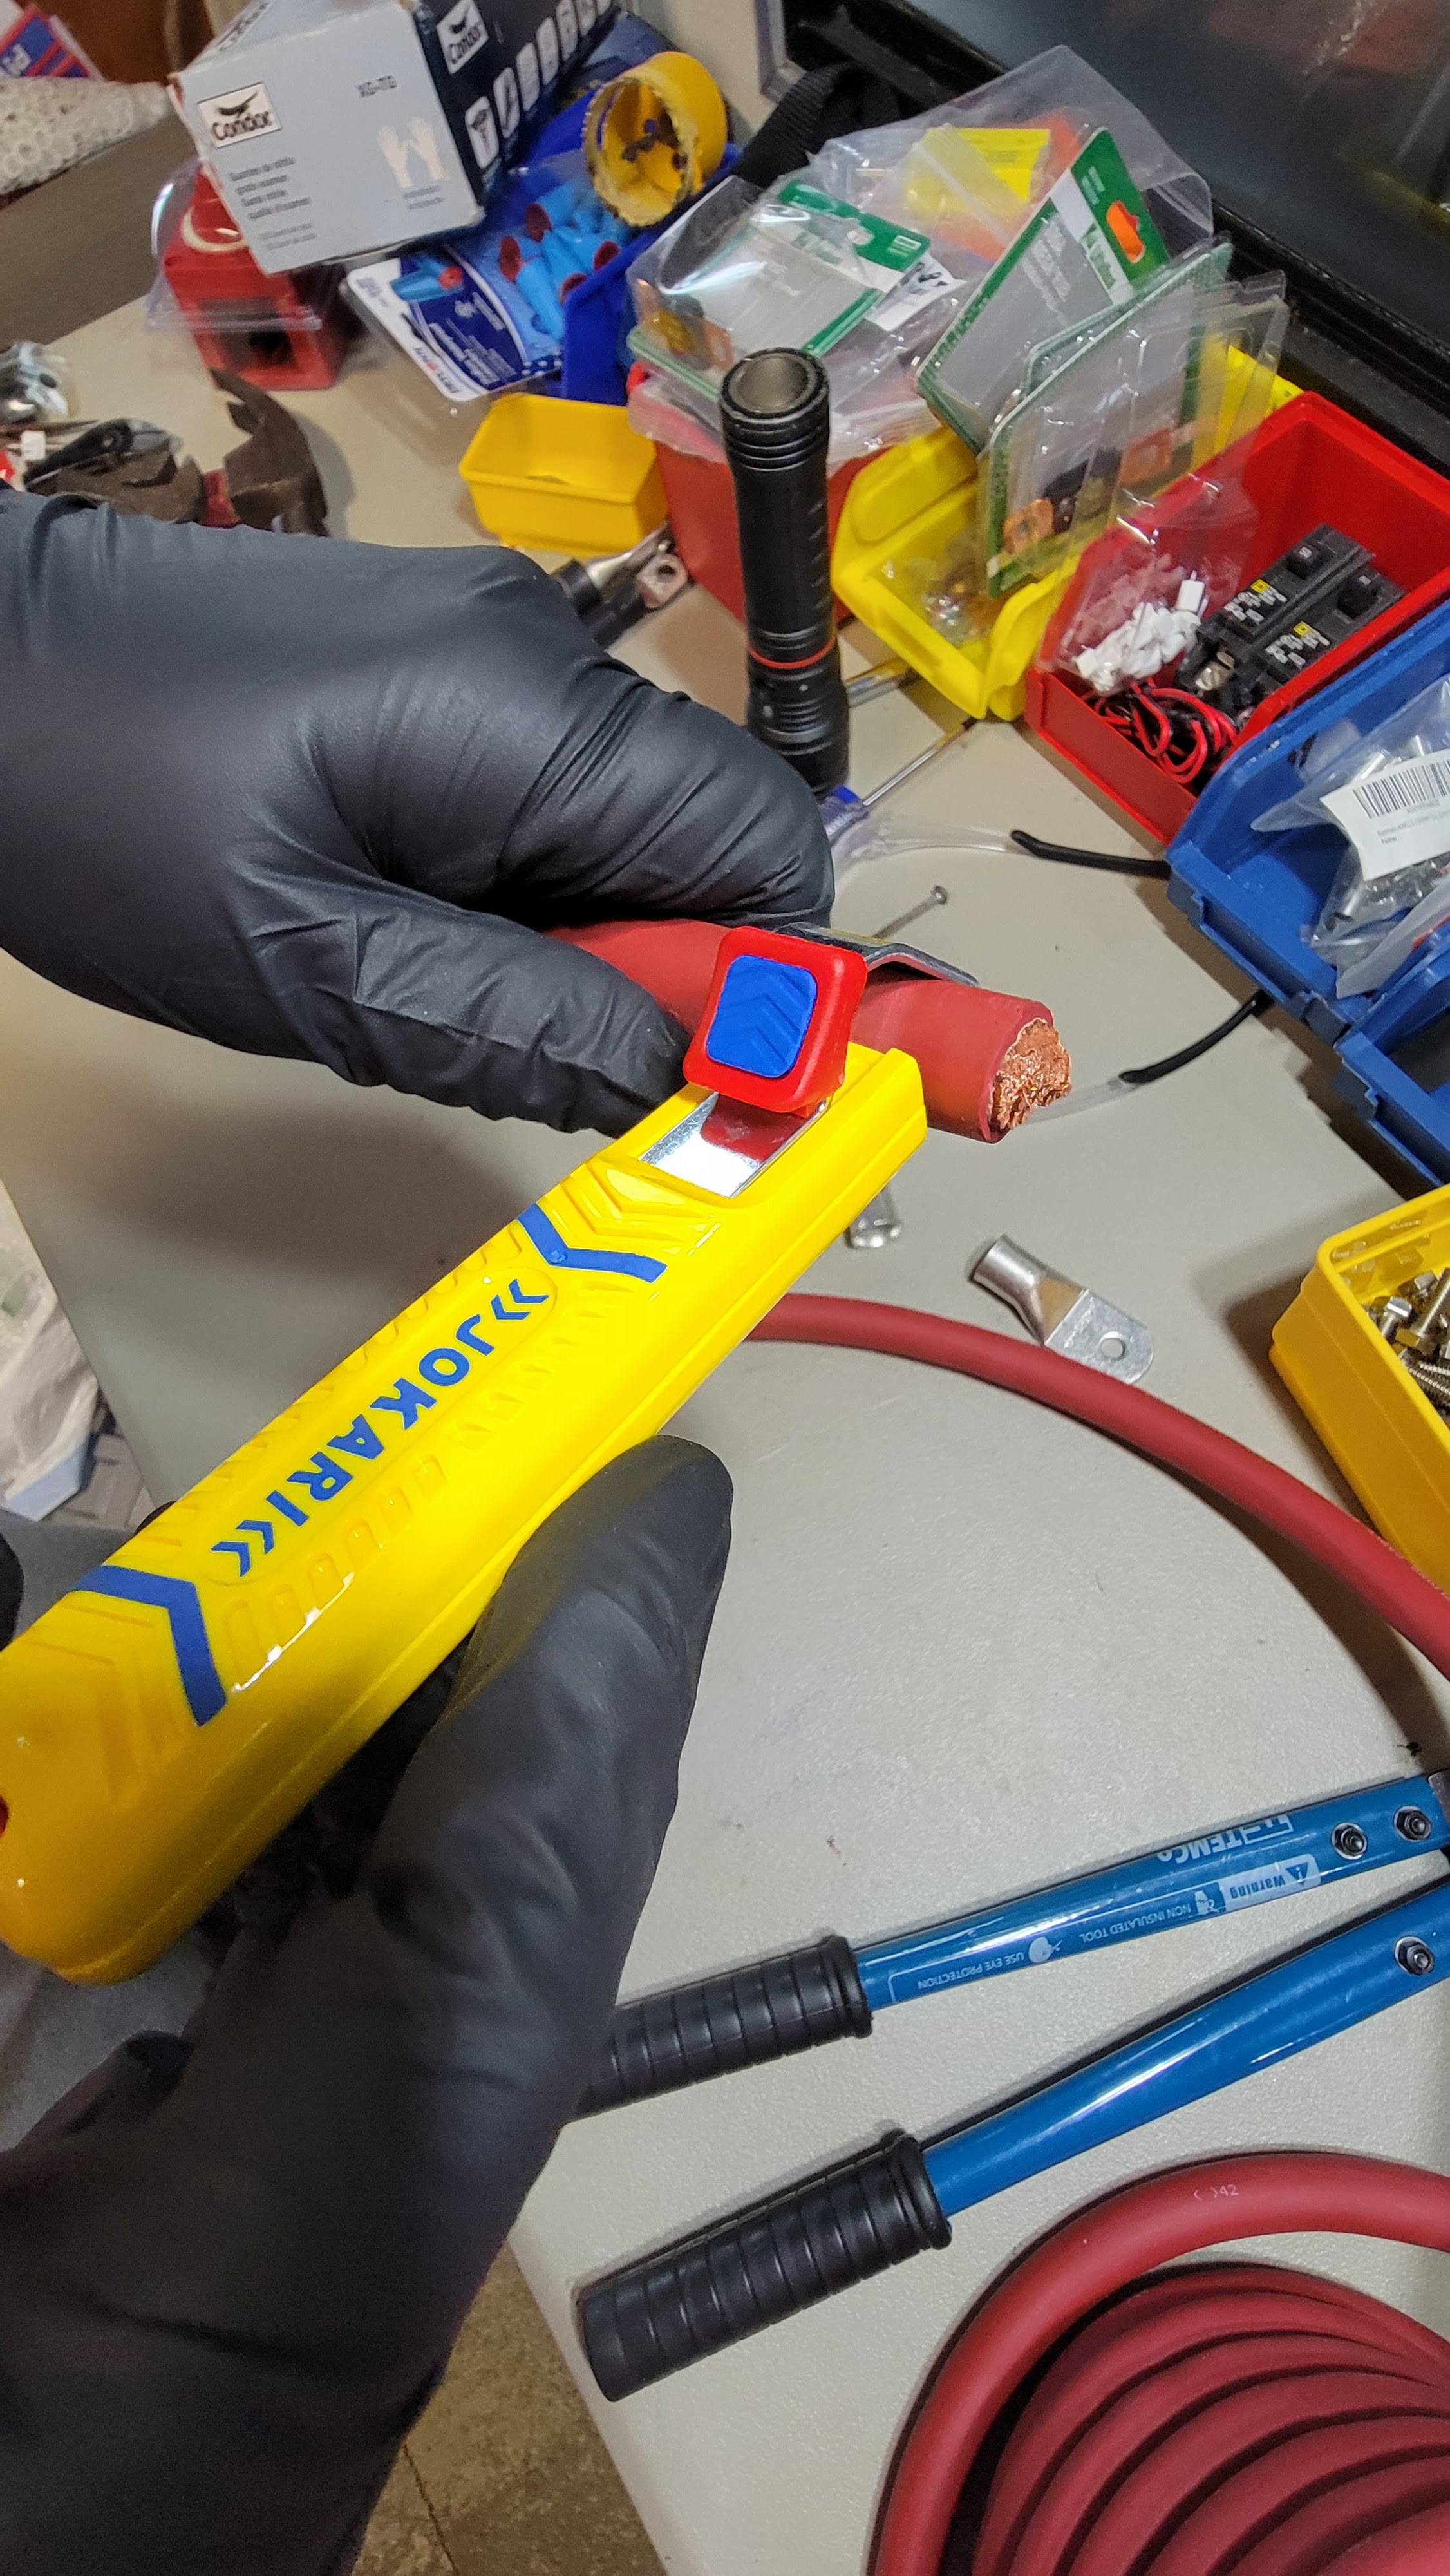
- Commercial/ high end wire strippers
- Torque Screw handle for electrical
- and a bunch of other miscellaneous bits and pieces
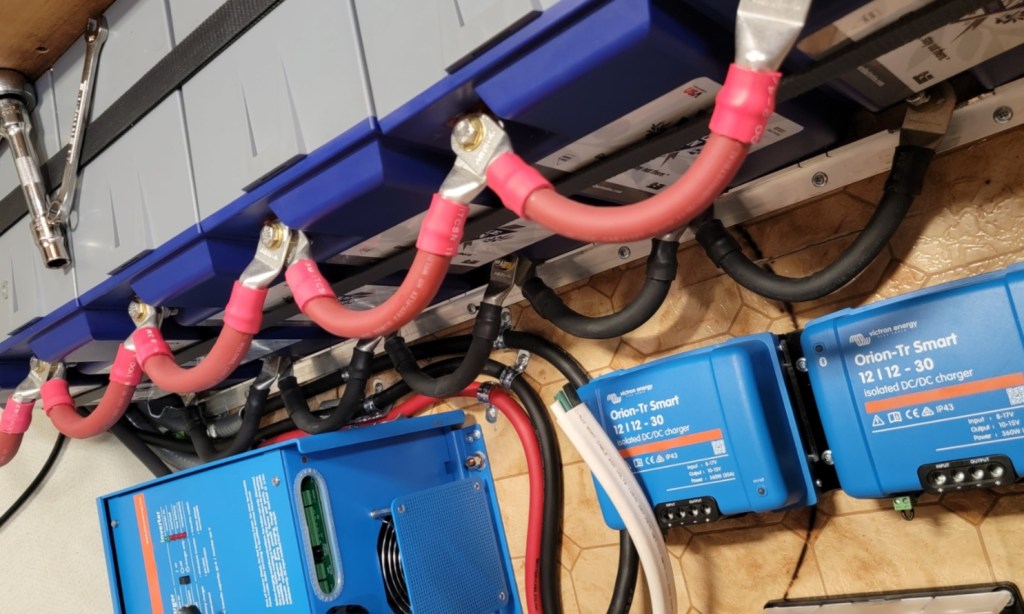
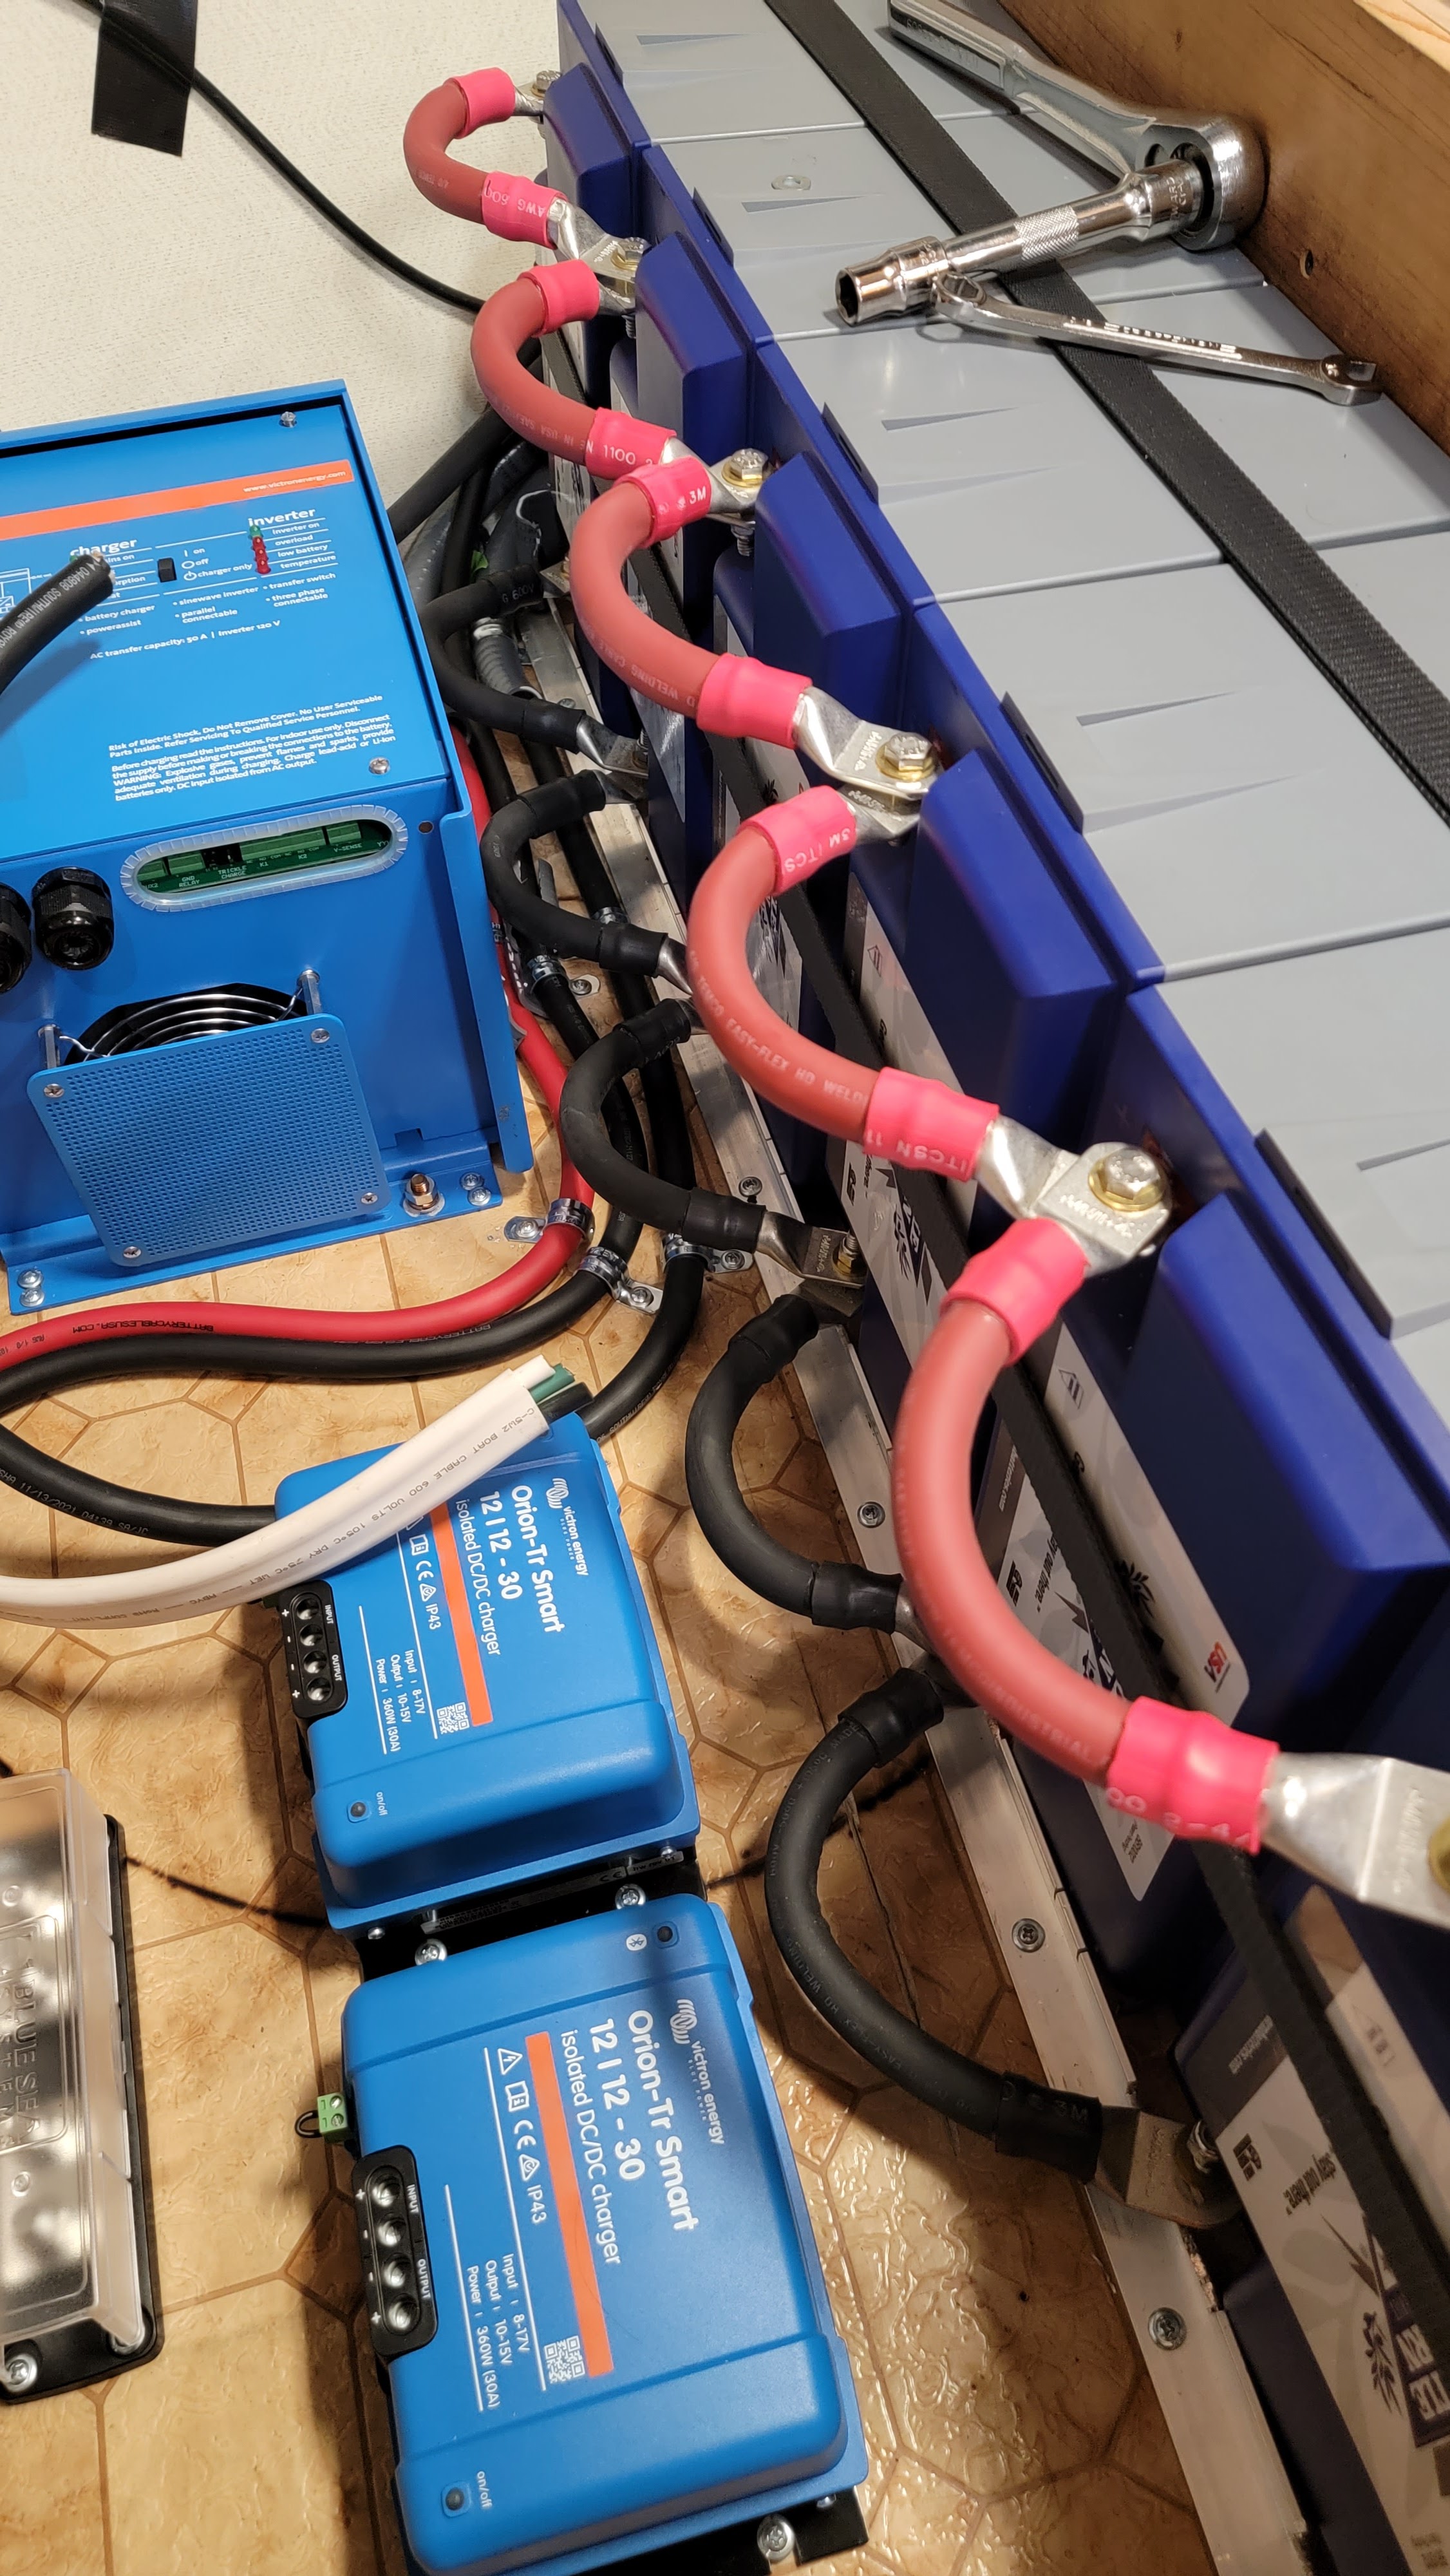
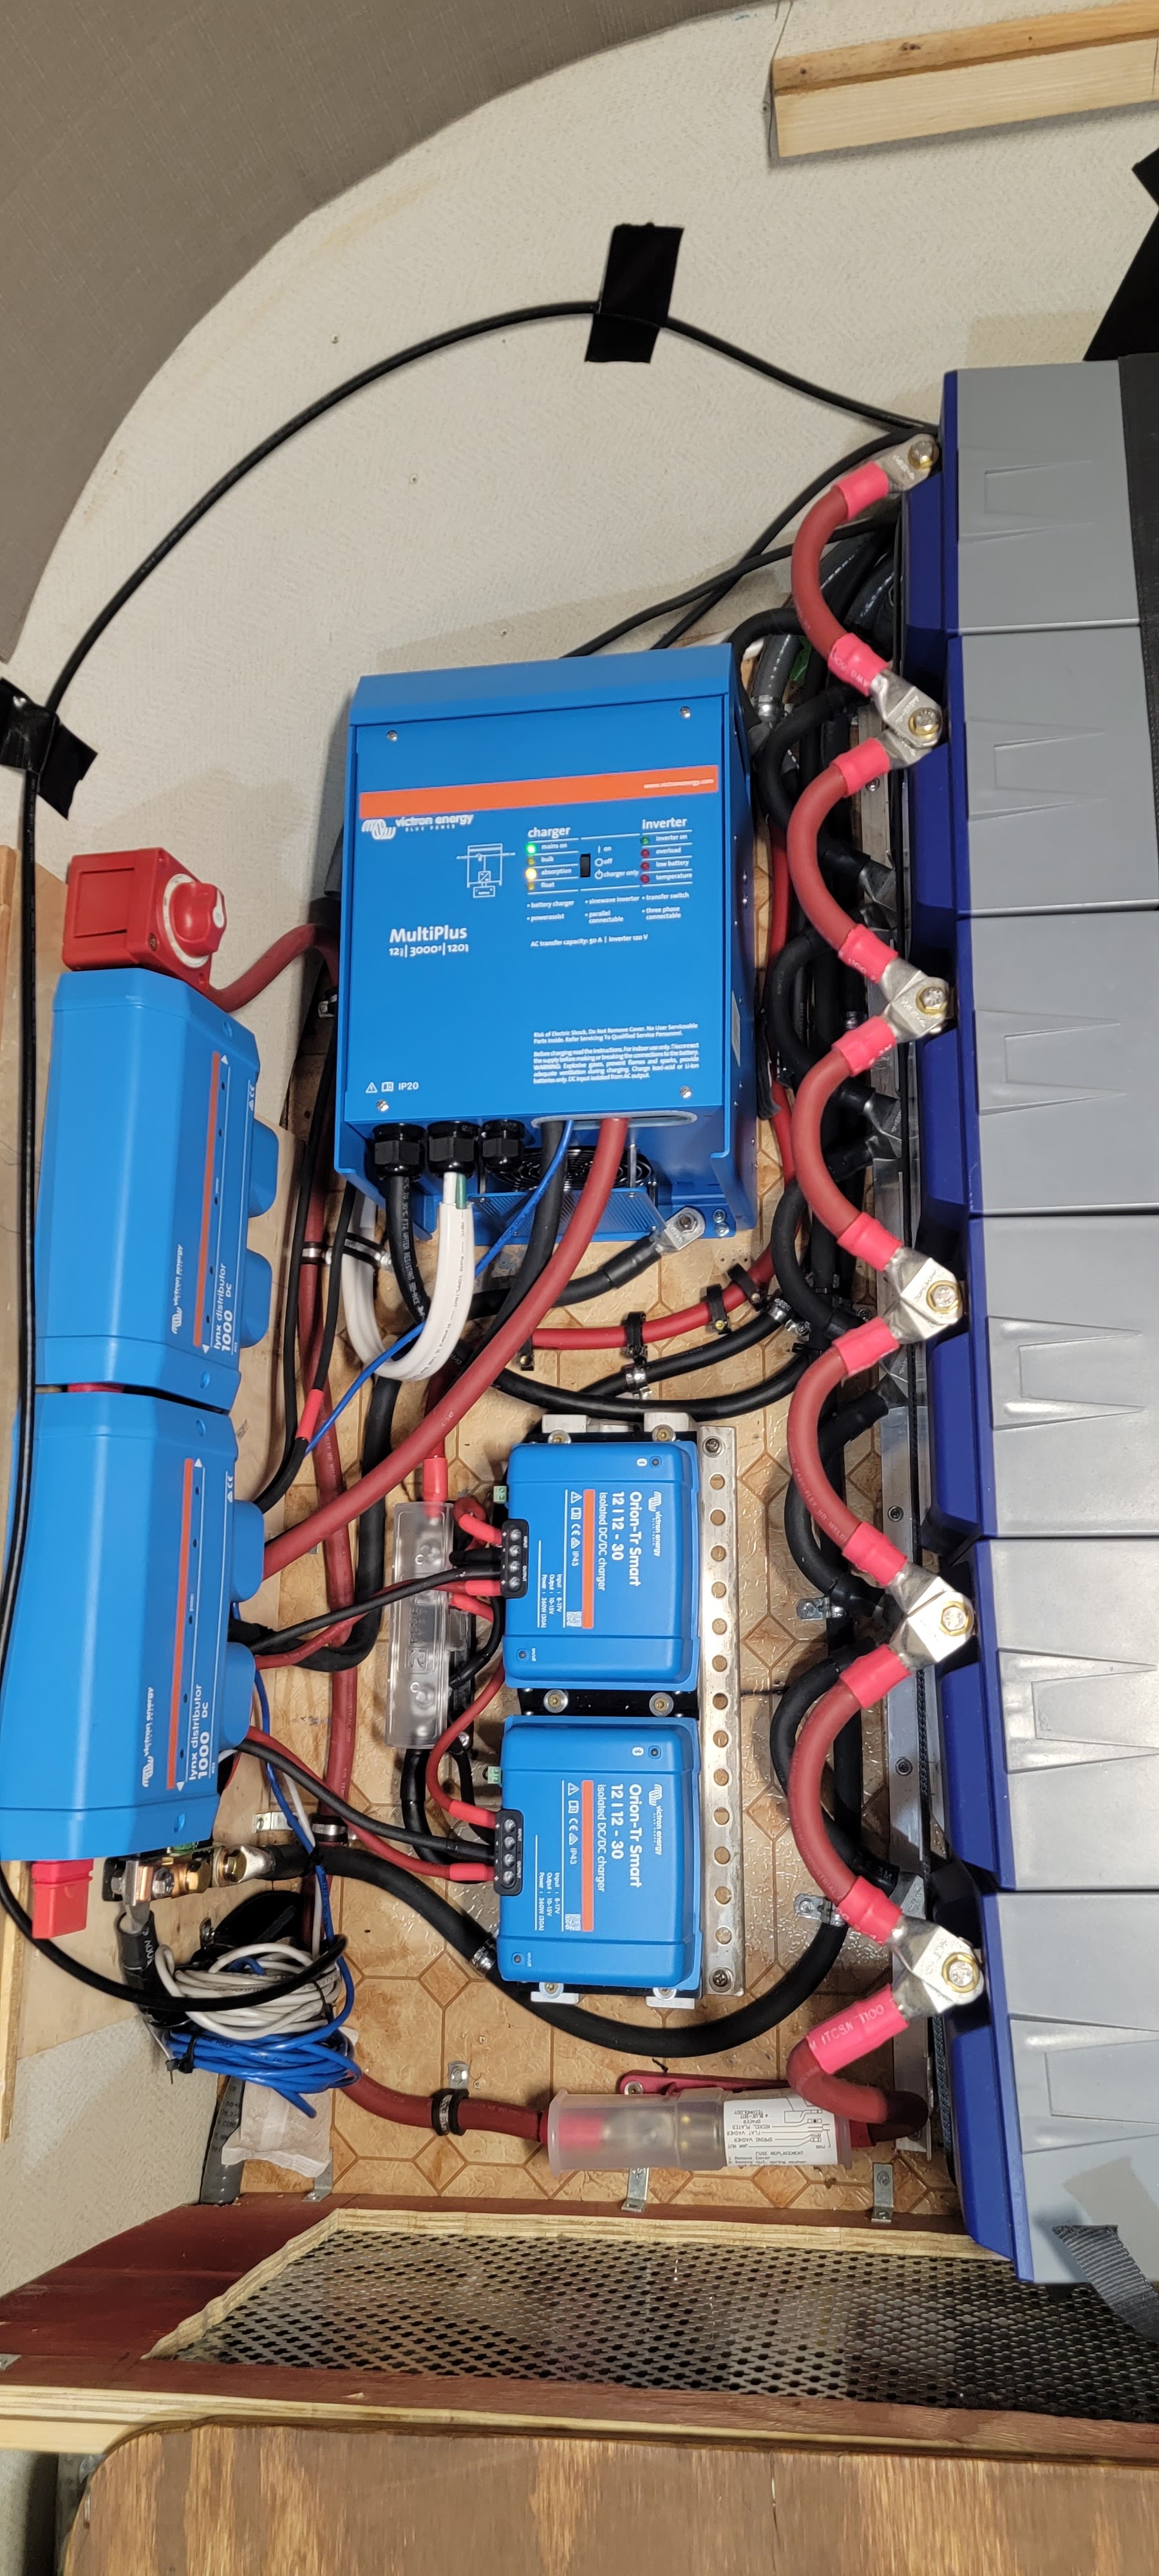
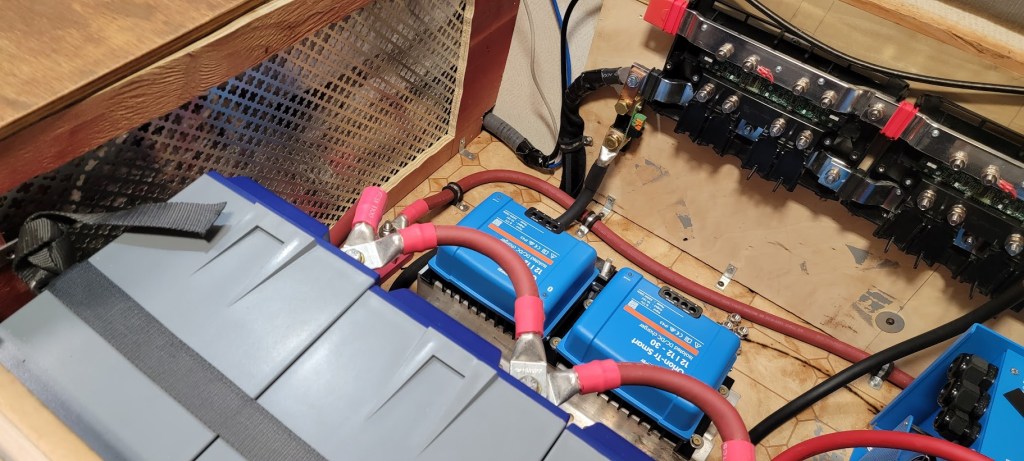
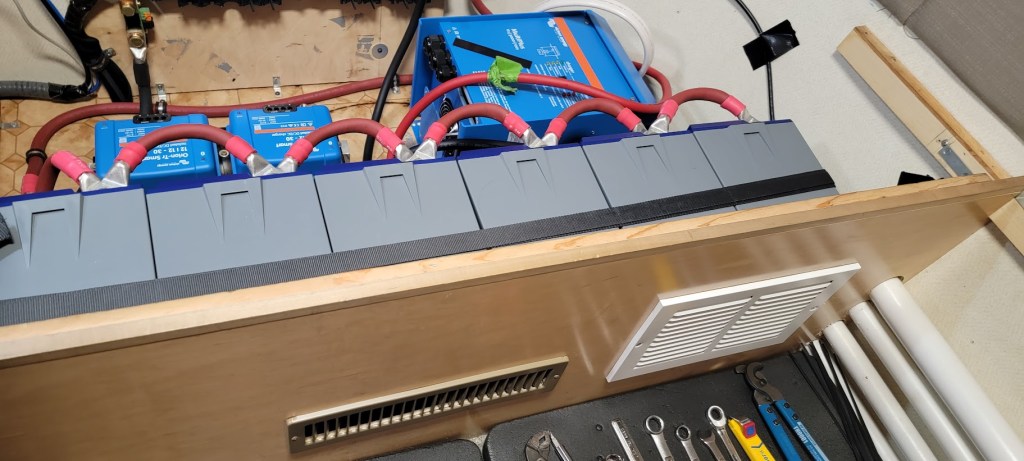
OUR PROCESS in brief- HOW WE GOT FROM A TO Z, FROM A NEST OF WIRES ON THE FLOOR TO FLIPPING THE SWITCH!

Above is the finished project for our BB install. Included but not covered in this blog article is the DC to DC Charger (Orion) system which is the two blue floor mounted boxes you see in the middle left of the photo. We will cover our DC to DC project in a future blog post as this also required work to our truck and wiring up through the front of our trailer and to the tongue area.
Here is a link to a video tour of our completed BATTLEBORN BATTERY project as well as a short tour of our Hughes 30 Amp Bluetooth Surge Protector with Auto Shut-off- Hardwired WatchDog and Hughes 30 Amp Voltage Booster with Surge Protector install and 20 AMP dedicated auxillary power line. We will again, cover that 20 AMP project separately as it is something that can be done quite easily and is not reliant on a lithium battery system. VIDEO LINK (5.31 MIN)
BASIC STEPS:
- Figure out your energy needs and do your research. Consult with either Battleborn Battery rep or company of your choice. Plan for a little to 25% more than you currently need in case you decide to add something to your RV in the future that is an additional energy draw. —-Example, since our install we added a Dometic CFX 75 Liter Dual Zone Cooler (which added 2.69 cubic feet of refrig/freezer space) instead of replacing our 6 cubic foot Dometic refrigerator (2way) that is only about 6 yrs old and running great
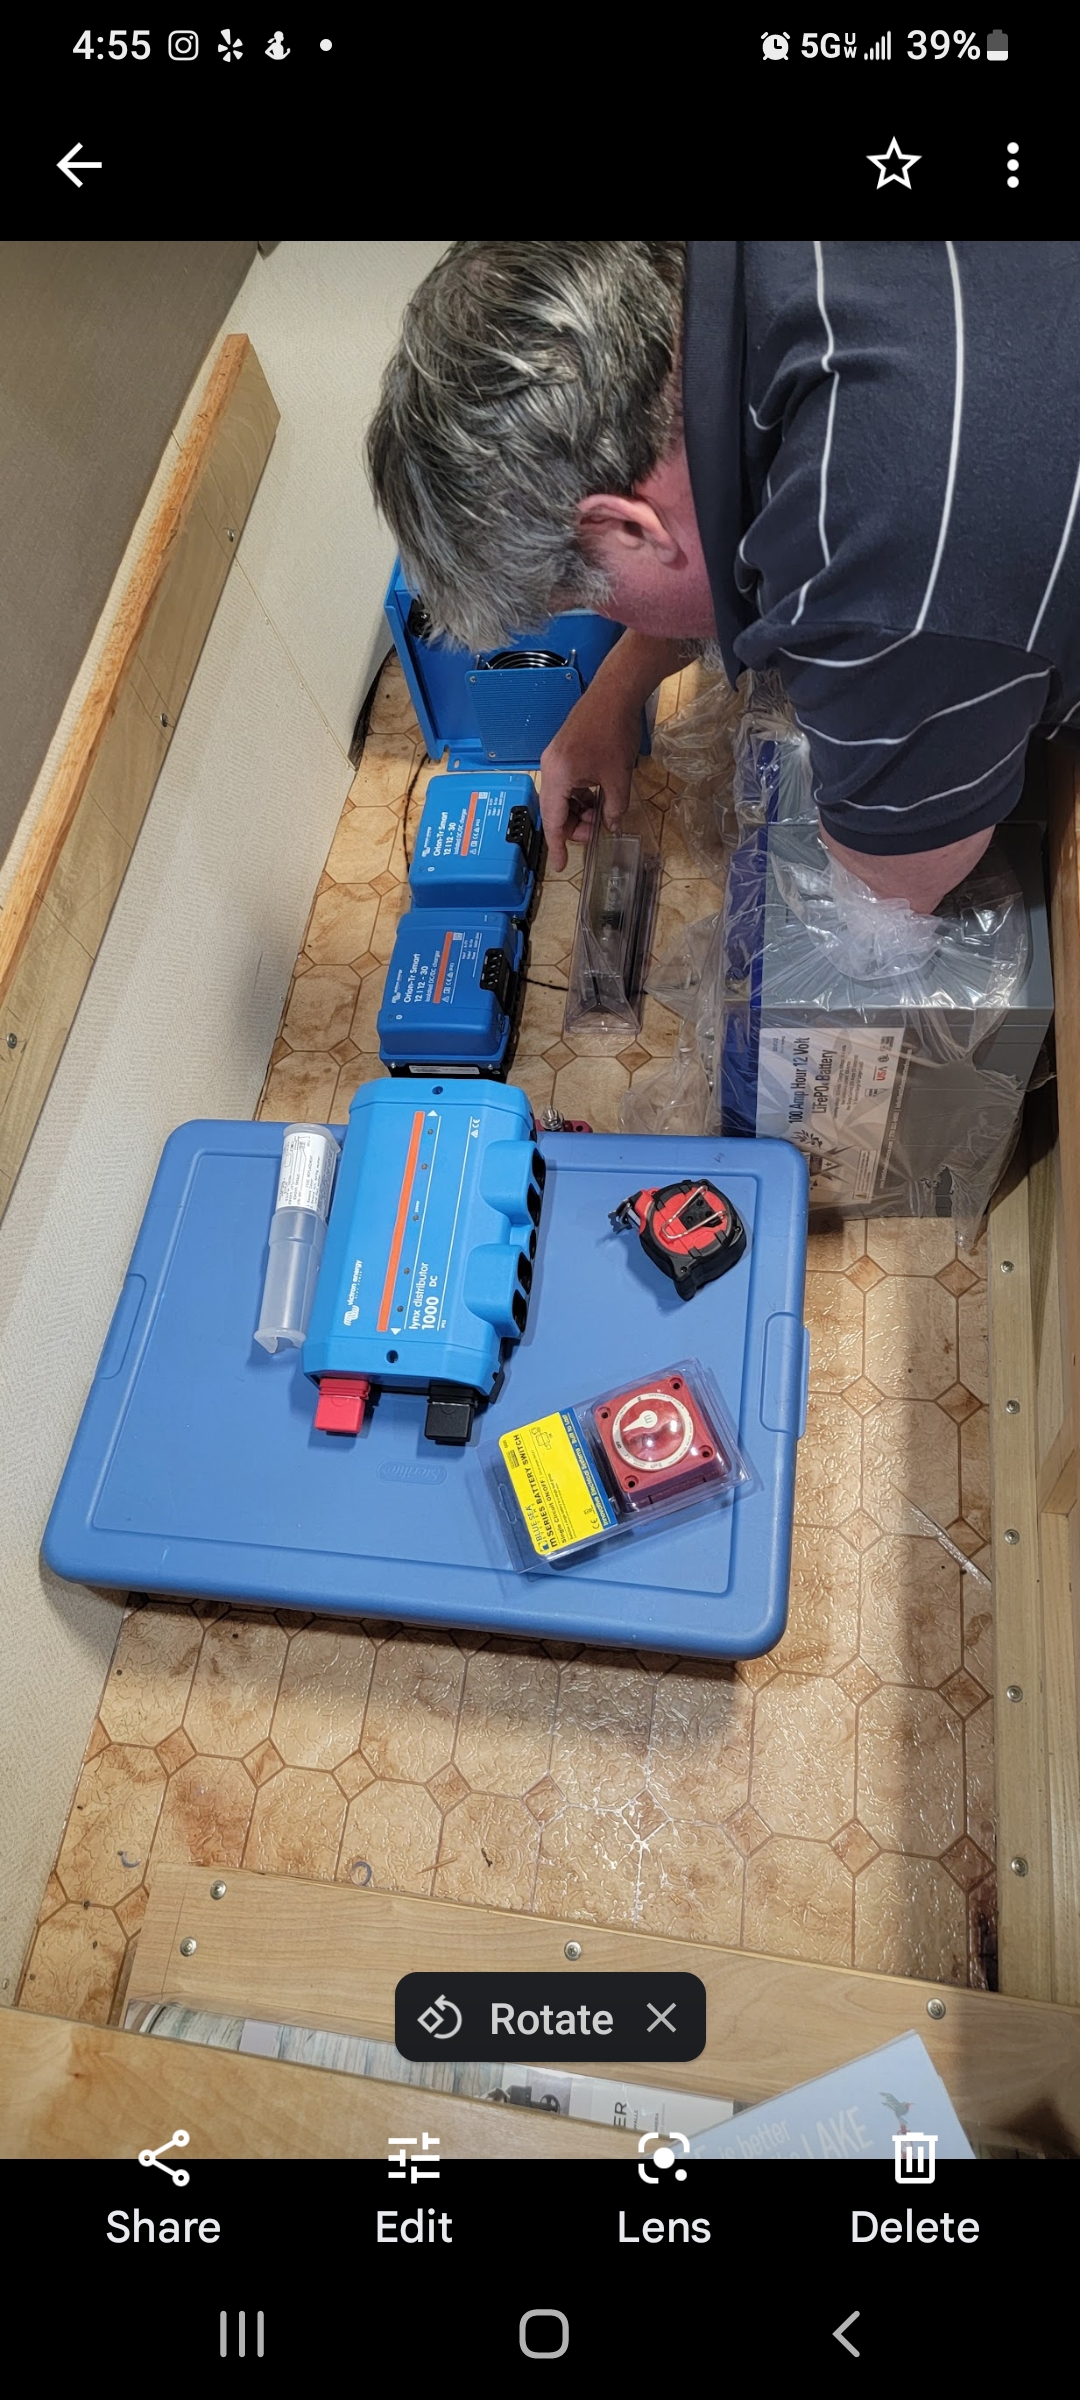
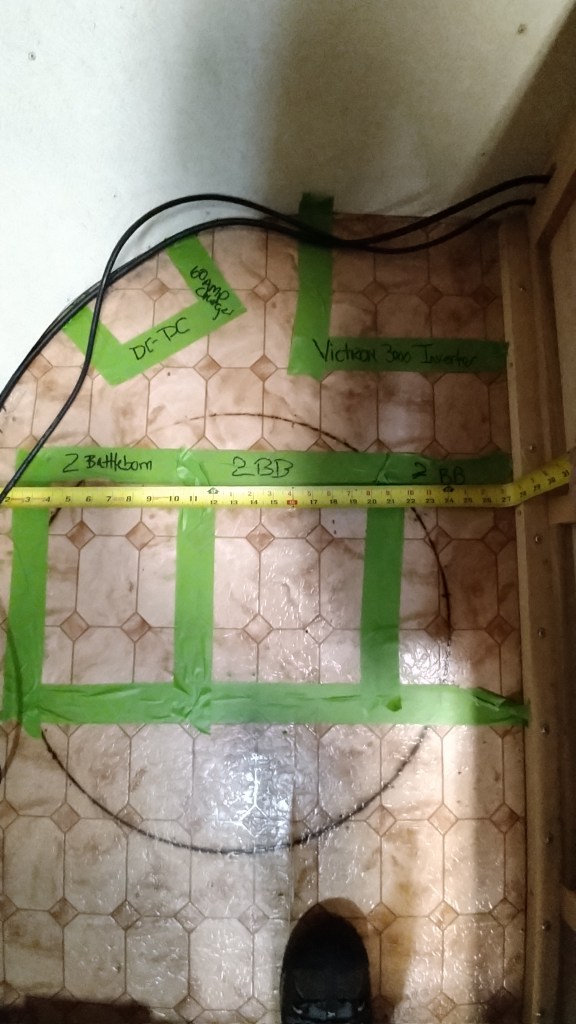
- Layout your proposed configuration using painters tape, cardboard boxes to simulate where and how you are going to install your battery system, inverter/charger and other components needed. Will they fit in the space you have decided on?
3. Order your batteries, supplies, and install tools/equipment. Ensure you have correct tools after doing your research! Create a workspace-preferably with external power source available to plug in heat guns, recharge cordless tool batteries.


4. Install the Batteries together correctly, safely and securely. Do research on this FIRST- it is very important to be done correctly and at the correct time in the process of install. The Explorist.life videos of the Airstream install was very helpful in this area as well as 90% of the total install. I think we watched that video 50 times over the course of 2 months. We will not be going into specific details on the install because there are many factors as to type of RV, components you select and to what degree you as a DIY person feels comfortable installing-our project may be very different from yours. Use your own research!
5. Refer to wiring diagrams by professionals. Installing all the components for this project are going to be specific to your project plan. There are specific steps and order of installs to do and please do your research accordingly. Again, we found the wiring diagrams we ordered from Explorist.life were invaluable.
TIP!! we took the wiring diagram plans we purchased from Explorist.life to Staples and had them enlarged to near poster size and taped them on the wall in the bedroom where we were working for easy reference!
Use the link we have above to find this specific install if doing your project in an Avion. If doing the install in a different RV he has various project plans for camper vans, 5th wheels, and motorhomes on his website.
OUR SPECIAL NOTES- these may be specific to our floor plan and setup:
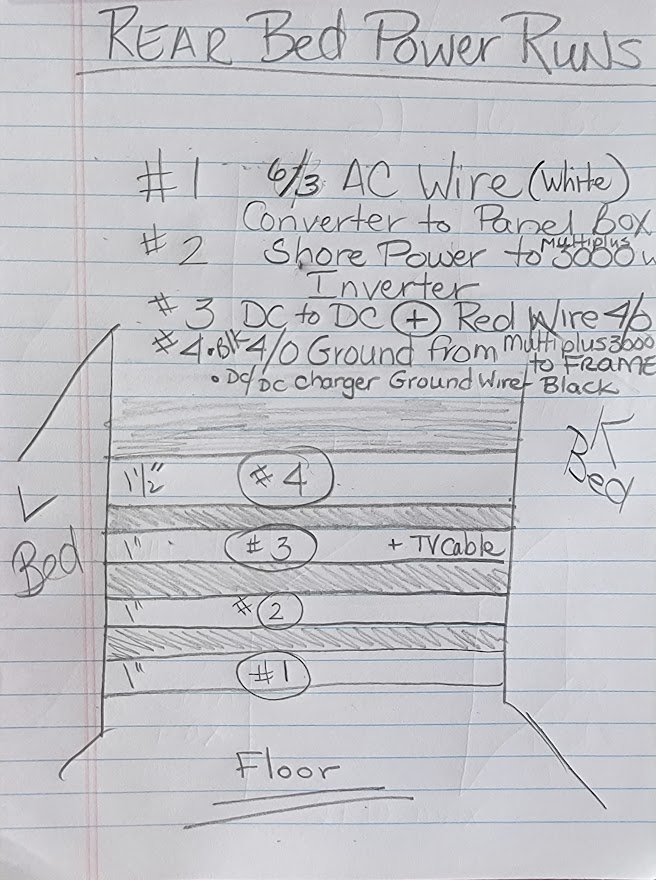
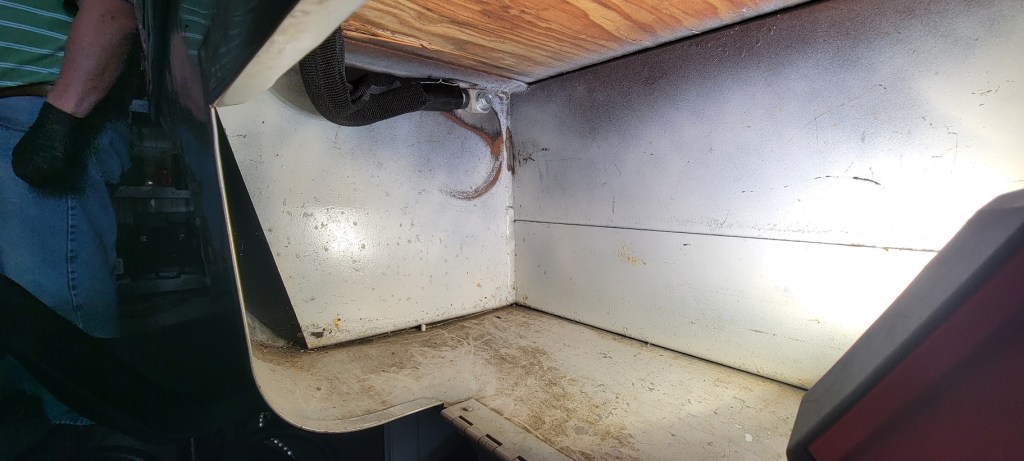
WIRE SAFETY & ROUTING: Since our fuse power box is under our Streetside/driver side bed, and our battery system was to be under the other bunk, we had to be creative and safe on how we were going to run the wires. We chose to use PVC pipe as conduit tubes for the various wires so as to prevent any undo bumping, open wires, etc in our bedroom area. We used a similar technique but with flexible plastic ribbed tubing to run the wires from the BB set up, along side our bunk wall to under our closets and then to meet up with our wall mounted control panels in our living room. Is this an extra step? yes, but we feel that encasing the wires is an added safety feature. Below are photos of that step:


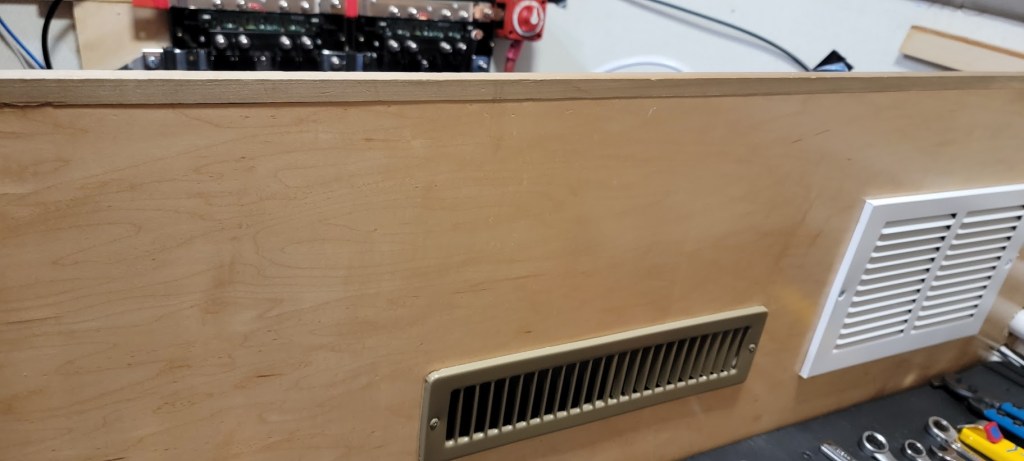
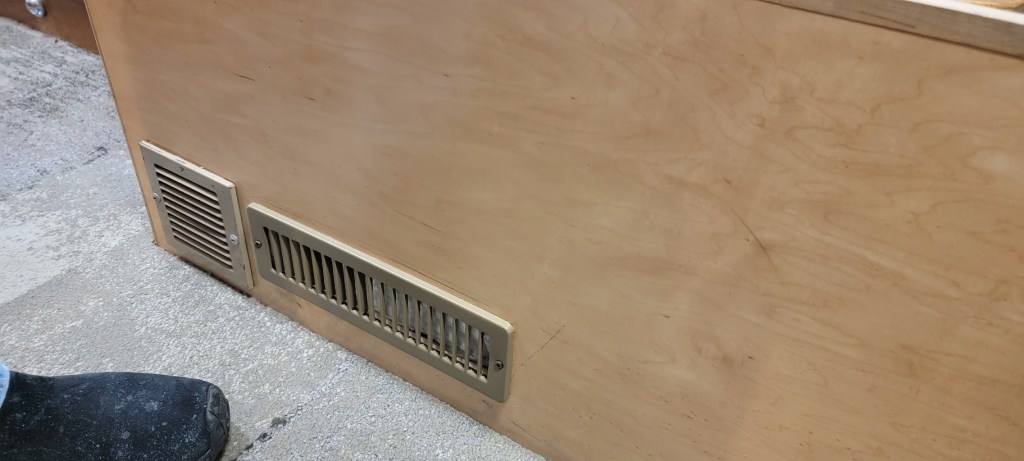
VENTILATION IN YOUR LITHIUM BATTERY AREA: Our BB project is under a rear twin bunk area. It did not take up the whole space and we wanted to retain some useful storage (yes, Luise sadly lost 2/3’rds of her storage!) For this we did several construction steps: (1) we created a “wall” by making a wooden framed metal screen to divide storage from battery area. (2) we cut in vent areas and using stock metal household vents found at Home Depot we installed 3 of them in the side of the bunk wall. We also closed off the old heater vent (we like to sleep cool) into the bedroom and just left it open for ventilation to under the bunk. Note- our bunks are not original so they did not have the drop down storage doors that originally would have been there.
Contrary to some myths out there, LiFePO4 batteries are very safe, they do not off-gas like lead acid and AGM batteries do. The Lithium Ion Phosphate batteries can withstand more temperature changes – see BB video
Pictures of our ventilation on side of bunk and screen to section our storage area under bunk are below.
GROUNDING YOUR SYSTEM- WHAT WE DID FOR OUR AVION
Part of the battery install system is the need to provide a ground for the Lynx Distributor. This literally grounds the entire system. What we did for this was to drill a large hole through the floor of our Avion under the bunk. This went into one of our rear side storage compartments right up against our trailer frame. Using a 4/0 cable, we encased it in a protective web covering and routed it into that basement storage area. We found a spot on the Avion’s frame, sanded and cleaned it down to bare metal then drilled a small pilot hole and then used a 5/16th self-tapping screw with the 4/0 wire using a lug terminal connector (marine grade) on the end to afix the lug to the frame. This created a very good ground for the entire system.

In conclusion, we hope that this article has provided our readers with insight into what we did to upgrade our Avion’s energy systems. We are not certified electricians and strongly suggest research and good safe decisions be made by any RV owner as to whether to tackle this project on their own or seek professional assistance or complete install.
WOULD WE DO IT ALL AGAIN? and other energy thoughts….
Yes, we would. It is wonderful not worrying if we have enough “juice”. We consistently had to be very careful when we only had the two AGM batteries when boondocking or off-grid. Despite the volume of work and time it took to do this project we feel it has been well worth it in the end. We have a well working, reliable system. We can easily go 5-7 days on our battery bank WITH our Dometic cooler in use. If we did not have the Dometic cooler drawing battery power we could easily go 10 days or more without having to top off the batteries using our Honda 2200-I Generator. These figures include running coffee maker, tv, fans, interior lights, radio’s, phone chargers and other small electronics and gadgets. Our Honda generator puts in between 70-75 amps per hour depending on outside temperatures (affected by high temps in summer) and our elevation so it would take a full 8 hours of gen time to refill dead batteries completely.
It was briefly noted above that as part of this install we also installed the two Orion DC to DC chargers. This project will be covered under a separate blog article at some point and will be cross-linked here when published. However, it is worth mentioning we feel strongly that having a DC to DC Charging system is a terrific bonus. It works by having our truck essentially sending a charge back to our battery bank while we are driving. It did require additional components installed in our truck- but having our battery bank topped off (just by driving) when we reach our campground is a real bonus! We also can, if needed, boost our recharge process to 120 amps per hours by running both our generator and our DC/DC truck recharging system at the same time if the need should arise when at a campsite/boondocking. In this case, if our battery bank was to be completely dead- we could completely recharge our batteries in only 5 hours.
Down the road.…we may buy a portable suitcase-style solar panel with a plug into our 7 way just so we can be quiet while having any need for recharging at a campsite rather than using the LP that our generator runs on. (yes, Kevin converted our Honda to run on LP rather than gasoline. We do not like to carry any gas)
We hope you found this article inspirational and informational. We would love to hear from you anytime with questions or comments! It helps our articles be found by others down the line.
Stay safe, have fun– enjoy your journey!
Kevin, Luise and Nutmeg!


Leave a comment