
My Personal Tips for using RVTW and General Trip Planning Tips:
As of May 2026, I (Luise) have been using the RV Trip Wizard planning program for 6 years. It is one of the products under the RV LIFE company of RV tools.
Honestly, I would be literally lost without it. Early on in our RV trip planning ( for 1-4 week trips while we were still both working full time) I tried using Google Maps that I created and using the “my maps” creating curated trips to save. That method was cumbersome, required multiple tabs to be open on the computer and the need to jump all around to verify info, make a booking, see credible peer reviews, find a phone #, get mileages to/from and more. It was anything but efficient! Planning only using Google maps drove me nuts!
In this article I am not going to go into all the features of the planning program. There is a link at the bottom to take you to their page that reviews all the planning features, your ability to customize to your travel preferences, rig, memberships, etc. In my article below I am simply sharing some personal tips on what I have found works well for us, and in turn may work well for you too. I also include some “day to day basics” of how we handle our planning process. What documents I keep handy on travel days, etc. to make our trips flow smoothly. To date we have logged 20 years of RV travel, and since going full time in May 2023 we have logged well over 55K miles, 49 “camped in” US states, 3 Canadian Provinces, 1 Canadian Territory and literally thousands of campground nights. If my shared experience can help you then I am happy!
Enter RV TRIP WIZARD!
Some basics:
- Be sure when setting up your account that you enter your vehicle, RV parameters as well as your desired dollar amounts under the trip budget feature. Remember to UPDATE those dollar amounts if economies change especially i.e. gas prices.
- Plan some short trips, long weekends, week long trips (even familiar ones) first before doing an epic long trip plan. Get used to its features and how it works.
- Use their tutorials-they are very good, as is their customer support.
- If you come across a link to a campground or attraction that is not correct, send in a repair ticket (“report a problem”). This helps the programmers keep the most current info available and prevents frustration on behalf of other users. Hey, CGs and others change URLs, status of open or close businesses, etc. all the time- your eyes and ears help everyone! I have found their staff at RVTW extremely efficient on updating changes to businesses, etc. I will always get a thank you within 24-48 hours of my noting an issue with a business listing.
- Their phone app is OK but I use it as a quick reference only. They have made significant improvements to its usability on the fly over the past couple years especially to make edits, etc. in recent years. But I still do my real planning and editing of a trip on my laptop.
- If we use the RV LIFE/RV Trip Wizard GPS Navigation tool we also always run Google Maps simultaneously. The reasons are, Google is easier to find other things like rest stops, gas, restaurants, etc. on the fly and to zoom in on satellite view while traveling. AND…although Google maps does not allow for RV “safe” routes specifically, as long as both routes mapping jive with each other we know the route is a good one. The RVTW GPS routing has improved greatly in recent years but I still would not depend on it as our only trip mapping tool while enroute. BTW- this GPS feature is seperate from the planning process and only used as a tool AFTER you have your trip planned and saved in the program.
- As I have become more used to planning I no longer use their trip mile “radius” feature. However, it is a nice feature to set as you wish to help you find CG stays within a preset mileage parameter that YOU set, i.e. 300 miles, 200 miles, etc. You can zoom out on the map to see where that mileage ring falls to select to then zoom into that area to see campgrounds there.
- I have found the ability to “archive” trips we have already taken super helpful rather than deleting them. There are many times we have had folks ask us about campgrounds in a specific place we have traveled, OR we plan to go back through that area and having old data about where we stayed, what site we had, costs, and any notes i made relative to that stay (even things like best restaurants, grocery stores, nearby attractions, dump stations, easy in and out gas stations) all are very helpful to reference again! So save and archive your trips.
SAFEGUARDING ALL YOUR TRIP PLANNING EFFORTS: (Just in case!)
Some of these TIPS pertain to whether you use RVTW or virtually any method of trip planning of any kind!
- I do export complicated, long trips to an Excel sheet (easily done in their program “tool kit” feature) and save it to my laptop and on the cloud so I can always retrieve it no matter what.
- I send a copied link of our entire trip planning itinerary to my adult children before we leave (or if we have needed to make significant changes to the original plan). We do this for safety sake so they know where we plan to be/should be- but also, this way we can always access that link should our own electronics die, get lost or somehow destroyed.
- BEFORE we leave on a trip I PRINT OUT the trip on paper. Yes, it may sound like “old school” however, when traveling there have been many, MANY places with ZERO CELL SIGNAL especially out west and in Alaska and Canada) and so having the trip printed out (easy to do using their “tools” tab on each trip) is really important. Additionally, on my paper copy I can jot notes quicker as we travel and also make notes for future add in’s like, nicer campsites within the campground we found for a future stay, issues we encountered enroute or during the CG stay which I may choose to incorporate into the “notes” section of that listing for future reference either of us or our followers. Noting gas stations or rest areas that worked well.
- BTW- I also PRINT out every campground or Harvest Host reservation. Again, you will not have cell signal in all places. These paper copies have saved us when a CG has said they could not find our reservation or tried to assign us to a different campsite than what I had reserved. I keep these in a loose leaf notebook that is sectioned by tabs via US state.
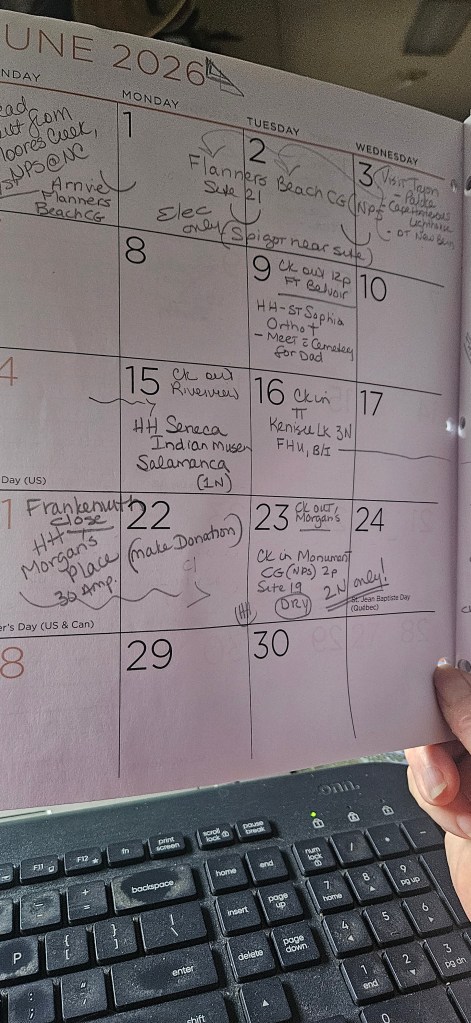
- Every year, at a Dollar store I purchase a 8 x 11/8 x 10 sized monthly calendar planner. Yup…paper again! In that planner I write the trip including campground names, an arrow showing # of nights stay. I will write “check out Smith Campground”, “Check in HH Winery” on specific dates. I will add in any attraction tickets purchased on the appropriate date with times, notes on arrival time, etc. I carry this paper planning calendar into the truck with us for each “travel day” where we are leaving one site and traveling to a new one. In there I will also take my printed reservation sheet out and tuck into the calendar booklet so I can reference the particulars of the reservation, direction notes, campground Phone #, etc. right at my fingertips rather than rely on cell signal to pull up the online reservation info. THIS process has saved our butts many, many times! Below is a slideshow to show a sample of my campground reservation print out and my monthly calendar planner- both of these I keep in the truck with us on travel days in case of no cell service and for quick on the fly reference!

OTHER IMPORTANT EVERY DAY TIPS WHEN USING RVTW:
I highly recommend planning your trips from start to finish on a laptop, PC or tablet so you can take advantage of opening new tabs that will generate automatically when using RVTW and having them for research while having RVTW open on another tab. (The default for their software is to open any links in their system as new tabs anyway!)
Use the “notes” space on each stop to put in extra things you want to see and do in those areas where you are overnight camping. When planning to make a reservation and have scoped out which campsites at a park you want to set as best for you…list them there. When the “window” to make the reservation has opened you have all the info you need right at your fingertips in one place!
Once I have BOOKED a specific campground, I go back into RVTW and:
- put in the confirmation# where indicated on their program form for that stop.
- I also add the word BOOKED in all caps after the CG name. This tells me it is all set.
- If I have sent a request for a stay e.g. to a Harvest Host, I will indicate in that title section “REQUESTED ON 2/12/26”. Then once the host confirms the stay I will changed that to BOOKED.
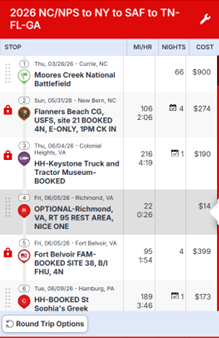
In some cases, I use abbreviations or remove some lengthier titles of campground just to save space for more important info I want to see like the samples below:
Example: KOA Devils Tower-BOOKED, 2N, FHU, Site 25, CK in after 2pm
Example: HH-Morgan’s Place, 3N, DRY, Ck in after 1PM
By doing this step above in the “title” of that stop it makes it WAY easier to see all pertinent info when using the RVTW phone app to view your trip on the fly.
I use abbreviations in these “campground name” titles to remind me of what type it is, i.e. HH (Harvest Host) FAM (Military base CG), COE (army corps of Engineers) NPS (national park service campground) BNDK (boondock, dry, parking lot stay)
You will also note, I have in the sample below an OPTIONAL place we could stay. This example being an official state rest area. I have also done this type of listing if we want to stay at a FCFS campground just in case when we get there, there is no site for us- then I have right on my planner a close by in proximity alternative optional campground, rest area, HH stay to check instead. After a long travel day the last thing you want to do is try to find a place last minute- especially at night!
Here is a good sample of how I title our “stops” from our actual 2026 trip plan:
ONCE BOOKED/CONFIRMED: I use the LOCK feature to cement in those dates of stay. The lock feature looks like a little red padlock and can be opened or closed/locked as you need to. This step I feel is critical since the system will NOT allow you then to book over a date and it will also show you were you have “gaps” with no overnight reservations made yet on specific dates.
Creating a super long, very complicated packed trip? One that encompasses many miles, months, stops, etc?
When planning our NY-AK-AZ 2023 trip that was over7 months and 15K miles I found that the software started really slowing down and getting glitchy when trying to open and if I needed to make edits. It seems to me the programmers have fixed a lot of that issue now, but I still feel that breaking a long trip up into “SEGMENTS” makes a lot of sense. Especially if you plan to open and use the RVTW app and its GPS navigation feature (more on the GPS feature later). So how to do this??
OPTIONS include;
- The easiest way is from the very start to create your very long trip in Segments that make sense. Perhaps either by 1-3 month blocks of time, or by state-to-state or geography to geography i.e Northward Route, Southbound Route, Eastbound Route, Westbound Route. I typically always do it “northbound, southbound, etc. and in that may have 2-3 months in one segment. OR…..
- Create the very basic long trip including just overnight stops only. This way you always have the “big picture” and a baseline of getting from to end points. Now, using their ‘tool kit” feature, make a copy of that trip.
- Paste that copied trip into a NEW trip- but label it SEGMENT 1: and put perhaps the State “A” to State “B” in the title. You will need to do this for EACH segment and then use the “delete multiple stops” in the tool kit to only keep the stops in that particular Segment. This is a more time consuming way to do segments. I had to do it this way for our AK trip simply bc I already had the plan all fleshed out and complete first.
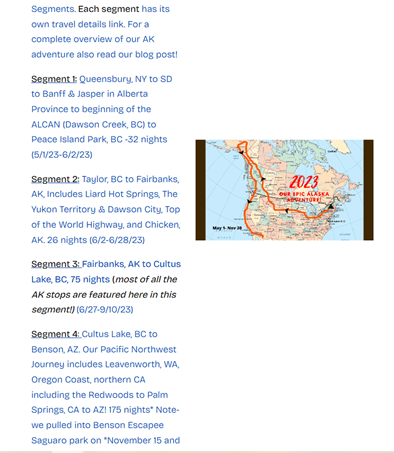
- For our 2023 Trip I broke it into what I felt where reasonable geographically themed segments like this: (click on the image to be taken to our actual blog page where there are links to view our actual RV Trip Wizard archives including mapping and travel itineraries)
- Once you create segments then embellish them with notes, things to see along the way, gas stops, places to stay or see while at a multi-night stay, etc.
- Paste that copied trip into a NEW trip- but label it SEGMENT 1: and put perhaps the State “A” to State “B” in the title. You will need to do this for EACH segment and then use the “delete multiple stops” in the tool kit to only keep the stops in that particular Segment. This is a more time consuming way to do segments. I had to do it this way for our AK trip simply bc I already had the plan all fleshed out and complete first.
There are many other tips and tricks to using RV Trip Wizard and some simply come from experimenting and getting used to using the program efficiently. There are now also some terrific Facebook Groups of users that share tips, support and tricks daily. The best is the one administrated by the company itself. These have helped me a lot too especially when a new feature is rolled out.
In conclusion, I sincerely believe with time and effort you will come to find it a critical planning tool as I have. It is a great tool for short vacation trips to long full time travel and everything in between. It is very robust with thousands and thousands of campgrounds of all types. Filters allow you to search by selecting the types of campgrounds/overnight locations YOU prefer including government, private, harvest hosts and more. YOU can also enter stops by simply using the search bar and typing in your destination/attraction/park if it is not in their database already- the mapping will find it and you simply save it as a “custom stop” and rename it the way you want. We appreciate you using our link below that RVTW has provided for us as content creators. It will give you the best current rate possible!
WANT TO LEARN MORE ABOUT RV TRIP WIZARD? CLICK HERE
Happy Travels….Happy Planning!
Luise


Leave a comment